In-Depth
Improve Authentication with Windows Identity Foundation
Windows Identity Foundation turns authentication over to token servers, reducing demands on developers while preparing the way for a service-oriented world. It also integrates with the authorization mechanisms you're already using.
Creating secure applications is hard. And, arguably, the most critical part of managing security is authentication -- ensuring that only approved users can access your application or site and that you can identify users once they've been given access. The second part of security -- authorization and controlling access to your application's resources -- is really only possible if you know whom the current user is.
In authentication, some domain (a server, a Web farm, an application) establishes a set of identities: a name with associated information.
The authentication process consists of a user adopting one of those identities (by specifying an identity's name) and providing some credentials (such as a password) that only those users allowed to adopt that identity will have. Managing all the identities needed for all applications, setting the right permissions for those identities, and managing/checking those credentials are just the basic issues in authentication. In a service-oriented world, to quote Ethan Hunt in the first "Mission Impossible" movie: "Relax, Luther -- it's much worse than you think."
In a service-oriented architecture (SOA) world, applications are created by stitching together applications and services that are often in different domains. As a request passes from the user to the application and services, developers need to deal with federated security: authentication that involves multiple organizations.
The first solution for authentication issues is usually to make the user's life more difficult. Users are bedeviled by having to remember the names of the identities they're supposed to adopt across all the domains/applications they access -- and then the users have to keep track of the credentials associated with each identity.
In a SOA world, if a user accesses an application that accesses other services (potentially, in other domains) how is authentication to be handled? One solution is to pass the credentials that the user provides to the original application onto the service. This can work within an organization, but if the service is provided by an external organization, the required coordination of identities and credentials is difficult to manage. An alternative is for each of the services involved to assign an identity and set of credentials to the application. Effectively, the application (rather than the user) authenticates with the service -- the service trusts the application and all those the application authenticates.
Authentication also makes developers' lives complicated. And, because authentication is difficult to do right, there's a real possibility that developers will do it wrong. No matter which solution you choose, if a malicious user can fool the authentication process in the application they're accessing, that malicious user gains access to the services the application accesses.
The WIF Solution
Windows Identity Foundation (WIF) provides solutions to the issues in authentication at all levels of application development. It's a shame that the word "federated" crops up so much in discussing WIF -- it suggests that WIF is for handling complicated, multiservice security issues. In fact, WIF simplifies security even for basic Web applications. WIF incorporates Active Directory Federation Services (part of Windows Server 2003 R2), Windows Cardspace and Windows Azure Access Control Services ... but you don't care. WIF handles encrypting and decrypting certificates, extracting user attributes, validation and the rest of the plumbing. It just works.
One of the key features of WIF is that it externalizes authentication, passing it over to security token services (STS) and reducing the demands on individual developers (authorization and controlling access to resources remain the responsibility of the application). WIF also supports trust relationships where a service trusts anyone authenticated by the application accessing it. The technology supports federated systems that involve multiple organizations (vendors, customers, partners) by supporting trees of STS leaves. In addition, WIF provides support for a single sign-on (SSO) for users by sharing STS among applications. Developers can also, at run time, support both by creating a trust relationship between the application and service or by passing the user's credentials from the application to the service.
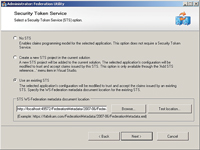
[Click on image for larger view.] |
| Figure 1. To use an existing token service (like Active Directory), you need to select the third option in the Visual Studio wizard and provide some configuration information. |
In addition to all of this, WIF also supports authorization by allowing developers to drive app behavior from user attributes. Those attributes are delivered to the application so that there's no need to keep looking up information in some security store (a performance benefit). You can embed this authorization into your application code to put it where you need it or centralize/externalize authorization so that it's independent of any developer's work. WIF provides all this and backward-compatibility, too: WIF, in many cases, integrates smoothly with the authorization tools you're already using.
The core of the WIF solution is the STS. An application contacts an STS (Active Directory, for instance), and the STS handles authentication and returns to the application a token that represents the user and the user's attributes. These attributes are the claims made by the user and can include the user's name, group affiliations or even permissions -- for example, whether the user has read-only access or can also perform updates. The STS providing the token is referred to as the issuer, while the application receiving the token is called the relying party. I won't discuss it here, but the relying party can determine the name of a token's issuer and use that to decide just how much reliance to place on any token.
So, let's get practical. In this article, I'm going to concentrate on what a developer (specifically, an ASP.NET developer) would do to exploit WIF. I'll be concentrating on using WIF in an application rather than, for instance, creating a custom STS.
One note: In this article, I'll refer to authenticating a user; however, the same techniques would be applicable to a service that was authenticating an access by a consumer (either an application or another service).
Configuring for WIF
To try out WIF, start Visual Studio as an administrator and open or create the project you want to work with (pick the empty ASP.NET template to highlight the changes that WIF makes). Press F5 to run your application once and copy its URL from the address bar of the Web browser.
The first step in integrating WIF into your application is to add a reference to an STS. As with any other reference, you add this by right-clicking on your project and selecting the Add STS reference menu choice. This starts a wizard that gives you three choices for your STS: You can skip connecting to an STS (which still allows you to work with claims), create a new STS or use an existing STS.
In real life, you'd probably pick an existing STS. However, for development purposes (or just to play with STS), pick the second option, which gives you a new ASP.NET project that will act as your STS. The wizard also adds a certificate to the IIS certificate store, which is why you need to run Visual Studio as an administrator. The wizard will generate the name for your STS site, but you'll need to paste in the URL for your site. It would also be a good idea to set the Specific port option in Project Properties to ensure that the port number in your URL doesn't change.
If all goes well, you should get a message that the Federation Utility site has completed successfully. If you get a message that it didn't complete, the most likely cause is that you're not running Visual Studio with administrator privileges.
Running the wizard adds a number of elements to your web.config file and, more importantly, comments out any existing <authentication> tags. Instead, your authentication tag is set to the ominous:
<authentication mode="None" />
While this looks like you've turned off authentication, you've really just turned off any native authentication built into the framework you're using. Now all authentication will be handled by WIF. Your authorization elements will also be set to prevent access to your site:
<authorization>
  <deny users="?" />
</authorization>
Your application will have a folder called Federation-MetaData, containing an XML file. That folder's security is set to allow all users to access it:
<location path="FederationMetadata">
  <system.web>
    <authorization>
      <allow users="*" />
    </authorization>
  </system.web>
</location>
Also added to your application's config file are references to the identityModel DLL, two new HttpHandlers/modules and an entry in appSettings. The entry in appSettings points to the XML file in your new FederationMetaData folder:
<appSettings>
  <add key="FederationMetadataLocation"
       value="c:\inetpub\wwwroot\MySite\
            FederationMetadata\2007-06\FederationMetadata.xml" />
</appSettings>
Configuring the identityModel
What matters most is a new configuration section called micro-soft.identityModel. It's within the identityModel that you'll find the issuerNameRegistry element, which specifies which STS you'll use and which certificate issuers you'll trust. The wsFederation element points to the STS you selected in the wizard (and references your site in the realm attribute):
<federatedAuthentication>
  <wsFederation passiveRedirectEnabled="true"
     issuer="http://localhost/Sample_STS/"
     realm="http://localhost/MySite/" requireHttps="false" />
  <cookieHandler requireSsl="false" />
</federatedAuthentication>
The trustedIssuers element contains reference to which certificates you'll trust. The wizard will add the thumbprint for the STS that you selected:
<issuerNameRegistry
  type="Microsoft.IdentityModel.Tokens.
     ConfigurationBasedIssuerNameRegistry, Microsoft.IdentityModel,
     Version=3.5.0.0, Culture=neutral, PublicKeyToken=31bf3856ad364e35">
  <trustedIssuers>
<add thumbprint="40A1D2622BFBDAC80A38858AD8001E094547369B"
     name="CN=IdentityTKStsCert"/>
  </trustedIssuers>
</issuerNameRegistry>
After running the wizard, you've done everything you need to enable authentication in your application -- no additional code is required. When a page is requested, the new WIF HttpHandlers will note the absence of any tokens from the STS and call the STS specified in the wsFederation element. The STS will do whatever is necessary to authenticate the user and return control (and a token, if the user is authenticated) to the application. Upon receipt of the token, the application will consider the user authenticated.
You have some administration tasks to perform around setting up your users in your STS, but, as an application developer handling authentication, you're done.
Advertising and Checking Claims
Authorization (controlling access to resources) still requires some coding, however. The token, in addition to indicating that the user has been authenticated, also contains information about the user -- the user's claims. Your application "advertises" what claims it needs to support its authorization process (this prevents the STS from sending every claim related to the user).
You specify the claims you want in the web.config file inside the claimTypeRequired element, which is part of the identityModel. This example asks for three claims (name, role and postal code):
<applicationService>
  <claimTypeRequired>
    <claimType optional="true"
     type="http://schemas.xmlsoap.org/ws/2005/05/identity/claims/name" />
    <claimType optional="true"
     type="http://schemas.microsoft.com/ws/2008/06/identity/claims/role" />
    <claimType optional="true"
     type="http://schemas.xmlsoap.org/ws/2005/05/identity/claims/postalCode" />
  </claimTypeRequired>
There are a large number of pre-defined claims (including gender and address information, among others). If you were creating a custom STS, you could extend the system to advertise for other claims. If you select the option in the wizard that allows you to connect to an existing STS, the wizard displays the list of the claims provided by the STS you're connecting to.
In the application, it's your responsibility to check the claims provided by the STS and determine what access you want to provide to the user. The good news here is that, in many cases, claims information is returned through existing components of your object model. For instance, in my config file, I requested the user's name. In my code, I can retrieve the name provided by the STS through the User object already available in ASP.NET:
Me.txtName.Text = User.Identity.Name
As another example, if you want to lock users out of particular folders using role-based security, you add the same authorization element that you used with ASP.NET forms-based security. This example, for instance, allows users in the Administrator role into the Admin folder and only users in the Manager and Administrator roles into the root folder:
<configuration>
  <location path="Admin">
    <system.web>
      <authorization>
        <allow roles="Administrator"/>
    </authorization>
    </system.web>
  </location>
  <system.web>
<system.web>
    <authorization>
      <allow roles="Manager, Administrator"/>
      <deny users="?" />
    </authorization>
    ...
However, for cases where no integration with an existing authorization framework is provided, you'll need to examine the claims yourself using the WIF object model. To access the WIF objects, you'll need to add references to both the Microsoft.IdentityModel and System.IdentityModel libraries. To save yourself some typing, also add this Imports statement to your code file:
Imports Microsoft.IdentityModel.Claims
The next step is to access the IClaimsPrincipal interface of the object returned by the current thread's CurrentPrincipal property. Once you have that, you can retrieve the first ClaimsIdentity in its Identities collection:
Dim prin As IClaimsPrincipal
prin = CType(Thread.CurrentPrincipal, IClaimsPrincipal)
Dim id As IClaimsIdentity
id = prin.Identities(0)
The IClaimsIdentity object has a collection of Claims that hold the values for the claims that you advertised for in your config file and that were available from the STS. Rather than loop through all the claims returned by the STS, this code uses a LINQ statement to retrieve the value for the postal code claim advertised for in the config file (or returns null if the claim isn't there):
	Dim pCode =
     (From c In cId.Claims
     Where c.ClaimType =
       System.IdentityModel.Claims.ClaimTypes.postalCode
     Select c.Value).FirstOrDefault()
I can now run tests on the postal code to control access to functionality on the page:
If pCode.Contains("N7A") = False Then
   Me.Request.Redirect("NoAccessAllowed.htm")
End If
The values for claims are always strings, so complex objects used in claims will need to be serialized.
Externalizing Authorization
Inserting code to check claims throughout your application isn't a best practice: it's only a matter of time until the check is omitted somewhere where it's needed. You can centralize the authorization by creating a class that checks claims for you, and then by telling your site to invoke it automatically with entries in your web.config file.
The first step is to add the ClaimsAuthorizationModule to both the existing httpModules and modules sections in your web.config file:
<httpModules>
  <add name="ClaimsAuthorizationModule"
	type="Microsoft.IdentityModel.Web.ClaimsAuthorizationModule,
		Microsoft.IdentityModel, Version=3.5.0.0, Culture=neutral,
		PublicKeyToken=31bf3856ad364e35" />
...
</httpModules>
...
<modules>
   <add name="ClaimsAuthorizationModule"
 type="Microsoft.IdentityModel.Web.ClaimsAuthorizationModule,
	Microsoft.IdentityModel, Version=3.5.0.0, Culture=neutral,
	PublicKeyToken=31bf3856ad364e35"
preCondition="managedHandler" />
...
</modules>
With those modules in your site's processing pipeline, you can add a reference to the class that will process your claims. That requires an entry in the service element of the identityModel. Within its service element you add a claimsAuthorizationManager element with a type attribute that points to the claims class you'll write. Within that element you can add any custom tags or elements that you want to hold information; you'll use that information in conjunction with the user's claims as part of authorizing access to resources.
This example show a custom element I've called claimData that specifies a folder and a Canadian postal code to be used in processing requests (you can ignore any warning messages you get about the content model being empty):
<microsoft.identityModel>
    <service>
      <claimsAuthorizationManager type="MySite.PHVCheckClaims">
        <claimData folder="/Admin/"
         pCode="N7A" />
      </claimsAuthorizationManager>
This flexibility allows you to support configuring any part of your authorization process through entries in your application's config file. For applications that will be installed on multiple servers, this provides a convenient way for site administrators to tailor the authorization process to meet their needs.
You're now ready to create your claims-checking class. Add a Class file to your App_Code folder with the same name as you used in the config file. This file must inherit from the ClaimsAuthorizationManager:
Public Class PHVCheckClaims
  Inherits ClaimsAuthorizationManager
End Class
Within this class, you'll want to retrieve any values you set in your custom element inside the claimsAuthorizationManager element. To support that, your custom element is passed to your class' constructor as a nodelist. This example retrieves the attribute values from the claimData element I used:
Imports System
Imports System.Linq
Imports System.Xml
Imports Microsoft.IdentityModel.Claims

Public Class PHVCheckClaims
Dim clmPCode As String
Dim folder As String

Public Sub New(ByVal cfg As Object)
  Dim nd As XmlNode

  nd = CType(cfg, XmlNodeList)(0)
  folder = nd.Attributes("folder").Value
  clmPCode = nd.Attributes("pCode").Value

End Sub
Finally, you'll need to override the GetAccess method. This method is passed by an AuthorizationContext object that provides access to information about the current request (including the resource being requested, the action and the user's identity).
The following code retrieves the page name from the context object's Resource property. The page being requested and the user's postal code are matched against the values retrieved from my claimData element. If I'm not happy with the result, I return false and prevent the access. Otherwise, I return true to let the user have the page:
Public Overrides Function CheckAccess(
        ByVal context As AuthorizationContext)
        As Boolean
Dim requestPage As Uri

  requestPage = New Uri(context.Resource.First().Value)

  Dim pCode = (From c In context.Principal.Identities(0).Claims
                 Where c.ClaimType = System.IdentityModel.Claims.
                 ClaimTypes.PostalCode).First().Value
  If requestPage.PathAndQuery.Contains(folder) Then
    Return clmLocation.Contains(pCode)
  End If

Return True

End Function
I can now remove the authorization elements in the config file that controlled access to the Admin pages.
Dealing with a SOA World
By default, an ASP.NET application accesses all other resources (databases, Web services) with a fixed identity. This allows the application (rather than the individual users) to be granted permission to access other resources as a trusted application. The problem with this strategy is that the resource loses visibility of the user's identity behind the ASP.NET application and can't grant -- or refuse -- access based on the user's permissions.
Some applications turn on impersonation, which allows the ASP.NET application to pass on the user's identity and gain the user's permissions (though usually resulting in poorer performance). However, this used to be an either/or choice, typically made at design time.
With WIF, your ASP.NET application can send the user's identity along with the application's predefined identity to the service -- at least when working with Web services. The application is configured to not use impersonation. You then write some additional code to retrieve a token that represents the user and include that token in your call to the service. WIF leverages the Web services standard WS-Trust ActAs mechanisms to incorporate the user's identity into calls to the service's methods (because of that, this technique will only work with services that support WS-Trust).
To implement this, you first need to modify the binding elements in your ASP.NET config file, which are generated when you add a reference to a Web service. These changes configure the service to use the ActAs mechanisms. In the issuer element within the bindings element, set the binding and bindingConfiguration elements to turn on ActAs:
  <issuer address=http://OtherHost/ActAsSTS/Issue.svc
   binding="ws2007HttpBinding"
   bindingConfiguration="ActAsBinding"/>
Still within the service's bindings element, configure the ws2007-HttpBinding settings like this:
<ws2007HttpBinding>
  <binding name="ActAsBinding">
    <security mode="Message">
      <message establishSecurityContext="false" />
    </security>
  </binding>
</ws2007HttpBinding>
The last change in the config file is in the identityModel element. You must add the saveBootstrapTokens attribute to the inputModel's service tag. That attribute causes the STS to return a "delegated" token that represents the user, in addition to any other tokens returned by the STS. The attribute also causes the delegated token to be saved for later use:
<microsoft.identityModel>
    <service saveBootstrapTokens="true">
To send the delegated token to the service, you must add code that retrieves the delegated token and then uses the service's channel factory to send the token. You can save yourself some typing by adding imports for System.Security.Cryptography.X509Certificates and Microsoft.IdentityModel.Protocols.WSTrust.ChannelFactoryOperations.
Your first step is to retrieve the delegated token from the first Identity on the current thread, using the BootstrapToken property:
Dim tkn As System.IdentityModel.Tokens.SecurityToken =
   CType(Thread.CurrentPrincipal, IClaimsPrincipal).
         Identities(0).BootstrapToken
The next step is to retrieve and configure the channel factory for the service (I've assumed that the service implements an interface called ISalary):
Dim cfact As System.ServiceModel.ChannelFactory(
                Of ISalaryServiceChannel)
cfact = New System.ServiceModel.ChannelFactory(
                Of ISalaryServiceChannel)
                   ("CustomBinding_ISalaryService")
cfact.Credentials.ServiceCertificate.SetDefaultCertificate(
           "CN=localhost",
           StoreLocation.LocalMachine,
           StoreName.My)
cfact.ConfigureChannelFactory()
The final step is to configure the factory to use the delegated token:
Dim chnl As ISalaryServiceChannel
chnl = cfact.CreateChannelActingAs(tkn)
Finally, you can call methods on the service and catch the result:
Dim res As Decimal
res = chnl.GetPayment()
chnl.Close()
Wrapping Up
The story that you should take away from this exploration is that the key issue in WIF is establishing your STS -- and, if you're using Active Directory, much of that is taken care of for you. Actually using the STS can be as simple as running the wizard to connect to an existing STS. The security features you're already using will often simply leverage the STS tokens.
When you want to go beyond declarative authorization or extend authorization beyond just the user name or role to handle additional claims, all you have to do is advertise for the claims you want. Within your application, you place your authorization code where you want in your application's code or externalize it (within your application) to ensure that it's handled correctly everywhere. When accessing Web services you can act as a trusted application or impersonate the user.
One last thing: If you're having trouble debugging your application, you can drag the SecurityTokenVisualizer control that comes with the WIF package onto your Web Forms page. This control displays information about the tokens received from your STS -- just make sure you remove it before putting your application into production!