In-Depth
Windows Phone App Porting: Bridging the PhoneGap
PhoneGap is used for building mobile applications across a range of devices with JavaScript, HTML5 and CSS3. Learn how to use PhoneGap to build a Windows Phone application that can be easily ported to another phone.
- By Michael Crump
- 06/04/2012
A problem that has plagued mobile developers for years is the challenge of learning multiple languages to build a mobile application that runs on multiple platforms. Currently, if you want to do iOS development, you need to learn Objective-C. If you want to build an Android application, you need to learn Java. To build a Windows Phone application, you need to learn XAML/C# or Visual Basic. Wouldn't this be a whole lot easier if you could build applications using one language that runs on multiple mobile devices? Enter PhoneGap.
What Is PhoneGap?
PhoneGap is a standards-based, open source development framework for building cross-platform mobile apps with HTML5, CSS3 and JavaScript. It currently works on a variety of platforms such as iPhone/iPad, Android, Windows Phone and more. You can also access native features such as accelerometer, camera, compass and more. The key takeaway is that after building an application for Windows Phone, for example, you can take the same HTML5, CSS3 and JavaScript and copy it into your Android Project and it will work - no other modification needed.
Let's go ahead and begin building your first Windows Phone project with PhoneGap.
Download the Bits
First, download the following:
- Windows Phone SDK version 7.1. The Windows Phone SDK 7.1 provides all the tools necessary to develop applications and games for devices running Windows Phone.
- PhoneGap 1.4.1 or later. This provides the PhoneGap SDK as well as Visual Studio templates to help get you started. To follow along with this tutorial, you should use PhoneGap 1.4.1. Other versions will work, but there may be minor differences between them.
While you can build a PhoneGap application for free, you'll need to become an App Hub member to install it on an actual device or submit it to the Windows Phone Marketplace.
Getting Started
Extract the PhoneGap download contents to a temporary folder and navigate to the Windows directory (callback-phonegap-0d1f305\lib\windows). Copy the file PhoneGapStarter.zip to your templates folder, C:\Users\[YOUR USERNAME]\Documents\Visual Studio 2010\Templates\ProjectTemplates\Silverlight for Windows Phone. If the Silverlight for Windows Phone folder doesn't exist, create it manually.
Now launch Visual Studio 2010 and Select File/New Project and look for Silverlight for Windows Phone, then select PhoneGapStarter, as shown in Figure 1.
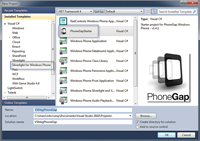
[Click on image for larger view.] |
| Figure 1. The default PhoneGap Visual Studio 2010 project template. |
Give it the name of VSMagPhoneGap and select OK.
Before starting to build an application, let's review the structure of the PhoneGap template.
The PhoneGap application template is similar to its default Windows Phone counterpart. (Go to VisualStudioMagazine.com/Crump0612 to see these similarities in table form.) The main difference is the www folder, which contains the index.html file and UI. Windows Phone UIs are typically created in the MainPage.xaml file.
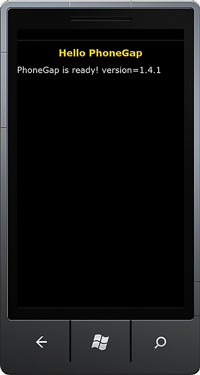
[Click on image for larger view.] |
| Figure 2. The PhoneGap Windows Phone 7 application running inside the emulator. |
Run the application in the emulator. Be sure to select Windows Phone Emulator from the dropdown and press F5. The default application loads, as shown in Figure 2.
Wow, that was easy! You have an HTML5/CSS/JavaScript application running on Windows Phone with just a few clicks of the mouse.
Let's examine what's actually happening in the index.html file and then start creating your own application.
Examining index.html
The default index.html file is shown in Listing 1.
Scanning the code reveals that it's using an HTML5 doctype and sets up the viewport to match mobile devices. Next is a style sheet reference called master.css. Unfortunately, this style sheet doesn't match the Metro-style guidelines for Windows Phone applications; fortunately, several other people have created style sheets that do, including those found here.
The next section loads the main PhoneGap JavaScript engine file that handles events and resources, followed by a piece of JavaScript that fires after the device is ready. It also contains a console.log message that displays in the Visual Studio output window. Finally, there's a div tag that contains the welcome message displayed in Figure 2.
Understanding the Base Project to Build Your Own
Armed with a solid understanding of what PhoneGap is and all the components necessary to build an application, it's time to build your own project - one that uses several features from Windows Phone, including the built-in camera.
The Completed PhoneGap Application
Your completed application will have two buttons and two places for images. The first button allows capturing a photo from your phone and displays it in the first image tag. The second button selects a photo from your phone and displays it in the second image tag. This provides a sample of interacting with native features directly in PhoneGap.
Starting with JavaScript
Start by adding JavaScript, then adding the code for the UI, which will be in HTML5. Go ahead and add a new file inside of the www folder called main.js. This will be the JavaScript file used by your main application; it contains the calls to interact with the camera. After that's in place, add the code snippet in Listing 2.
As Listing 2 shows, you begin by creating two variables for retrieving and displaying the image selected when the "Display from Library" button is clicked. Next, you subscribe to an event that fires when PhoneGap is fully loaded. The PhoneGap deviceready event fires once PhoneGap has fully loaded. After the device has fired, you can safely make calls to the PhoneGap function. The onDeviceReady function is now safe to call the PhoneGap API and assign the PictureSourceType and DestinationType to your variables.
Following that are two functions that will only be called when a photo is successfully retrieved, either through the user taking a picture with the phone's hardware or through selecting an image already on the device. In each of these functions, it first gets the id of the Image on our index.html and sets the display style and source to the ImageData or ImageURI passed in. Finally, it calls an alert that looks and feels like the native MessageBox built in to Windows Phone.
The capturePhoto method calls the PhoneGap API and returns a string containing the Base64 encoded photo image. The getPhoto method calls the same PhoneGap API (navigator.camera.getPicture), and returns a string representing the image file location on local storage. The function also has its source passed in to it through the calling button pictureSource.PHOTOLIBRARY (discussed next).
Main.js wraps up with a simple Error Handling function in case anything goes wrong. It will simply alert the user with an error message. You may also take advantage of the built-in console.log to output the message to the Visual Studio output window with something like this:
console.log("Failed because: " + message);
Building the UI with HTML5
Now replace the contents of index.html inside the www folder with the HTML5 markup from Listing 3.
The first change to note is the reference to main.js. This is the file created earlier that contains the code to interact with the camera. Also, the JavaScript function onDeviceReady that comes with the template was removed.
Inside the body tags, the existing code was removed, and two buttons and two images were added using standard HTML and a bit of CSS. The first button calls a function in the main.js named capturePhoto, which allows you to capture a photo from your phone and display it in the first image tag. The second button allows you to select a photo from your phone and display it in the second image tag.
Taking a closer look at the second button reveals that when the user clicks the button, it calls the function in our main.cs called getPhoto and passes pictureSource.PHOTOLIBRARY:
<button onclick="getPhoto(pictureSource.PHOTOLIBRARY);">Display from Library</button><br>
You can quickly check the API reference and see that PHOTOLIBRARY is defined as a sourceType, which sets the source of the picture. This demonstrates the power and flexibility of PhoneGap.
Ready to Launch
Now that all the pieces are in place, it's time to launch the application in the emulator. Select Windows Phone Emulator from the dropdown and press F5. You should see the application shown in Figure 3.
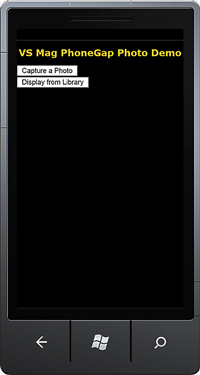
[Click on image for larger view.] |
| Figure 3. The Windows Phone PhoneGap Camera application. |
Go ahead and click the "Capture a Photo" button, and you should see the screen shown in Figure 4 .
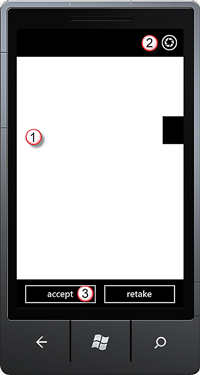
[Click on image for larger view.] |
| Figure 4. Camera screen in Windows Phone. |
What the numbers in Figure 4 mean:
- This is a simulation of taking a picture with the built-in camera.
Because there's no camera in the emulator, a black rectangle circles around the screen until the user presses the shutter (button No. 2). If this application were deployed on the phone, you'd see whatever is in front of the camera.
- Press this button to take a picture.
- This button accepts the current picture taken and returns data to the method that called it.
Once the user presses accept, it displays an alert notifying the user the picture was successfully captured, and will display the picture in the top image.
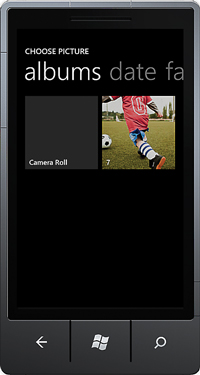
If the user selects "Display from Library," the screen in Figure 5 appears. Here the user can select either the "Camera Roll" or some of the built-in and saved pictures directly off the phone.
[Click on image for larger view.] |
| Figure 5. Displaying the Choose Picture dialog from a PhoneGap application. |
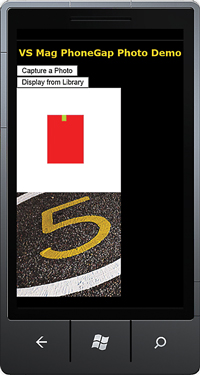
Once the user selects a photo, it returns to the main application and displays it, as shown in Figure 6 .
[Click on image for larger view.] |
| Figure 6. The PhoneGap Camera application after both buttons have been clicked and pictures selected. |
The Beauty of PhoneGap
The real beauty here is that this application was built for Windows Phone, but could easily be deployed to other devices. For example, if you're developing an Android app using PhoneGap, you could simply copy the index.html and main.js from this project into Eclipse and run the same app on a different platform within minutes. It would also work for all the other platforms that PhoneGap supports.
PhoneGap uses what mobile (Web) developers already know: HTML, CSS and JavaScript. Learning the PhoneGap API rather than multiple languages is something for which most modern mobile developers would opt. At the end of the day, it's about solving customers' needs in a timely manner - if you have the option of maintaining only one codebase, it becomes a no-brainer.
About the Author
Michael Crump is a product manager that works at Microsoft on the Azure platform. He is a is a developer, blogger and speaker of topics relating to cloud development. He’s passionate about helping developers understand the benefits of the cloud in a no-nonsense way. You can reach him on Twitter at mbcrump or by following his blog at michaelcrump.net.