Mobile Corner
Retrieving, Storing and Displaying Data in Windows Phone Apps
Nick Randolph connects a Windows Phone application to the cloud to save and retrieve data, then uses a local SQLite database to cache data for offline use.
- By Nick Randolph
- 12/03/2013
Windows Phone applications have different needs when it comes to accessing, storing and synchronizing data. Most consumer applications typically consume data -- displaying the contents of a news feed, for example -- and can get away with minimal or even no caching of data. Enterprise applications, on the other hand, typically have to be architected for the content to be available in offline or occasionally-connected scenarios. In this article we'll start with a design of a simple application, connect it to real data services, and then add synchronization logic to add the ability to work offline. We'll be using the Windows Azure Mobile Services, but the basic principles of data synchronization can be applied to other technologies.
We'll start of by building out the design of our application, which is a simple, two-page defect-capturing application. The first page contains a list of defects that have been logged; the second page will enter a new defect. First create a new Visual Studio project, called Defects, based on the Windows Phone App project template. We'll immediately add a second page, AddDefectPage.xaml, before switching over to Blend to design the layout of both pages.
To assist with page design, we'll create two sets of design time data using the Data window in Blend. Figure 1 illustrates the AddDefectDataSource, made up of a collection of DefectTypes and a NewDefect object, and the MainDataSource, which is a collection of Defects.
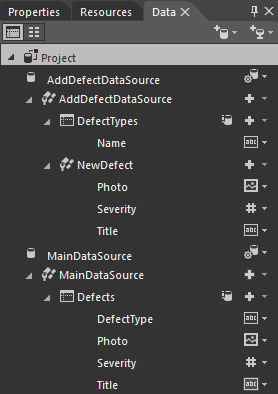 Figure 1. Design-Time Data
When creating design time data, uncheck the "Enable sample data when application is running" option, as we'll be wiring up runtime data and don't want the design time data to get in the way. To create the layout of the main page, drag the Defects collection from the Data window into the main area of the page. Right-click on the newly created ListBox and select Reset Layout -> All, which will expand the ListBox to consume the available space. Right-click on the ListBox again and select Edit Additional Templates -> Item Template -> Edit Current. Now you can adjust the item template to improve the layout of each item.
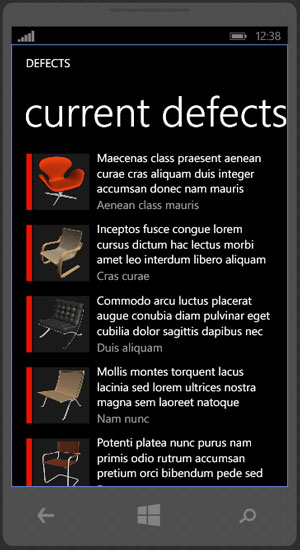
Figure 2 illustrates how each of the defects is displayed, using the following item template:
 [Click on image for larger view.]
Figure 2. How the Defects Are Displayed
[Click on image for larger view.]
Figure 2. How the Defects Are Displayed
<DataTemplate x:Key="DefectsItemTemplate">
  <Grid Margin="12,0,0,24">
    <Grid.ColumnDefinitions>
      <ColumnDefinition Width="12"/>
      <ColumnDefinition Width="Auto"/>
      <ColumnDefinition/>
    </Grid.ColumnDefinitions>
    <Border Background="{StaticResource PhoneAccentBrush}"/>
    <Grid Grid.Column="1" Width="100" Height="100"        VerticalAlignment="Top">
      <Border BorderBrush="Black" BorderThickness="1"          Background="{StaticResource PhoneContrastBackgroundBrush}"          Opacity="0.1"/>
      <Image Source="{Binding Photo}"/>
    </Grid>
    <StackPanel Orientation="Vertical" Grid.Column="2"
      Margin="0,-6">
      <TextBlock Text="{Binding Title}"
        Style="{StaticResource PhoneTextNormalStyle}"
        TextWrapping="Wrap" MaxHeight="82"/>
      <TextBlock Text="{Binding DefectType}"
        Style="{StaticResource PhoneTextSubtleStyle}"/>
    </StackPanel>
  </Grid>
</DataTemplate>
Currently, there's a Border on the left side of each defect, which is filled using the accent color on the device (in this case, red). This is supposed to represent the severity of the defect: Red when Severity > 5; otherwise Green. To do this we're going to data bind the background color of the Border to the Severity property on the Defect. As the Severity is a number and the Background is a brush, we'll need to use the SeverityColorConverter to translate between the types:
public class SeverityColorConverter : IValueConverter
{
  public SolidColorBrush HighPriorityColor { get; set; }
  public SolidColorBrush DefaultAndLowPriorityColor { get; set; }


  public object Convert(object value, Type targetType,
    object parameter, CultureInfo culture)
  {
    try
    {
      var data = value + "";
      var dataValue = double.Parse(data);
      if (dataValue > 5)
      {
        return HighPriorityColor;
      }
      return DefaultAndLowPriorityColor;
    }
    catch (Exception ex)
    {
      return DefaultAndLowPriorityColor;
    }
  }

  public object ConvertBack(object value, Type targetType,
    object parameter, CultureInfo culture)
  {
    return value;
  }
}
An instance of the SeverityColorConverter is added to the Resources collection on the page, with attributes DefaultAndLowPriorityColor and HighPriorityColor set in XAML:
<local:SeverityColorConverter x:Key="SeverityColorConverter" DefaultAndLowPriorityColor="Green" HighPriorityColor="Red"/>
The Background attribute of the Border within the item template can be updated to use the SeverityColorConverter instance as a converter:
<Border Background="{Binding Severity,
  Converter={StaticResource SeverityColorConverter}}"/>
The last thing to do on the MainPage is add two application bar buttons, Add and Sync, which will be wired up shortly.
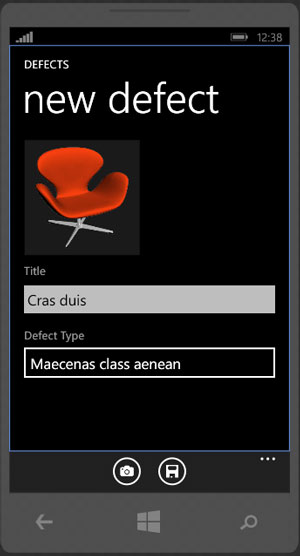
Next, we'll update the AddDefectPage to look like Figure 3.
 [Click on image for larger view.]
Figure 3. The Add Defect Page
[Click on image for larger view.]
Figure 3. The Add Defect Page
Here's the complete XAML mark up for this page:
<phone:PhoneApplicationPage xmlns="http://schemas.microsoft.com/winfx/2006/xaml/presentation"
  xmlns:x="http://schemas.microsoft.com/winfx/2006/xaml"
  xmlns:phone="clr-namespace:Microsoft.Phone.Controls;
    assembly=Microsoft.Phone"
  xmlns:shell="clr-namespace:Microsoft.Phone.Shell;
    assembly=Microsoft.Phone"
  xmlns:d="http://schemas.microsoft.com/expression/blend/2008"
  xmlns:mc=
    "http://schemas.openxmlformats.org/markup-compatibility/2006"
  xmlns:toolkit="clr-namespace:Microsoft.Phone.Controls;
    assembly=Microsoft.Phone.Controls.Toolkit"
  x:Class="Defects.AddDefectPage"
    FontFamily="{StaticResource PhoneFontFamilyNormal}"
    FontSize="{StaticResource PhoneFontSizeNormal}"
    Foreground="{StaticResource PhoneForegroundBrush}"
    mc:Ignorable="d"
    shell:SystemTray.IsVisible="True">
  <phone:PhoneApplicationPage.Resources>
    <DataTemplate x:Key="DefectTypesItemTemplate">
      <TextBlock Text="{Binding Name}" />
    </DataTemplate>
  </phone:PhoneApplicationPage.Resources>
  <phone:PhoneApplicationPage.ApplicationBar>
    <shell:ApplicationBar>
      <shell:ApplicationBarIconButton
        IconUri="/Assets/AppBar/feature.camera.png"
        Text="photo" />
      <shell:ApplicationBarIconButton
        IconUri="/Assets/AppBar/save.png"
        Text="save" />
    </shell:ApplicationBar>
  </phone:PhoneApplicationPage.ApplicationBar>

  <Grid x:Name="LayoutRoot"
      Background="Transparent"
      d:DataContext=
        "{Binding Source={StaticResource AddDefectDataSource}}">
    <Grid.RowDefinitions>
      <RowDefinition Height="Auto" />
      <RowDefinition Height="*" />
    </Grid.RowDefinitions>

    <StackPanel Grid.Row="0"
          Margin="12,17,0,28">
      <TextBlock Style="{StaticResource PhoneTextNormalStyle}"
        Text="DEFECTS" />
      <TextBlock Text="new defect"
        Margin="9,-7,0,0"
        Style="{StaticResource PhoneTextTitle1Style}" />
    </StackPanel>
    <StackPanel x:Name="ContentPanel"
      Grid.Row="1"
      Margin="12,-12,12,0">

      <Grid Margin="{StaticResource PhoneMargin}"
        VerticalAlignment="Top"
        HorizontalAlignment="Left"
        Width="200"
        Height="200">
        <Border BorderBrush="Black"
          BorderThickness="1"
          Background=
            "{StaticResource PhoneContrastBackgroundBrush}"
          Opacity="0.1" />

        <Image Source="{Binding NewDefect.Photo}" />

      </Grid>
      <TextBlock Text="Title"
        Style="{StaticResource PhoneTextSubtleStyle}" />
      <TextBox Height="72"
        TextWrapping="Wrap"
        Text="{Binding NewDefect.Title, Mode=TwoWay}" />
      <toolkit:ListPicker Header="Defect Type"
        ItemTemplate="{StaticResource DefectTypesItemTemplate}"
        ItemsSource="{Binding DefectTypes}"
        FullModeItemTemplate=
          "{StaticResource DefectTypesItemTemplate}" />
    </StackPanel>
  </Grid>
</phone:PhoneApplicationPage>
We can now run the application, without data, and view the basic layout for both pages. In order to see the AddDefectPage, we'll add in an event handler for the Add application bar button:
private void AddDefectClick(object sender, EventArgs e)
{
  NavigationService.Navigate(
    new Uri("/AddDefectPage.xaml", UriKind.Relative));
}
After designing the pages in the application, we can now progress to connecting up data. For this we'll start by defining the Defect and DefectType entities. As we'll be data binding to the Defect entity, it needs to implement the INotifyPropertyChanged interface:
public class Defect : INotifyPropertyChanged
{
  public int Id { get; set; }

  public string UniqueId { get; set; }

  public string Title { get; set; }

  public string DefectType { get; set; }

  public int Severity { get; set; }

  public string PhotoUrl { get; set; }

  public Defect()
  {
    UniqueId = Guid.NewGuid().ToString();
    PhotoUrl = string.Empty;
    Title = string.Empty;
    DefectType = string.Empty;
  }

  public event PropertyChangedEventHandler PropertyChanged;

  protected virtual void OnPropertyChanged([CallerMemberName]
    string propertyName = null)
  {
    PropertyChangedEventHandler handler = PropertyChanged;
    if (handler != null) handler(
      this, new PropertyChangedEventArgs(propertyName));
  }
}

public class DefectType
{
  public int Id { get; set; }

  public string Name { get; set; }

  public DateTime LastUpdated { get; set; }
}
Each page in the application will be associated with a view model, which will hold the data to be displayed. Again, as the view models will be data bound, they also need to implement the INotifyPropertyChanged interface. Rather than implementing this on every view model, we'll create a BaseViewModel which provides this implementation:
public class BaseViewModel : INotifyPropertyChanged
{
  public Repository Repository { get; set; }


  public event PropertyChangedEventHandler PropertyChanged;

  protected virtual void OnPropertyChanged([CallerMemberName]
    string propertyName = null)
  {
    PropertyChangedEventHandler handler = PropertyChanged;
    if (handler != null) handler(
      this, new PropertyChangedEventArgs(propertyName));

  }
}
The MainViewModel and AddDefectViewModel inherit from BaseViewModel and expose properties that align with the design time data created earlier:
public class MainViewModel : BaseViewModel
{
  private readonly ObservableCollection<Defect> defects
            = new ObservableCollection<Defect>();

  public ObservableCollection<Defect> Defects
  {
    get
    {
      return defects;
    }
  }
}

public class AddDefectViewModel : BaseViewModel
{
  public AddDefectViewModel()
  {
    NewDefect = new Defect();
  }

  public Defect NewDefect { get; set; }

  private readonly ObservableCollection<DefectType> defectTypes
    = new ObservableCollection<DefectType>();

  public ObservableCollection<DefectType> DefectTypes
  {
    get
    {
      return defectTypes;
    }
  }
}
The list of defect types for the application are going to be downloaded from Windows Azure Mobile Services (WAMS). Similarly, new defects will be saved to WAMS. As such, it makes sense for the logic to access WAMS to be kept together. We'll create an entity called Repository, which will be used to connect to WAMS. The Repository needs to be created when the application starts and passed into both view models (the Repository property has been pushed into the BaseViewModel):
public class Repository
{
  public static MobileServiceClient MobileService =
    new MobileServiceClient(
      "https://<your service>.azure-mobile.net/",
      "<your service application key>");
}
To create the Repository, create instances of the view models and assign the Repository to them we have another entity, the ViewModelLocator:
public class ViewModelLocator
{
  private  Repository Repository { get; set; }

  public ViewModelLocator()
  {
    Repository=new Repository();

  }


  public MainViewModel Main
  {
    get
    {
      return new MainViewModel {Repository = Repository};
    }
  }

  public AddDefectViewModel AddDefect
  {
    get
    {
      return new AddDefectViewModel {Repository = Repository};
    }
  }
}
An instance of the ViewModelLocator can be created in XAML within the Resources dictionary of App.xaml file:
<Application.Resources>
  <SampleData:AddDefectDataSource x:Key="AddDefectDataSource" d:IsDataSource="True"/>
  <SampleData1:MainDataSource
    x:Key="MainDataSource" d:IsDataSource="True"/>
  <defects:ViewModelLocator x:Key="Locator" />
</Application.Resources>
Also in XAML, an instance of the corresponding view model can be data bound to the DataContext of each of the pages. We can add helper properties to make it easier to reference the view model within the code-behind file:
MainPage.xaml
DataContext="{Binding Main, Source={StaticResource Locator}}"

MainPage.xaml.cs
public MainViewModel ViewModel
{
  get { return DataContext as MainViewModel; }
}

AddDefectPage.xaml
DataContext="{Binding AddDefect, Source={StaticResource Locator}}"

AddDefectPage.xaml.cs
public AddDefectViewModel ViewModel
{
  get { return DataContext as AddDefectViewModel; }
}
In order to enter a new defect, we first need to have a list of the available defect types. By overriding the OnNavigatedTo method on the AddDefectPage, we can load the list of defects by calling the Load method on the view model:
AddDefectPage.xaml.cs
protected async override void OnNavigatedTo(NavigationEventArgs e)
{
  base.OnNavigatedTo(e);

  if (e.NavigationMode == NavigationMode.New)
  {
    await ViewModel.Load();
  }
}
The Load method on the AddDefectViewModel simply loads the list of defect types from the Repository and adds them to the DefectTypes observable collection, making the list of types available to be chosen using the ListPicker on the page:
AddDefectViewModel.cs
public async Task Load()
{
  var defecttypes = await Repository.LoadTypes();
  foreach (var defecttype in defecttypes)
  {
    DefectTypes.Add(defecttype);
  }
}
Initially, the Repository will connect directly to WAMS to retrieve the list of defect types.
Repository.cs
public async Task<IEnumerable<DefectType>> LoadTypes()
{
  return await MobileService.GetTable<DefectType>().ToListAsync();
}

The ListPicker doesn't lend itself well to two-way data binding. As such, the SelectionChanged event can be used to set the DefectType property on the new defect:
AddDefectPage.xaml.cs
private void DefectTypeChanged(
  object sender, SelectionChangedEventArgs e)
{
  var dType = (sender as ListPicker).SelectedItem as DefectType;
  if (dType == null) return;
  ViewModel.NewDefect.DefectType = dType.Name;
}
To complete the functionality of the AddDefectPage, we need to wire up both the photo and save application bar buttons. The photo button will simply launch the CameraCaptureTask, which will be used to return an image:
AddDefectPage.xaml.cs
private CameraCaptureTask camera;

public AddDefectPage()
{
  InitializeComponent();

  camera = new CameraCaptureTask();
  camera.Completed += CameraCompleted;
}

private async void CameraCompleted(object sender, PhotoResult e)
{
  if (e.TaskResult == TaskResult.OK)
  {
    var store = IsolatedStorageFile.GetUserStoreForApplication();
    if (store.FileExists(ViewModel.NewDefect.LocalPhotoPath))
    {
      store.DeleteFile(ViewModel.NewDefect.LocalPhotoPath);
    }
    using (var file = store.OpenFile(
      ViewModel.NewDefect.LocalPhotoPath,
      FileMode.Create, FileAccess.Write))
    {
      await e.ChosenPhoto.CopyToAsync(file);
    }
    ViewModel.NewDefect.Refresh();
  }
}

private void PhotoClick(object sender, EventArgs e)
{
  camera.Show();
}
Capturing the camera image requires additional properties to be added to the Defect class:
Defect.cs
public string LocalPhotoPath
{
  get
  {
    return UniqueId + ".jpg";
  }
}

public BitmapImage Photo
{
  get
  {
    if (string.IsNullOrWhiteSpace(PhotoUrl))
    {
      var stor = IsolatedStorageFile.GetUserStoreForApplication();
      var file = LocalPhotoPath;
      if (stor.FileExists(file))
      {
        var bmp = new BitmapImage();
        var strm = stor.OpenFile(
          file, FileMode.Open, FileAccess.Read);
        bmp.SetSource(strm);
        return bmp;
      }
      return null;
    }
    else
    {
      return new BitmapImage(new Uri(PhotoUrl));
    }
  }
}

public void Refresh()
{
  OnPropertyChanged("Photo");
}
The save button invokes the Save method on the AddDefectViewModel, which in turn invokes the SaveDefect method on the Repository:
AddDefectPage.xaml.cs
private async void SaveClick(object sender, EventArgs e)
{
  await ViewModel.Save();
  NavigationService.GoBack();
}

AddDefectViewModel.cs
public async Task Save()
{
  await Repository.SaveDefect(NewDefect);
}

Repository.cs
public async Task SaveDefect(Defect newDefect)
{
  var defects = MobileService.GetTable<Defect>();
  await defects.InsertAsync(newDefect);
}
After being able to successfully save a new defect, we need to populate the MainPage with the list of existing defects. Again, we override the OnNavigatedTo method on the MainPage to invoke the Load method on the MainViewModel:
MainPage.xaml.cs
protected override void OnNavigatedTo(NavigationEventArgs e)
{
  base.OnNavigatedTo(e);

  ViewModel.Load();
}

MainViewModel.cs
public async  void Load()
{
  var defects = await Repository.LoadCurrentDefects();
  Defects.Clear();
  foreach (var defect in defects)
  {
    Defects.Add(defect);
  }
}

Repository.cs
public async Task<IEnumerable<Defect>> LoadCurrentDefects()
{
  return await MobileService.GetTable<Defect>().ToListAsync();
}
At this point, the application can be run and defects created and saved to WAMS. If you don't need to implement any offline capability, you can skip the next section. For those applications where it's important to be able to work offline (in this case, the ability to capture defects when out of network coverage is important), we need to implement local storage both for the list of defect types and for any defects we create. Here are the steps to get started:
- Install the SQLite for Windows Phone extension from the Visual Studio gallery.
- Add a new project, ManagedSqlite, based on the Windows Phone Class Library template.
- Install sqlite-net from nuget into the ManagedSqlite project.
- Add USE_WP8_NATIVE_SQLITE to the Conditional Compilation Symbols for all Configurations and all Platforms for the ManagedSqlite project.
- Add a reference to the SQLite extension to both the ManagedSqlite project and your Windows Phone application.
- Download the sqlite-net-wp8 native to managed interop library. Add this project into your solution.
- Add a reference to the sqlite-net-wp8 to the ManagedSqlite project.
- Add a reference to the ManagedSqlite project to your Windows Phone application.
- Change build configuration to x86 (for emulator) or ARM (for device).
With these steps completed, we're ready to write code to access a SQLite database. First we'll create a connection to our database file in the Repository, along with an Initialize method which will be called by the ViewModelLocator to ensure we have the correct tables set up:
Repository.cs
public SQLiteAsyncConnection Connect = new SQLiteAsyncConnection(
  Path.Combine(ApplicationData.Current.LocalFolder.Path,
  "defects.db"), true);

public async Task Initialize()
{
  await Connect.CreateTableAsync<Defect>();
  await Connect.CreateTableAsync<DefectType>();
}
Now, instead of going off to WAMS to save and retrieve data, the Repository will read and write to the local SQLite database file, which means we can replace the LoadTypes, SaveDefect and LoadCurrentDefects methods with the following:
Repository.cs
public async Task<IEnumerable<DefectType>> LoadTypes()
{
  return await Connect.Table<DefectType>().ToListAsync();
}

public async Task<IEnumerable<Defect>> LoadCurrentDefects()
{
  return await Connect.Table<Defect>().ToListAsync();
}

public async Task SaveDefect(Defect newDefect)
{
  await Connect.InsertAsync(newDefect);
}
We'll also want logic to synchronize both defect types and defects with the WAMS. The SyncDefectTypes method queries for any defect types that have changed. In this case we're assuming that defect types don't actually change, so we simply add updated defect types to the SQLite database:
Repository.cs
public async Task SyncDefectTypes()
{
  // Retrieve the last updated value for items
  // in the defect type table
  var localDTypes = Connect.Table<DefectType>();
  var types = await (from dtype in localDTypes
            orderby dtype.LastUpdated descending
            select dtype).FirstOrDefaultAsync();
  var updated =
    types != null ? types.LastUpdated : DateTime.MinValue;

  // Retrieve updated defect types from WAMS
  // and add them to the local db
  var newTypes =
    await (from dtype in MobileService.GetTable<DefectType>()
      where dtype.LastUpdated > updated
      select dtype).ToListAsync();
  await Connect.InsertAllAsync(newTypes);
}
Synchronizing new defects requires the photo to be uploaded to blob storage, the defect to be inserted into WAMS and the local copy removed. This means that the MainPage shows only unsynchronized defects:
Repository.cs
public async Task SyncDefects()
{
  // Retrieve all defects that haven't been sync'd
  var defs = await Connect.Table<Defect>().ToListAsync();
  var defects = MobileService.GetTable<Defect>();

  foreach (var defect in defs)
  {
    // Upload the photo
    await UploadPhoto(defect);
    // Upload the defect
    await defects.InsertAsync(defect);
    // Remove the local copy
    await Connect.DeleteAsync(defect);
  }
}
The UploadPhoto method called by the SyncDefects method needs to retrieve a shared access signature (by calling the getblobaccess api on WAMS), then upload the photo using the CloudBlobUploader class. The code for this, and the getblobaccess WAMS API, is included in this article's code download.
The last thing to connect is the event handler for the Sync button on the MainPage. This will call the Sync method on the MainViewModel, which will in turn call the SyncDefectTypes and SyncDefects methods on the Repository.
MainPage.xaml.cs
private void SyncClick(object sender, EventArgs e)
{
  ViewModel.Sync();
}

MainViewModel.cs
public async void Sync()
{
  await Repository.SyncDefectTypes();
  await Repository.SyncDefects();
  Load();
}
When running the application the first time you'll need to tap the Sync button to ensure the defect types have been downloaded to the application. Thereafter you can create as many defects as you like, and they'll be stored in the SQLite database until you're ready to synchronize them to the server. When you hit the Sync button, it'll download any new defect types as well as uploading any defects you've saved.
While this example is relatively trivial, it illustrates the end-to-end process of connecting both local and cloud-based data to a layout designed using sample data in Blend. Targeting data held in a local database improves application performance, but there is a significant tradeoff, as the complexity involved in synchronizing data to the device is non-trivial.