Tips and Tricks
Creating SharePoint Application Pages with Visual Studio
SharePoint Application Pages provide truly flexible functionality across all the sites within a SharePoint front end. You can use Visual Studio to create those pages, with the added bonus of securing the content during development.
- By Malin De Silva
- 05/22/2015
SharePoint allows us to create pages for interacting with users to get whatever functionality they need to get their work done. There are two main types of pages that you can use for this purpose: site pages and application pages.
Site pages, which users can create, customize and delete, are created using a template located within the file system, then stored in the SharePoint content database. Site pages can be further divided into two, as Standard Pages that contain text, images and some other elements; and Web Part pages that contains Web Parts inside the defined Web Part zones.
Application pages are meant to provide a variety of SharePoint application functionalities. Unlike site pages, application pages have more flexibility, since they're available for any site within a particular Web application. They also can be customized with different ASP.NET controls, and debugged easily by attaching the debugger to the correct w3wp.exe process using Visual Studio. Application pages are compiled by the .NET runtime and as it gets only compiled once, they are considered as much faster when accessing.
Application pages are stored in %ProgramFiles%\Common Files\Microsoft Shared\web server extensions\14\TEMPLATE\LAYOUTS directory of the front-end Web server and it is mapped to an IIS virtual directory named _layouts.
Let's start with creating an application page that manages all the Web properties set within a particular site. Imagine maintaining a site for each client in an organization, where you need to run workflows and share multiple documents. You'll also need to create some custom pages for each client to access and interact with. As I have a site for each client, I need to define their contact information. I plan to store each custom page as Web properties that will have different values for each and will start with a prefix "client_".
I'll create the following Web properties for this:
- client_name
- client_address
- client_email
- client_phone
- client_mobile
I need to have a single page, where I can edit values for each and save them as Web properties.
The prerequisites for this are Visual Studio 2012 or 2013 version with Office Developer Tools installed and access to a SharePoint environment that can deploy farm solutions.
Creating the Visual Studio Solution
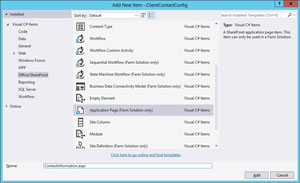
To start, create a new project with the "SharePoint 2013 – Empty Project" template and name it ClientContactConfig. The solution should be a farm solution. Right-click on the project in Solution Explorer and add a new "Application Page (Farm Solution only)" in the Office/ SharePoint section of the Add New Item window, as shown in Figure 1. Name it ContactInformation.aspx.
 [Click on image for larger view.]
Figure 1: ClientContactConfig Application Page
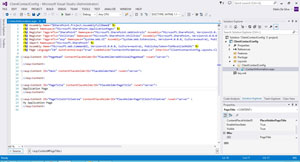
If you look at the Solution Explorer window in Figure 2, you can see a folder named Layouts added to the project and another project inside named ClientContactConfig that contains the Application Page just added.
 [Click on image for larger view.]
Figure 2: ClientContactConfig Project Viewed from Solution Explorer
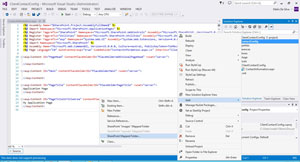
So, what is this Layouts folder? It represents the %ProgramFiles%\Common Files\Microsoft Shared\web server extensions\14\TEMPLATE\LAYOUTS folder that is located in the front-end server of the SharePoint installation. This is called a SharePoint Mapped Folder. If you need to manually create any mapped folder in Visual Studio, you can do so by right-clicking project and following the path Add | SharePoint Mapped folder, as shown as in Figure 3.
 [Click on image for larger view.]
Figure 3: Creating a SharePoint Mapped Folder
The best practice is to create a folder with a meaningful name and add the pages inside it. There is a reason for that. Given the application pages are located in the SharePoint installation within the file system, there is a probability that can get replaced if Microsoft makes updates that can affect anything in that default folder. You're safe if you add a folder with a different name and insert the application page into it.
Building the Application Page
Given the solution is created and an application page is created in a defined path, we can go ahead and add the application page content. We need to create an HTML table that contains a label to define the property name and a textbox to edit the value of it.
Replace the content inside the asp:Content element with the id property assigned to value PageTitleInTitleArea with the following aspx markup in Listing 1.
Listing 1: HTML Table with Button Control for Updating Application Page
<asp:Content ID="PageTitleInTitleArea" ContentPlaceHolderID="PlaceHolderPageTitleInTitleArea" runat="server" >
    <asp:Label ID="PageTitleLabel" runat="server" Font-Bold="true"></asp:Label>
    <br />
    <br />
    <table>
        <tr>
            <td>Name</td>
            <td> : </td>
            <td>
                <asp:TextBox ID="ClientNameTextBox" runat="server"></asp:TextBox>
            </td>
        </tr>
        <tr>
            <td>Address</td>
            <td> : </td>
            <td>
                <asp:TextBox ID="AddressTextBox" runat="server"></asp:TextBox>
            </td>
        </tr>
        <tr>
            <td>Email</td>
            <td> : </td>
            <td>
                <asp:TextBox ID="EmailTextBox" runat="server"></asp:TextBox>
            </td>
        </tr>
        <tr>
            <td>Phone</td>
            <td> : </td>
            <td>
                <asp:TextBox ID="PhoneTextBox" runat="server"></asp:TextBox>
            </td>
        </tr>
        <tr>
            <td>Mobile</td>
            <td> : </td>
            <td>
                <asp:TextBox ID="MobileTextBox" runat="server"></asp:TextBox>
            </td>
        </tr>
        <tr>
            <td colspan="3" align="right">
                <asp:Button ID="UpdateButton" runat="server" Text="Update Contacts" OnClick="UpdateButton_Click" />
            </td>
        </tr>
    </table>
</asp:Content>
This is a simple HTML table with an asp.net Button control. It will update the values for Name, Address, Email, Phone and Mobile properties that have a Web property with a name that includes a "client_" prefix.
In the code behind file (ClientInformation.aspx.cs), let's write the logic that stores and updates the contact information. Here are the possible scenarios.
- If there are no Web properties, the Web properties should be created.
- If there are values set for properties, display them.
- If values are changed and the update button is clicked, update the contact information.
Listing 2 shows the code.
Listing 2: Updating Contact Information
public partial class ContactInformation : LayoutsPageBase
    {
        protected void Page_Load(object sender, EventArgs e)
        {
            if (!IsPostBack)
            {
                SPWeb currentWeb = SPContext.Current.Web;
                this.PageTitleLabel.Text = currentWeb.Title + " Contact Properties";

                this.CreateWebPropertyIfNotExists(currentWeb, "client_name");
                this.CreateWebPropertyIfNotExists(currentWeb, "client_address");
                this.CreateWebPropertyIfNotExists(currentWeb, "client_email");
                this.CreateWebPropertyIfNotExists(currentWeb, "client_phone");
                this.CreateWebPropertyIfNotExists(currentWeb, "client_mobile");

                this.PopulateContactValues(currentWeb);
            }
        }

        private void CreateWebPropertyIfNotExists(SPWeb web, string propertyName)
        {
            if (web.Properties[propertyName] == null)
            {
                this.SetWebProperty(web, propertyName, string.Empty);
            }
        }

        private string GetWebProperty(SPWeb web, string propertyName)
        {
            if (web.Properties[propertyName] == null)
            {
                return string.Empty;
            }

            return web.Properties[propertyName];
        }

        private void SetWebProperty(SPWeb web, string propertyName, string propertyValue)
        {
            web.AllowUnsafeUpdates = true;
            web.Properties[propertyName] = propertyValue;
            web.Properties.Update();
            web.AllowUnsafeUpdates = false;
        }

        private void PopulateContactValues(SPWeb web)
        {
            this.ClientNameTextBox.Text = this.GetWebProperty(web, "client_name");
            this.AddressTextBox.Text = this.GetWebProperty(web, "client_address");
            this.EmailTextBox.Text = this.GetWebProperty(web, "client_email");
            this.PhoneTextBox.Text = this.GetWebProperty(web, "client_phone");
            this.MobileTextBox.Text = this.GetWebProperty(web, "client_mobile");
        }

        protected void UpdateButton_Click(object sender, EventArgs e)
        {
            SPWeb currentWeb = SPContext.Current.Web;
            this.SetWebProperty(currentWeb, "client_name", this.ClientNameTextBox.Text);
            this.SetWebProperty(currentWeb, "client_address", this.AddressTextBox.Text);
            this.SetWebProperty(currentWeb, "client_email", this.EmailTextBox.Text);
            this.SetWebProperty(currentWeb, "client_phone", this.PhoneTextBox.Text);
            this.SetWebProperty(currentWeb, "client_mobile", this.MobileTextBox.Text);

            this.PopulateContactValues(currentWeb);
        }
    }
Deploying the Solution
Now we have the coding done, when you look at the Solution Explorer window you may not find any features added. That's because Application Pages can't be controlled at feature level. If you open the Package Explorer, you will find a Layouts folder has been added into the package. The ClientConfiguration folder will be deployed to the Layouts folder when the wsp is deployed.
Right-click on the solution in the Solution Explorer and select Deploy Solution. The Output window will show the solution is deployed. Make sure it's deployed without any errors.
Now go to one of the sites available and add _layouts/15/ClientContactConfig/ContactInformation.aspx after the site URL, like this:
http://sp2013/_layouts/15/ClientContactConfig/ContactInformation.aspx
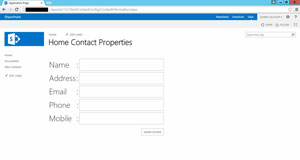
This will take you to the Application Page we just created and it will be visible as shown in Figure 4.
 [Click on image for larger view.]
Figure 4: Application Page Is Now Visible
Application Page Security
The purpose of the application page is to allow contact information to be saved client-wise, which means Web-wise. So go to one of the sites and set contact information. Then go to another Web and check whether they are affected. By default the Application Pages are visible for any user who is accessing the site -- they are not affected by the security mechanisms within SharePoint. Therefore check the URL with another user and you shall find the same values available for that user as well. However depending on permission level, updating property values can be restricted by Windows security.
So how can we secure the Application Pages?
The truth is they need to be validated through the code or need to display content by securing the content.
If we are reading from a list, then the items retrieved will always be the items for which the viewing user has permission. Else, you can make the code check for permissions and have separate asp:view items within an asp:MultiView. Depending on the user's permission level, you can render the appropriate view to the user.
There are multiple user permission types that can be used for validating the page content: Group Membership, Role Definitions, and Base Permission.
Group Membership
We can check whether a user belongs to a particular SharePoint group and allow that user to access the content inside the page. Depending on the requirement we can customize members of some groups to have elevated permissions. Here is an example to check whether the user belongs to a particular group:
using (SPWeb web = SPContext.Current.Web)
{
SPGroup superAdminGroup = web.Groups["Super Admins"];

       if (superAdminGroup.ContainsCurrentUser)
       {
       	// Validate the page request to verify
              // as a valid POST requests.
              if (Request.HttpMethod == "POST")
              	SPUtility.ValidateFormDigest();

//Execute the application page logic here.
}
              else
              {
              	Response.Redirect("/_layouts/accessdenied.aspx");
              }
}
}
Role Definitions
SharePoint role definitions define a set of activities a user can perform within a certain site. Common built-in role definitions are full control, contribute, approve, read, manage hierarchy, and design. Role definitions are also known as permission levels and can be customized according to need. Often these role definitions are matched to some built-in SharePoint groups.
For example the default Approvers group has approve permission level, while those in the Site Visitors group might be limited to read permission level. This is how you can check whether the roles assigned to the current user who is browsing the page has a particular role:
using (SPWeb site = SPContext.Current.Web)
{
if (Request.HttpMethod == "POST")
       	SPUtility.ValidateFormDigest();

SPRoleDefinitionBindingCollection usersRoles =
site.AllRolesForCurrentUser;
SPRoleDefinitionCollection siteRoleCollection =
site.RoleDefinitions;
SPRoleDefinition roleDefinition =
siteRoleCollection["Full Control"];

if (usersRoles.Contains(roleDefinition))
       {
       	//Execute the application page logic here.
}
       else
       {
       	Response.Redirect("/_layouts/accessdenied.aspx");
}
}
Base Permissions
If your application page security logic has restrictions on that it cannot be addressed through Group Membership and Role Definitions, you check for accessibility via Base Permission. One advantage of going with Group Membership or Role Definitions is that those permission can be changed easily, which makes them much more configurable. But if you check for a Base Permission, it make take some extra effort to ensure the other application logic is not affected with the changes you make in this way.
Though it is not often that you'll need to check for Base Permissions, there are still scenarios where you may need to do so. Imagine a scenario where you need to check if a user has full control over the site to perform a specific operation. This can be assigned through built-in role definitions or some custom role definitions, this way:
using (SPWeb site = SPContext.Current.Web)
{
if (Request.HttpMethod == "POST")
       SPUtility.ValidateFormDigest();

       if (site.DoesUserHavePermissions(SPBasePermissions.ManageWeb))
       {
       	//Execute the application page logic here.
       }
       else
       {
       	Response.Redirect("/_layouts/accessdenied.aspx");
}
}
Conclusion
Now you know how to deploy an Application Page, and be able to give users secure access to them. There are many advantages of using Application Pages when considering the speed and performance, especially with content security as part of the consideration.
Be aware that if you are contemplating a move to Office 365 any time soon, this might not be the best solution. End of the day, application logic of an Application Page resides in a code behind file, which needs a DLL deployment to the Global Assembly Cache (GAC), and GAC deployments are not allowed in Office 365. If your solutions are on-premises ones, then the solution should be a good one.