Inside VSTS
Unit Testing With VSTS2008
Mickey shows you a basic example of unit testing with Visual Studio Team System 2008. Part 1 of 3.
Unit Testing with Visual Studio Team System 2008 -- Part 1
Mickey shows you a basic example of unit testing with Visual Studio Team System 2008.
One of the features in Visual Studio Team System 2008 that helps developers write better quality code is unit testing. With unit testing, developers can verify that the classes they are creating, and the methods in those classes, are working as expected. Unit testing was available in Visual Studio Team System 2005, but in VSTS 2008 it has received several upgrades. Unit tests run much faster now, and there is support for generics and test class inheritance, to name a few of the welcome improvements. The biggest change, however, was that unit testing was made available in Visual Studio 2008 Professional Edition -- previously dev shops had to purchase VSTS to get this functionality. Clearly, Microsoft recognized the need for all professional developers to be able to generate unit tests, and moved the functionality accordingly.
In this column we are going to look at how to create a simple unit test. We'll start with a very simple console calculator application. From there, we'll look at how to use the unit testing framework to stub out sample unit tests for us, and how to modify and run those unit tests.
Console Calculator Application
For our application to test, we've created a console application with four different methods: Add, Subtract, Multiply and Divide. A sample of the code is shown in Figure 1. The console application itself calls each of these methods once and outputs the information. In a way, you could say that running the console app is a test against those methods. However, we want to make use of the testing framework provided by Team System to ensure this application is tested thoroughly.
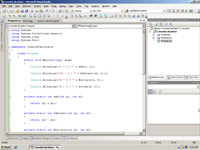
[Click on image for larger view.] |
| Figure 1. Partial Code Sample of the Console Calculator Application |
Creating A Unit Test
Let's create a simple unit test for our Add method. To get started, right-click on the Add method and select Create Unit Tests from the context menu. This opens the Create Unit Tests wizard, which is used to stub out the basic unit test code. You can select the different methods for which you want to create unit tests. In the wizard's Output project drop down list box, you can select an existing test project in which to store your unit tests, or you can create a new Visual Basic or C# test project. For this example, we are only going to create a unit test for the Add method, and we are going to create a new C# test project.
Click the OK button, and you will be prompted to provide a name for your test project. Call it ConsoleCalculatorTests and click the Create button. The Unit Test Wizard will proceed to create a new Test Project, and stub out the basic unit test code for the Add method.
A new Test Project named ConsoleCalculatorTests will be added to Solution Explorer. A file named ProgramTest.cs will be created that contains the stubbed out code for our test method. Figure 2 shows an example of the auto-generated code from the Unit Test Wizard.
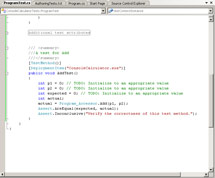
[Click on image for larger view.] |
| Figure 2. Default Stubbed Code |
Visual Studio Team System saves you a good bit of time by stubbing out the basic unit test code. However, there are still changes that need to be made to the test before it is considered a valid test. The first thing you need to do is initialize the p1 and p2 parameters to valid values. Let's set p1 equal to 4 and p2 equal to 5. Next, you need to set the expected value. In this case you would set the expected value to be 9. Finally, now that you have modified this test to make it a valid test, you should remove the Assert.Inconclusive statement.
Once you are finished modifying the test method, save your work, then rebuild your solution to make sure there aren't any problems with the test code.
Running The Unit Test
There are several different ways to run unit tests, but the easiest is to simply right-click on the unit test method in your code, and from the context menu select Run Tests. The Test Results window will open (shown in Figure 3). This window will show the test as In Progress while it is running. Once the test is complete, the Test Results window will show the passing or failing results of the test. You can double-click on a test that has run to see details of the test. We will delve into this window more in a future column.
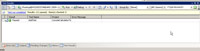
[Click on image for larger view.] |
| Figure 3. Test Results |
Conclusion
In this column we looked at how to create a simple unit test. We showed how to use Visual Studio Team System to stub out basic unit test code, how to modify that code, and how to run a unit test. In our next column, we'll look at what happens when a unit test fails, and show how to enable code coverage on your application.
About the Author
Mickey Gousset spends his days as a principal consultant for Infront Consulting Group. Gousset is lead author of "Professional Application Lifecycle Management with Visual Studio 2012" (Wrox, 2012) and frequents the speaker circuit singing the praises of ALM and DevOps. He also blogs at ALM Rocks!. Gousset is one of the original Team System/ALM MVPs and has held the award since 2005.