Inside TFS
Coded UI Tests (Part 2): Editing and Running a Test in VS 2010
Mickey Gousset delves into and explains the generated code of the coded UI Test, and shows us how to run the test.
In
Part 1 of this column series, we discussed what coded UI tests were, showed how to create a simple coded UI test and add validation to it. This column builds off the previous column, by examining the code created for the test, and showing how to run the coded UI test.
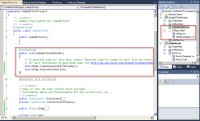
When the Coded UI Test Builder window is closed, after creating the tests, control is returned back to Visual Studio 2010. The CodedUITest1.cs file (Figure 1) contains the main test method (surrounded by a red box in the image), which calls the different user action and validation methods created during the recording process.

[Click on image for larger view.] |
| Figure 1. CodedUITest1.cs File. |
In the test method CodedUITestMethod1(), you can see the two methods that are performing the actual work. The first one, this.UIMap.TypeValuesAndClickCreate(), is the method that opens the application, enters the two values, and clicks the button to create the resulting string. The second method, this.UIMap.AssertHelloWorld(), is the validation method created to make sure the application was performing as expected.
To view the details around a particular method, right-click on the method and select Go To Definition (or press F12). Doing this for the TypeValuesAndClickCreate() method takes you to the method definition, located in the UIMap.Designer.CS file (Figure 2).
As you can see, this method correlates back to the individual steps that were recorded during the creation of the coded UI test. The application is started, the value "Hello" is typed in the first textbox, the value World is typed in the second textbox, and the Create button is clicked. A sharp eye will notice that the actual parameter values entered for this test are not stored in this method. Instead, they are stored in their own class, named TypeValuesAndClickCreateParams. This class can be found farther down in the UIMap.Designer.cs file, as shown in Figure 3. The main reason for this is to make it easy to override and change the parameters that are used in the test.
This file also contains the definition for the AssertHelloWorld() validation method (Figure 4).
This is the method that performs the validation test. In this instance, it is using an Assert.AreEqual() method call to test the value contained in the textbox, uiTextBoxResultEdit.Text, with the expected value, this.AssertHelloWorldExpectedValues.UITextBoxResultEditText. As with the previous method, the expected results are encapsulated in a class (also located in this file), making it easy to override and change them.
Running The Coded UI Test
Now that we have looked under the covers at the code that makes up a coded UI test, let's run the test and see what happens. Visual Studio 2010 provides multiple ways to execute a test. For this scenario, open the Test View window (Figure 5) by selecting Test | Windows | Test View from the main menu of Visual Studio 2010.
Right-click on the CodedUITestMethod1 test and select Run Selection from the context menu. As the test begins to execute, we see the application open, the test data "Hello" and "World" entered in the two fields, and then the Create button clicked, resulting in the words "Hello World" being displayed in the Results textbox. As we can see in the Test Results window (Figure 6) the test passed. If we double-click the test result, we can see detailed test information, shown in Figure 7.
For completeness sake, let's modify the coded UI test to fail, to see the results. In Visual Studio, open the UIMap.Designer.cs file and navigate to the AssertHelloWorldExpectedValues class definition, shown in Figure 8. To make the test fail, change the UITextBoxResultEditText value to be something other than "Hello World", for example "Hello Goodbye." Save the changes, then go back to the Test List window and run the CodedUITestMethod1 test again. This time the test fails (Figure 9), as the actual value did not match the expected value.
In my next column, I will look at how to increase the usefulness of this test by making it data-driven.
About the Author
Mickey Gousset spends his days as a principal consultant for Infront Consulting Group. Gousset is lead author of "Professional Application Lifecycle Management with Visual Studio 2012" (Wrox, 2012) and frequents the speaker circuit singing the praises of ALM and DevOps. He also blogs at ALM Rocks!. Gousset is one of the original Team System/ALM MVPs and has held the award since 2005.