Inside TFS
Test Cases and Test Suites with Microsoft Test Manager 2010
Mickey Gousset discusses test cases and test suites, and how they relate to test plans in Microsoft Test Manager 2010.
In the previous column, we looked at how you create a test plan, and modify its run and configuration settings. The next step in creating your test plan is to add test cases and test suites to the plan, to give your testers something to test with.
A Test Case is a new work item in Team Foundation Server 2010 that is mostly used to represent manual tests. This is a major change from TFS 2005/2008, where manual tests were Microsoft Word documents. Now in TFS 2010 they are work items, and first class citizens within the TFS 2010 structure. Test cases can be created using Team Explorer, but for this column we will use Microsoft Test Manager 2010.
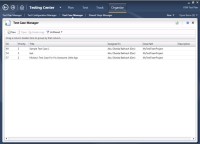
As with most things in Visual Studio/TFS 2010, you have multiple ways to create test cases in MTM 2010. To continue from the previous column, you can create test cases from the Organize tab in MTM 2010. Figure 1 shows the Test Case Manager sub-tab of the Organize section.

[Click on image for larger view.] |
| Figure 1. Test Case Manager Sub-Tab |
By default, this tab shows all the test cases contained in the team project you are currently connected to. You can change what is shown by clicking the Unfiltered button on the toolbar and changing the work item query used to populate the table.
To create a new test case, you have two options. The first is to click the New button, which will open the Test Case work item form to fill out. We will cover how to create a manual test using a test case in a future column. You also have the ability to copy an existing test case. This can be very useful if there is already a test case that defines most of the steps needed for your test. You can click the Create Copy button on the toolbar, and it will copy all the information from the current test case into a new test case. You can then edit the test case and save it.
To view the details of a particular test case, either double-click the specific test case, or click it once to highlight it, and select Open from the toolbar menu. Figure 2 shows you the Test Case work item form for a particular test case.
Once we have our test cases created, the next step is to add the appropriate test cases to our test plan that we started earlier. A test plan is usually tied to an Area/Iteration, so we need to add all the test cases that test functionality built for that Area/Iteration. To do this, click the Plan tab at the top of MTM 2010 to switch to the planning section. This is where you add your test cases to your test plan, and create your test suites, as shown in Figure 3.
To add an existing test case to the test plan, select the test plan, and in the right-hand pane, click the Add button. This will open a work item query window, where you can create a query to return test case work items. Click the Run button to run the query, select the test cases that you want to add to the plan, and click the Add test cases button to add them to the plan.
Test Suites
While the above adds test cases directly to the test plan, you may want to group your test cases into logical groups. That can be done by creating a test suite, or multiple test suites, for your test plan.
There are two ways to create a test suite. To create a basic test suite, right-click on the test plan and select New Suite. This will create a new leaf node on the tree where you can enter the name of the test suite. You can then add test cases to the test suite as described previously. You can also nest test suites within test suites if you need to for organizational purposes.
There is a second way to create test suites, and that is with a work item query. Since test cases are just work items, you can create a work item query to retrieve the test cases you want for a particular test suite. One nice aspect of this is that, when new test cases are created that match the query criteria, they are automatically added to the test suite.
To create a test suite in this fashion, right-click on the test plan and select New Query-Based Suite. This will open a window (Figure 4) where you can specify the work item query. You can run the query from here to see what the results would be, then click the Create Test Suite button to create the test suite. The test suite will be listed in the test plan, and will automatically update with new test cases as appropriate.
Now that you have created your test plan, with test suites and test cases, you are ready to run your tests. In upcoming columns, we'll look into how to create a test case, how to run a test plan, and how to interpret the results.
About the Author
Mickey Gousset spends his days as a principal consultant for Infront Consulting Group. Gousset is lead author of "Professional Application Lifecycle Management with Visual Studio 2012" (Wrox, 2012) and frequents the speaker circuit singing the praises of ALM and DevOps. He also blogs at ALM Rocks!. Gousset is one of the original Team System/ALM MVPs and has held the award since 2005.