Code Focused
An Encrypted String Data Type for Visual Studio LightSwitch
Learn how to extend support for Microsoft C#-only BlankExtension/BizType projects to Visual Basic.
In my recent article, "Is Visual Studio LightSwitch the New Access?", I looked at the suitability of LightSwitch as a replacement tool for departmental applications developed in Microsoft Access. LightSwitch is being positioned as a tool for the power user to develop Microsoft .NET Framework applications without having to face the substantial learning curve of the full .NET technology stack. I described each of the six extension types available to add the functionality to LightSwitch that an experienced .NET developer might want to use to make development in LightSwitch easier, or that a designer may want to use to build a visually appealing application.
This article demonstrates the usefulness of LightSwitch extension points by showing how to build a custom business data type to provide automatic encryption to a database string field. Once installed, the "Encrypted String" field data type can be available for use in any table in a LightSwitch project with the extension enabled. When a field of the Encrypted String data type is used in a LightSwitch screen, the field automatically decrypts itself when the cursor enters the field and automatically encrypts itself whenever the cursor leaves the field. The LightSwitch developer can store sensitive information in the database in encrypted form with no more effort than selecting the "Encrypted String" data type when designing the table.
Figure 1 shows an example of a LightSwitch grid with two rows of data, each row having User Name and Password as the Encrypted String data type. The cursor is in the Password field of the first row, so it's shown and editable as plain text -- which is automatically encrypted when the cursor leaves the field. The Comments column shows the decrypted value of each field. The database sees and saves the field value in its encrypted form; be sure to allow sufficient length in the database field for the encrypted string value.

[Click on image for larger view.] |
| Figure 1. The Encrypted String business type being edited in a LightSwitch screen. |
Installing and Using the Encrypted String Business Type
In order to run LightSwitch, you must be using Visual Studio Professional or higher with Service Pack 1 installed, and also the Visual Studio LightSwitch beta 2 (available for download here). Beta 1 must be uninstalled before installing beta 2.
To install the Encrypted String business type into LightSwitch, download the code from this article and extract all files. Close all instances of Visual Studio. Double-click the Blank.Vsix.vsix file found in the Blank.VSIX\bin folder. You'll see the Visual Studio Extension Installer dialog box. Make sure the Microsoft LightSwitch checkbox is checked and click the Install button. You'll see an Installation Complete confirmation dialog box once the install is done. The Visual Studio Extension Manager will now show Encrypted String Extension in the Installed Extensions list.
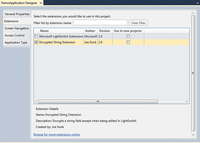
The Encrypted String extension must be enabled in any LightSwitch project that wishes to use it. In the LightSwitch project, right-click on the project's properties and choose the Extensions tab. Click on the Encrypted String Extension item to activate it for the project, as shown in Figure 2. Now the Encrypted String data type is available for use when creating a table in the same manner as an Integer, Date Time or String field.

[Click on image for larger view.] |
| Figure 2. Including the Encrypted String Extension in the LightSwitch project. |
To remove existing LightSwitch extensions, go to the Extension Manager in Visual Studio. Choose Tools and then Extension Manager, then select the extension and choose Uninstall. Close Visual Studio for the change to take effect.
Creating the Custom Business Type Extension
On March 16, 2011, the LightSwitch team published the "LightSwitch Beta 2 Extensibility Cookbook". In addition to the Cookbook document, the post has a BlankExtension.zip file, which is the completed version of the Cookbook's instructions to create a sample extension of each type in the Cookbook. This completed sample will serve as the starting point to create the Encrypted String custom business type extension. The instructions in this section serve as a guide for how you can modify this sample project to implement your own custom business type, as I did.
Download the BlankExtension.zip file and extract the "Blank Extension - BizType" project to a location of your choosing. Load the BlankExtension solution into Visual Studio. Examine each project in the Blank Extension solution to ensure all LightSwitch references are correct in the Blank.Client, Blank.ClientDesign and Blank.Common projects. Note that the LightSwitch beta 2 product does not install into the Global Assembly Cache, or GAC, but instead into the C:\Program Files\Microsoft Visual Studio 10.0\Common7\IDE\LightSwitch\1.0 folder. Remove any incorrect references and browse to the needed assemblies in the Client subfolder of the LightSwitch folder.
You may have already noticed that this is a C# language solution; a Visual Basic version of the BlankExtension - BizType project is not available. We'll be able to add a Visual Basic class project to hold our custom encrypted string business logic, but we'll need to make a few modifications in the existing C# code to call that class.
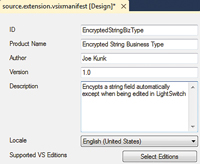
Next, we modify the project to identify the extension in the Visual Studio Extension Manager. In the BlankModule.cs file of the BlankModule.Common project, change the Name constant from "Blank" to "EncryptedStringBizType" and modify the source.extension.vsixmanifest file, as shown in Figure 3. The ID field must match the Name constant and the Product Name field value must be unique for all extensions, as it will be the folder where the extension will be installed. The path where extensions are installed in Windows 7 is C:\Users\{UserName}\AppData\Local\Microsoft\VisualStudio\10.0\Extensions\{VSIX Author}\{VSIX Product Name}\1.0\. This must result in a unique path for each extension to be installed.

[Click on image for larger view.] |
| Figure 3. Modifying the vsixmanifest in the Blank.Vsix project. |
To have the VSIX file reflect the identity of the extension, change the Assembly Name to "EncryptedStringBizType.Vsix" in the Application tab of the Blank.Vsix project property page. Leave the Default namespace as Blank.Vsix. Also change the Module Name property to "EncryptedStringBizType" in the BlankModule.lsml file in the Metadata folder of the Blank.Common project. Here's the code:
<?xml version="1.0" encoding="utf-8" ?>
<ModelFragment
  xmlns="http://schemas.microsoft.com/LightSwitch/2010/xaml/model"
  xmlns:x="http://schemas.microsoft.com/winfx/2006/xaml">

  <Module Name="EncryptedStringBizType" />

</ModelFragment>
Remove the <AttributeProperty Name="Business" MetaType="Int32"> tag and its contents, as it's part of the Cookbook example and not relevant to our Encrypted String data type. See Listing 1 for the revised BlankPresentation.lsml file.
This is sufficient for the business type extension to be unique in the Visual Studio Extension Manager. From this point forward you can test the extension at any time by uninstalling any previous version in the Visual Studio Extension Manager, and double-clicking the EncryptedString.vsix file in the bin\Release folder of the Blank.vsix project to install it.
Next, change the name of the extension in the solution from the "MyBusiness" of the Cookbook example to "EncryptedString" using a global search and replace across the entire solution. Compile the solution to ensure the changes have no errors. In my experience, there were 51 changes and no errors created.
Next, remove the validations that were placed into the Blank-Solution as part of the MyBusiness sample. Go to the MyBusinessValidator.cs file of the Blank.Client project and comment out the contents of the Validate method in the EncryptedStringValidator class. This will remove the restriction from the MyBusiness sample that the encrypted field can only be 15 characters maximum length.
Finally, we add the Visual Basic project that will contain our Encrypted String business logic. Add a Visual Basic Silverlight 4 class library to the solution and name it EncryptedString.
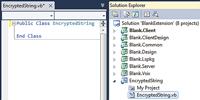
Rename the automatically generated class file and class name to EncryptedString, as shown in Figure 4.

[Click on image for larger view.] |
| Figure 4. Adding the EncryptedString.vb project. |
Next, modify the EncryptedString class (as shown in Listing 2) to provide the string encryption and decryption services to the editor control. The encryption password is based on the GUID of the EncryptedString project. While this is convenient as a password for the purposes of this article, for best security of the encrypted data, you should modify the EncryptedString class to obtain the GUID from a source outside the application. Changing the GUID in the AssemblyInfo.vb file of the EncryptedString Visual Basic project and re-compiling the solution will change the password from the code download for some additional security.
The Rfc2898DeriveBytes method implements key stretching based on the Password-Based Key Derivation Function (PBKDF2) and is applied 10,000 times to the GUID to make cracking the password significantly more difficult. This process generates a pseudo-random Key and Initialization Vector, or IV, for use as the cryptographic keys in the EncryptString and DecryptString methods in EncryptedString.vb.
In the spirit of language parity, I've implemented identical functionality in C#. I've also updated the BlankModule.cs file in the Blank.Common project to reflect this functionality. The needed using statements are included in the online listing as comments.
Next, we modify the Silverlight Client editor control to call the DecryptString method when the cursor enters the editor field, and to call the EncryptString method when the cursor leaves the editor field. The Blank.Client project needs a reference to the Encrypt-edString.dll assembly (not a Project reference). Browse to the Bin\Release folder of the EncryptedString project to add the reference.
Create event handlers for the editor's GotFocus and LostFocus events. Open the MyBusinessControl.xaml file in the Blank.Client project, highlight the Silverlight control, click on the Events property tab and double-click both the GotFocus and LostFocus events to create default event handlers. Modify the MyBusinessControl.xaml.cs with the code shown in Listing 3 to call the proper encryption methods. If desired, the C# version of the EncryptedString methods can be called by uncommenting the C# class instantiation and commenting out the Visual Basic instantiation.
Finally, we need to include the Visual Basic EncryptedString.dll assembly into the LsPkg that's part of the VSIX extension file, so it can be available for use at runtime. This requires editing the Blank.Lspkg.csproj file in the Blank.LsPkg project in Notepad. Locate the two <ItemGroup> sections and add the lines containing EncryptedString, as shown in Listing 4 (we must add entries for ClientGeneratedReference, IDEReference, ServerGeneratedReference and ProjectReference).
Build the solution and ensure there are no errors. Now install and test the extension using the procedures outlined at the beginning of this article. Remember that Visual Studio must be restarted each time there are changes to the Extensions, in order for the changes to be seen by the IDE.
LightSwitch Shows its Youth
The process described in this article relies on the BlankExtension - BizType sample provided by the LightSwitch team. If you follow this same process to create a second BizType extension, you'll find that both will successfully load into the Visual Studio Extension Manager, but only one can be active in the LightSwitch project at a time. It's not clear why this is the case. Further guidance from Microsoft is needed to produce truly independent, custom BizType extensions.
The custom business type extension in LightSwitch provides the experienced .NET developer with a means to add useful data types for the LightSwitch developer to easily consume, as shown by the EncryptedString data type produced in this article. I'm confident that the process of creating extensions will become easier as the product matures. It's very impressive that the LightSwitch team has invested heavily in providing extension capabilities as a core feature of the product. This speaks well to the future success of LightSwitch as a product that will provide easier .NET application development for a wide variety of needs. LightSwitch beta 2 is already a great product that will only get better with age.
About the Author
Joe Kunk is a Microsoft MVP in Visual Basic, three-time president of the Greater Lansing User Group for .NET, and developer for Dart Container Corporation of Mason, Michigan. He's been developing software for over 30 years and has worked in the education, government, financial and manufacturing industries. Kunk's co-authored the book "Professional DevExpress ASP.NET Controls" (Wrox Programmer to Programmer, 2009). He can be reached via email at joekunk@gmail.com.