Cross Platform C#
Standardized Navigation Principles for Android App Development
Navigation in mobile devices is an important consideration. If a user isn't able to navigate an app, he might quickly abandon it. Learn the navigation principles of Android to keep this from happening to you.
Mobile applications have a number of screens (Activities and Fragments) associated with them. Navigating through these is an important mechanism. There are a number of ways to provide standardized navigation in Android. This article will look at three mechanisms to provide navigation:
- Menus: Menus provide a common UI component for an application. The Menu APIs are used to present actions, as well as other options within an application.
- Navigation Drawer: The navigation drawer is a panel shown from the side of the display; it provides the user with the application's main navigation.
- Action Bar: The action bar provides a familiar navigation mechanism to the user across the top of the screen via an app icon, action items and action overflow.
Menus
Android has several types of menus, including:
- Options Menu: The primary set of items for an activity. This is where a user can perform actions such as Compose E-mail, User Settings, or in the case of the sample app presented in this article, which pet you want to load.
- Context Menu: Allows for a menu to be created that's associated with a view.
To create an options menu, two code methods must be created: OnCreateOptionsMenu and OnOptionsItemSelected. The OnCreateOptionsMenu method creates a menu. In the code sample in Listing 1, the menu is loaded from a resource .xml file. There are additional methods to create menus programmatically via the Menu.Add method. The OnCreateOptionsMenu is called several ways:
- In Android 2.3 and earlier, OnCreateOptionsMenu is called when a user touches the physical menu key on a device.
- In Android 3.0 and later, OnCreateOptionsMenu is called when a user touches the soft menu key in the action bar.
The OnOptionsItemSelected method is called when a user selects a menu item. In Listing 1, a basic switch statement is used to determine the menu item selected.
Listing 1: The OnCreateOptionsMenu Method
public override bool OnCreateOptionsMenu (IMenu menu)
{
  MenuInflater inflater = this.MenuInflater;
  inflater.Inflate(Resource.Menu.examplemenu, menu);
  return true;
}
public override bool OnOptionsItemSelected (IMenuItem item)
{
  switch (item.ItemId) {
  case Resource.Id.catexample:
    Android.Util.Log.Info (this.Application.PackageName, "Cat Example Selected");
    ic.SetImageResource (Resource.Drawable.wells);
    break;
  case Resource.Id.dogexample:
    Android.Util.Log.Info (this.Application.PackageName, "Dog Example Selected");
    ic.SetImageResource (Resource.Drawable.dog);
    break;
  default:
    break;
  }
  return base.OnOptionsItemSelected (item);
}
In Listing 2, the XML is loaded from the Resource/Menu directory.
Listing 2: Content for Creating a Menu with XML
<?xml version="1.0" encoding="utf-8"?>
<menu xmlns:android="http://schemas.android.com/apk/res/android">
  <item android:id="@+id/dogexample"
        android:title="@string/thedog" />
  <item android:id="@+id/catexample"
        android:icon="@drawable/wellssmall"
        android:title="@string/thecat" />
</menu>
The key tags and properties in Listing 2 are:
- item. An <item> tag defines an item in a menu.
- android:id. An android:id property defines the id of a menu item. This property will be used inside the software code to determine the menu item selected.
- android:icon. An android:icon property defines the image/icon used when the menu item's displayed. In the code sample in Listing 2, the image is pulled from the drawable resources.
- android:title. An android:title defines the text displayed when the menu is activated. In the example code shown in Listing 2, the text is pulled from the values resource; specifically, from the string.xml file.
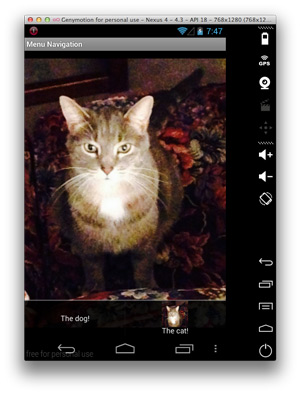
Figure 1 shows the menu displayed in an application running as an Android 2.3 application. Notice that the menu is displayed at the bottom, and the icon is shown.
 [Click on image for larger view.]
Figure 1. The menu for an Android 2.3 application. Notice that it's displayed at the bottom, and the icon is shown.
[Click on image for larger view.]
Figure 1. The menu for an Android 2.3 application. Notice that it's displayed at the bottom, and the icon is shown.
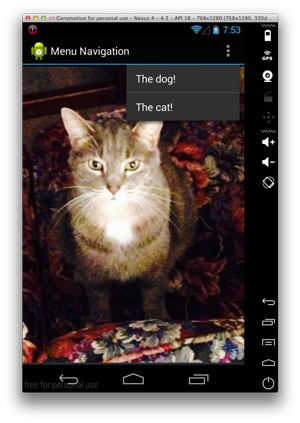
Figure 2 shows the same code running as an Android 4.0 application. Notice that the menu is displayed from the top of the image in the android action bar.
 [Click on image for larger view.]
Figure 2. The same code from Figure 1, running as an Android 4.0 application. Notice the menu is displayed from the top of the image in the Android action bar.
[Click on image for larger view.]
Figure 2. The same code from Figure 1, running as an Android 4.0 application. Notice the menu is displayed from the top of the image in the Android action bar.
Context Menu
A contextual menu allows for actions performed against a view. The process:
- The view must be registered for a context menu. This is done via a call to RegisterForContextMenu(view).
- Override the OnCreateContextMenu method in an activity or fragment.
- Override the OnContextItemSelected method.
Listing 3 shows the setup and processing of a context menu in an imageview. The key details:
- The call to RegisterForContextMenu and passing the view to the method. This registers the example imageview for context menu operations.
- The OnCreateContextMenu is particular for a given activity or fragment. Because of this, it's important to check and make sure the view passed in is appropriate for a given context menu request.
- The OnContextItemSelected is the same as the OnOptionsItemSelected shown previously. A switch command is used to determine the selected menu item.
Listing 3: Setup and Processing a Context Menu
protected override void OnCreate (Bundle bundle)
{
  base.OnCreate (bundle);
  SetContentView (Resource.Layout.Main);
  ic = FindViewById<ImageView> (Resource.Id.iv);
  ic.SetImageResource (Resource.Drawable.wells);
  RegisterForContextMenu (ic);
}

public override void OnCreateContextMenu (IContextMenu menu, View v, IContextMenuContextMenuInfo menuInfo)
{
  MenuInflater inflater = this.MenuInflater;

  if (v.Id == ic.Id) {
      inflater.Inflate (Resource.Menu.catmenu, menu);
  }
  base.OnCreateContextMenu (menu, v, menuInfo);
}
public override bool OnContextItemSelected (IMenuItem item)
{
  switch (item.ItemId) {
    case Resource.Id.meow:
      Android.Util.Log.Info (this.Application.PackageName, "Meow!");
      break;
    case Resource.Id.eat:
      Android.Util.Log.Info (this.Application.PackageName, "Eat");
      break;
    case Resource.Id.shed:
      Android.Util.Log.Info (this.Application.PackageName, "Shedding on everything");
      break;
    default:
      break;
  }
  return base.OnContextItemSelected (item);
}
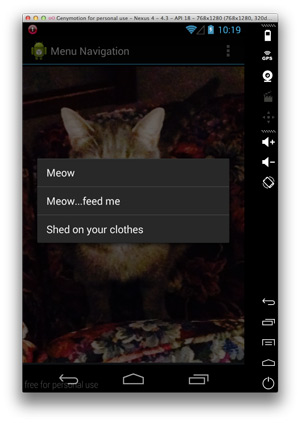
Figure 3 shows the output of having the Listing 3 code as a context menu.
 [Click on image for larger view.]
Figure 3. The output from Listing 3, showing the context menu.
[Click on image for larger view.]
Figure 3. The output from Listing 3, showing the context menu.
Navigation Drawer
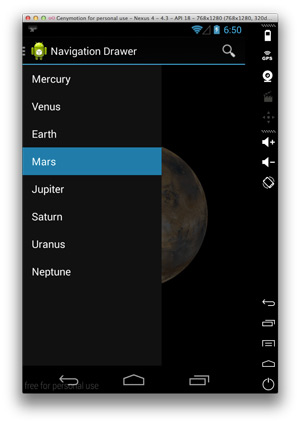
The navigation drawer is a panel that transitions from the left edge of the screen to display some navigation options. With the navigation drawer, the user activates it by swiping from the left edge of the screen or touching the application icon in the action bar. As the navigation drawer expands, it overlays the screen content except for the navigation bar.
When should an application make use of the navigation drawer? The navigation drawer is a great tool when there will be three or more top-level views.
Note: The navigation drawer is available via the Android Support Library v4. This article assumes Android 4 or later.
Figure 4 shows the navigation drawer once the user has activated the drawer.
 [Click on image for larger view.]
Figure 4. The navigation drawer, once the user has activated it.
[Click on image for larger view.]
Figure 4. The navigation drawer, once the user has activated it.
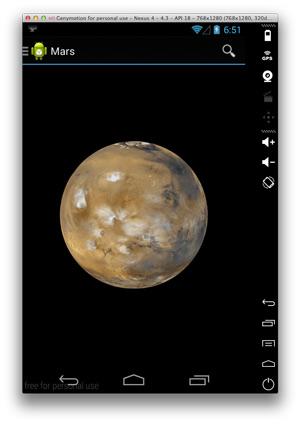
Figure 5 shows the result of selecting one of the items in the navigation drawer. In this case, the user selected Mars.
 [Click on image for larger view.]
Figure 5. The result of selecting an item in the navigation drawer. In this case, the user selected Mars.
[Click on image for larger view.]
Figure 5. The result of selecting an item in the navigation drawer. In this case, the user selected Mars.
Let's start by looking at the layout used to store the display. There are three widgets in the layout in Listing 4:
- DrawerLayout: A container layout that holds both the framelayout that contains the fragment, as well as a listview.
- FrameLayout: Contains the content that will be displayed. The framelayout will be changed programmatically to contain the fragment that contains the imageview of the planet.
- ListView: Contains the items that will be navigated to.
Listing 4: The XML Used to Create the DrawerLayout
<?xml version="1.0" encoding="utf-8"?>
<android.support.v4.widget.DrawerLayout xmlns:android=
  "http://schemas.android.com/apk/res/android"
  android:id="@+id/drawer_layout"
  android:layout_width="match_parent"
  android:layout_height="match_parent">
  <FrameLayout
    android:id="@+id/content_frame"
    android:layout_width="match_parent"
    android:layout_height="match_parent" />
  <ListView
    android:id="@+id/left_drawer"
    android:layout_width="240dp"
    android:layout_height="match_parent"
    android:layout_gravity="start"
    android:choiceMode="singleChoice"
    android:divider="@android:color/transparent"
    android:dividerHeight="0dp"
    android:background="#111" />
</android.support.v4.widget.DrawerLayout>
Listing 5 shows the activity that displays the content, as well as processes the selection. The key items:
- The listview within the drawer is loaded with content. The content comes from the string.xml file in the resources.
- Clicking on the item in the listview is set up and handled by the SelectItem method. The SelectItem method is going to handle the screen changes by handling the fragment changes. After the fragment is instantiated, a value is passed to the fragment.
Listing 5: Setting Up the MenuDrawer Code
[Activity (Label = "Navigation Drawer", MainLauncher = true)]
public class MainActivity : Activity
{
  private String[] mPlanetTitles;
  private DrawerLayout mDrawerLayout;
  private ListView mDrawerList;
  private myActionBarDrawerToggle mDrawerToggle;
  private string mTitle, mDrawerTitle;

  protected override void OnCreate (Bundle bundle)
  {
    base.OnCreate (bundle);
    SetContentView(Resource.Layout.activity_main);
    mTitle = mDrawerTitle = Title;
    mPlanetTitles = Resources.GetStringArray(Resource.Array.planets_array);
    mDrawerLayout = FindViewById<DrawerLayout>(Resource.Id.drawer_layout);
    mDrawerList = FindViewById<ListView>(Resource.Id.left_drawer);

    // Set the adapter for the list view
    mDrawerList.Adapter = (new ArrayAdapter<String>(this,
      Resource.Layout.drawer_list_item, mPlanetTitles));

    mDrawerList.ItemClick += (sender, args) => SelectItem(args.Position);

    mDrawerToggle = new myActionBarDrawerToggle (
      this,                  /*            host Activity */
      mDrawerLayout,         /*            DrawerLayout object */
      Resource.Drawable.ic_drawer,  /*     nav drawer icon to replace 'Up' caret */
      Resource.String.drawer_open,  /*     "open drawer" description */
      Resource.String.drawer_close  /*     "close drawer" description */
    );

    ActionBar.SetDisplayHomeAsUpEnabled(true);
    ActionBar.SetHomeButtonEnabled(true);

    mDrawerToggle.DrawerClosed += delegate
    {
      ActionBar.Title = mTitle;
    };

    mDrawerToggle.DrawerOpened += delegate
    {
      ActionBar.Title = mDrawerTitle;
    };

    mDrawerLayout.SetDrawerListener(mDrawerToggle);

    if (null == bundle)
        SelectItem(0);
  }

  private void SelectItem(int position)
  {
    var fragment = new PlanetFragment();
    var arguments = new Bundle();
    arguments.PutInt(PlanetFragment.ArgPlanetNumber, position);
    fragment.Arguments = arguments;

    FragmentManager.BeginTransaction()
      .Replace(Resource.Id.content_frame, fragment)
      .Commit();

    mDrawerList.SetItemChecked(position, true);
    ActionBar.Title = mTitle = mPlanetTitles[position];
    mDrawerLayout.CloseDrawer(mDrawerList);

  }

  protected override void OnPostCreate(Bundle savedInstanceState)
  {
    base.OnPostCreate(savedInstanceState);
    mDrawerToggle.SyncState();
  }

  public override void OnConfigurationChanged(Configuration newConfig)
  {
    base.OnConfigurationChanged(newConfig);
    mDrawerToggle.OnConfigurationChanged(newConfig);
  }

  public override bool OnCreateOptionsMenu(IMenu menu)
  {
    MenuInflater.Inflate(Resource.Menu.main, menu);
    return base.OnCreateOptionsMenu(menu);
  }

  public override bool OnPrepareOptionsMenu(IMenu menu)
  {
    var drawerOpen = mDrawerLayout.IsDrawerOpen(Resource.Id.left_drawer);
    menu.FindItem(Resource.Id.action_websearch).SetVisible(!drawerOpen);
    return base.OnPrepareOptionsMenu(menu);
  }

  public override bool OnOptionsItemSelected(IMenuItem item)
  {
    if (mDrawerToggle.OnOptionsItemSelected(item))
        return true;

    switch (item.ItemId)
    {
    case Resource.Id.action_websearch:
      {
        var intent = new Intent(Intent.ActionWebSearch);
        intent.PutExtra(SearchManager.Query, ActionBar.Title);

        if ((intent.ResolveActivity(PackageManager)) != null)
            StartActivity(intent);
        else
          Toast.MakeText(this, Resource.String.app_not_available,
            ToastLength.Long).Show();
        return true;
      }
    default:
      return base.OnOptionsItemSelected(item);
    }
  }
}
The two classes from Listing 6 are:
- ActionBarDrawerEventArgs: It has the drawer event args.
- myActionBarDrawerToggle: is inherited from the ActionBarDrawerToggle. This class provides an easy way to integrate the DrawerLayout and the ActionBar.
Listing 6: Setup Code for the Drawer
public class ActionBarDrawerEventArgs : EventArgs
{
  public View DrawerView { get; set; }
  public float SlideOffset { get; set; }
  public int NewState { get; set; }
}

public delegate void ActionBarDrawerChangedEventHandler(
  object s, ActionBarDrawerEventArgs e);

public class myActionBarDrawerToggle : ActionBarDrawerToggle
{
  public myActionBarDrawerToggle(Activity activity,
    DrawerLayout drawerLayout, int drawerImageRes,
    int openDrawerContentDescRes, int closeDrawerContentDescRes)
    : base(activity, drawerLayout, drawerImageRes,
      openDrawerContentDescRes, closeDrawerContentDescRes)
  { }

  public event ActionBarDrawerChangedEventHandler DrawerClosed;
  public event ActionBarDrawerChangedEventHandler DrawerOpened;
  public event ActionBarDrawerChangedEventHandler DrawerSlide;
  public event ActionBarDrawerChangedEventHandler DrawerStateChanged;

  public override void OnDrawerClosed(View drawerView)
  {
    if (null != DrawerClosed)
        DrawerClosed(this, new ActionBarDrawerEventArgs { DrawerView = drawerView });
    base.OnDrawerClosed(drawerView);
  }

  public override void OnDrawerOpened(View drawerView)
  {
    if (null != DrawerOpened)
        DrawerOpened(this, new ActionBarDrawerEventArgs { DrawerView = drawerView });
    base.OnDrawerOpened(drawerView);
  }

  public override void OnDrawerSlide(View drawerView, float slideOffset)
  {
    if (null != DrawerSlide)
        DrawerSlide(this, new ActionBarDrawerEventArgs
          {
            DrawerView = drawerView,
            SlideOffset = slideOffset
          });
    base.OnDrawerSlide(drawerView, slideOffset);
  }

  public override void OnDrawerStateChanged(int newState)
  {
    if (null != DrawerStateChanged)
        DrawerStateChanged(this, new ActionBarDrawerEventArgs
          {
              NewState = newState
            });
    base.OnDrawerStateChanged(newState);
  }
}
Listing 7 shows the fragment that displays the planet image. The key piece here is that when the view is created in the OnCreateView method, the planet is decoded and displayed.
Listing 7: Fragment Used To Display the Planets
public class PlanetFragment : Fragment
{
  public override void OnCreate (Bundle savedInstanceState)
  {
    base.OnCreate (savedInstanceState);

    // Create your fragment here
  }

  public static string ArgPlanetNumber = "planet_number";

  public override View OnCreateView(LayoutInflater p0, ViewGroup p1, Bundle p2)
  {
    var rootView = p0.Inflate(Resource.Layout.fragment_planet, p1, false);
    var i = Arguments.GetInt(ArgPlanetNumber);
    var planet = Resources.GetStringArray(Resource.Array.planets_array)[i];
    var imageId = DecodeImageId (i);
    rootView.FindViewById<ImageView>(Resource.Id.image).SetImageResource(imageId);
    Activity.Title = planet;
    return rootView;
  }

  private int DecodeImageId(int i)
  {
    switch (i) {
    case 0:
      return Resource.Drawable.mercury;
      break;
    case 1:
      return Resource.Drawable.venus;
      break;
    case 2:
      return Resource.Drawable.earth;
      break;
    case 3:
      return Resource.Drawable.mars;
      break;
    case 4:
      return Resource.Drawable.jupiter;
      break;
    case 5:
      return Resource.Drawable.saturn;
      break;
    case 6:
      return Resource.Drawable.neptune;
      break;
    case 7:
      return Resource.Drawable.uranus;
      break;
    default:
      return 0;
      break;

    }
  }
Action Bar
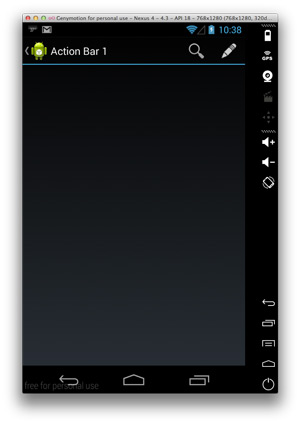
The action bar is a feature of a window. It identifies the user's location, as well as providing actions that a user can perform in a quick and easy way. The action bar APIs were first introduced in Android 3.0. While these APIs are provided in the Support Library and available with Android 2.1 (API Level 7), I'll look at the action bar in Android 4 and higher. Figure 6 shows an Action Bar at the top of the screen. This example has two menus, including a search menu item denoted with a magnifying glass icon, and a pencil that denotes the creation of an item.
 [Click on image for larger view.]
Figure 6. The action bar at the top of the activity.
[Click on image for larger view.]
Figure 6. The action bar at the top of the activity.
Listing 8 shows the XML used to fill the action bar. It's the same that was used in the menu items mentioned previously. The two different items:
- showAsAction: Provides information regarding the display of the action bar menu item as an individual item. The value ifRoom will display if there's room. The value withText will display text information when the user selects the item.
- actionViewClass: The actionViewClass tells the action bar to use the SearchView when the menu item is selected.
Listing 8: XML for Setting Up the Action Bar
<?xml version="1.0" encoding="UTF-8" ?>
<menu xmlns:android="http://schemas.android.com/apk/res/android" >
  <item android:id="@+id/action_search"
        android:icon="@drawable/ic_action_search"
        android:title="@string/action_search"
        android:showAsAction="ifRoom|withText"
        android:actionViewClass="android.widget.SearchView" />
  <item android:id="@+id/action_compose"
        android:icon="@drawable/ic_action_edit"
        android:title="@string/action_compose"
        android:showAsAction="ifRoom|withText" />
</menu>
Listing 9 shows application activity. Here are some things to notice:
- The activity implements the SearchView.IOnQueryTextListener interface. This interface requires the methods OnQueryTextSubmit and OnQueryTextChange.
- The OnQueryTextSubmit method has some code within it to make the keyboard go away when the search is performed in the SearchView.
- The icon in the top left of the screen can be set to have an action associated with it. The default is to take the user back to the "home" activity of the screen. This is set via the method ActionBar.SetDisplayHomeAsUpEnabled(true).
- In the OnCreateOptionsMenu method, a reference to the SearchView is resolved. With the reference, the method .SetOnQueryTextListener(this) associates the SearchView with this class. When the search and change events occur in the SearchView, the methods will be processed by the OnQueryTextSubmit and OnQueryTextChange methods.
Listing 9: Code To Set Up the Action Bar
[Activity (Label = "Action Bar 1", MainLauncher = true)]
public class MainActivity : Activity, SearchView.IOnQueryTextListener
{
  SearchView searchView;
  protected override void OnCreate (Bundle bundle)
  {
    base.OnCreate (bundle);

    // Set the view from the "main" layout resource
    SetContentView (Resource.Layout.Main);
    //ActionBar.Show();
    ActionBar.SetDisplayHomeAsUpEnabled (true);
  }

  public override bool OnCreateOptionsMenu (IMenu menu)
  {
    MenuInflater inflater = this.MenuInflater;

    inflater.Inflate(Resource.Menu.main_activity_actions, menu);

    // Associate searchable configuration with the SearchView
    SearchManager searchManager =
      (SearchManager)GetSystemService(Context.SearchService);
    searchView =
      (SearchView) menu.FindItem(Resource.Id.action_search).ActionView;
    searchView.SetSearchableInfo(
      searchManager.GetSearchableInfo(this.ComponentName));
    searchView.SetOnQueryTextListener (this);

    return base.OnCreateOptionsMenu (menu);
  }

  public override bool  OnOptionsItemSelected(IMenuItem item) {

    // Handle presses on the action bar items
    switch (item.ItemId) {
    case Resource.Id.action_search:
      OpenSearch();
      return true;
    case Resource.Id.action_compose:
      ComposeMessage();
      return true;
    default:
      return base.OnOptionsItemSelected(item);
    }
  }

  public void OpenSearch(){

  }

  public void ComposeMessage()
  {
  }

  public bool OnQueryTextSubmit (String query)
  {
    InputMethodManager imm =
      (InputMethodManager) this.GetSystemService(Context.InputMethodService);
    imm.HideSoftInputFromWindow(searchView.WindowToken, 0);

    Toast.MakeText (this, "You searched for: " + query, ToastLength.Long).Show ();
    return true;
  }

  public bool OnQueryTextChange (String newText)
  {
    return false;
  }
}
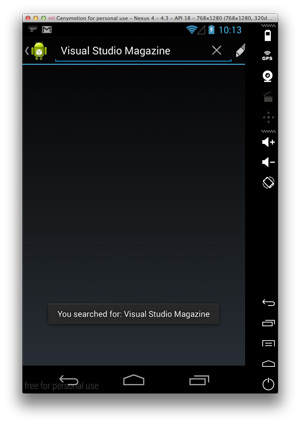
Figure 7 shows a search occurring in the sample application. In this case, a toast is displayed to the user. In a real application, a search of some data source would typically occur.
 [Click on image for larger view.]
Figure 7. A search from the code in Listing 9. In this case, a toast is displayed to the user. In a real application, a search of a data source would typically occur.
[Click on image for larger view.]
Figure 7. A search from the code in Listing 9. In this case, a toast is displayed to the user. In a real application, a search of a data source would typically occur.
Other Navigation Options
One other common navigation option can be used with Android: Android Fragments. The basic idea is that there are two screens within an Android Tablet (or larger screen device). Selecting an item on one screen causes an operation on the other screen. (I covered Fragments in a past column.)
Simplify Your Navigation
Allowing a user to navigate easily and in a way that makes sense is crucial for every successful application. It's important to learn how to properly navigate within a platform, and as I've shown here, Android provides a number of features to make it easy.