Ask Kathleen
How-To Q&A: How Can I Automate Code Without Resorting to Heavy Code-Generation Techniques?
Kathleen Dollard shows how to improve development using T4 code generation and in-line DSL as a localized development tool.
Q: My manager doesn't want to shift our development to the kind of application code-generation approaches you've described, but I'm incredibly sick of writing the same 11 lines of code. I'd hoped that auto properties would help, but they don't allow notification that the property changed. Is there any way to avoid rewriting all this code?
A: There are two ways to use code generation in .NET. You can use application code-generation techniques with a separate modeling/metadata-defining step or your own architecture. I assume your manager doesn't want to adopt those approaches. You can also use T4 code generation as a localized development tool. You can approach this in a few ways, including an approach I call in-line DSL. This is a pseudo-DSL that's a hack compared to a real, textual DSL, but it gets the job done. I'll show you how to define your class in terms of T4 and generate properties in place.
While I use application code generation on projects, I developed this approach for infrastructure classes -- particularly ones requiring extra bulk to support Managed Extensibility Framework (MEF) interfaces. The approach is also useful on small projects with unique architectures, and when you just can't make a broad commitment to code generation. It's also useful as a secondary technique within development environments that rely on application code generation.
It's a bit of a twist in thinking to define your metadata in T4, but I think there are big wins. Defining your metadata in place allows clear recording of your intent, which in this case is simply to create a property. When you need this information in multiple locations, such as creating an interface and a corresponding implementation, you can automatically reuse a single definition. And, perhaps most important, if you need to change what a standard property looks like you can do it in one location and push it out across your application.
To begin this approach, create a text template to hold the in-line DSL inside your project. In Visual Studio 2010, add a Text Template item. In Visual Studio 2008, create a text file and give it a .TT extension. This creates a template file recognized by template-editing tools and as well as a custom tool to create the output as a dependent file. In Visual Studio 2008 you need to add the template header:
<#@ template debug="true" hostspecific="false" language="c#v3.5" #>
Items prefixed with <#@ are template directives -- in this case a directive that initiates the template. The language portion defines the language of the template and C# is the default. If you're working with Visual Studio 2010, you can drop the version 3.5 portion because the custom tool now defaults to the current version of the framework. If you're outputting Visual Basic, you also need to add an output directive to specify the extension.
The in-line DSL is actually C# or Visual Basic code. Code in a T4 template is enclosed in statement blocks delimited by <# #>:
<#
Item("MyClass");
Property("FirstProperty", "string");
Property("SecondProperty", "int");
Property("ThirdProperty",
	"IEnumerable<MyOtherClass>");
Run();
#>
The first four lines of code build a simple object graph of the information you'd like to output. The last line actually outputs the code.
The final piece makes this work. An include directive references another T4 template, which contains the Item, Property and Run methods. I add this line right after the template directive:
<#@ include file="Support.t4" #>
This references a T4 file in the same directory, although you could access any file. Relative references are desirable because your project structure should remain the same across different machines in your group, but the location of that structure varies. I use the .T4 rather than .TT extension because the custom tools are assigned automatically to only the .TT file in Visual Studio 2008. In Visual Studio 2010, ensure there's not a custom tool for the support templates. Template editing helpers recognize both extensions.
The Support.t4 file provides an abstraction layer that points to the templates that do the actual work. If you have many in-line DSL templates relative to the Support.t4 template, this gives you more flexibility in accessing the support templates that do the heavy lifting:
<#@ include file="..\InternalGeneration\SuppportCommon.t4" #>
<#+
	private string nspace = "KadGen.MyNamespace";
#>
The Support.t4 template can also include information such as the namespace for all of the C# files that reference it. This reduces the amount of information that must be placed in each T4 template. Note that the delimiter for the namespace definition is <#+ #>. T4 is compiled into normal .NET code, which runs to create your output. Code within <# #> are statement blocks that appear within the body of the TransformText method that creates your output. <#+ #> are class feature blocks that appear within the outputting class, but outside the TransformText method. This is how you define fields, properties, methods and nested classes used by your template.
The SupportCommon.t4 defines the pseudo-DSL in methods in a class feature block:
private string _itemName;
private List<PropertyStuff> _properties = new
	List<PropertyStuff>();

private void Item(string name)
{ _itemName = name; }

private void Property(string name, string typeName)
{ _properties.Add(new PropertyStuff() {Name=name, TypeName=typeName}); }
Once the graph is built, the Run method outputs your code:
private void Run()
{
   Import("System");
   Import("System.Collections.Generic");
   OutputFileStart(nspace, _imports.Distinct());
   OutputClass(_itemName);
   foreach (var prop in _properties)
   { OutputProperty(prop.Name, prop.TypeName); }
   Close();
}
In addition to the Property and Item methods, the pseudo-DSL includes an Import method that allows you to add using statements. You'll Import items within the Run method when the using statements are needed for the specific pattern you're generating. You'll sometimes also need to add Import calls to the in-line DSL template or the Support.t4 template to define usings for property types.
The OutputFileStart method shows the importance of the T4 template infrastructure to manage the appearance of your output. The WriteLine method appends your output to a StringBuilder and manages horizontal white space via the PushIndent and PopIndent methods. I keep track of the bracket level that allows them to be simultaneously closed:
private void OutputFileStart(string nspace,
	IEnumerable<string> imports)
{
   foreach (var import in imports)
      { WriteLine("using " + import + ";"); }
   WriteLine("");
   WriteLine("namespace " + nspace);
   WriteLine("{");
   bracketLevel ++;
   PushIndent("   ");
}
The OutputClass and OutputProperty methods are similar and you can explore them in the download that accompanies this article, available at VisualStudioMagazine.com/Dollard0410. I've kept the pseudo-DSL and the OutputProperty method in the sample simple, in order to avoid distracting from the technique. You'll alter this to express the complexity of the property you need.
This approach is designed for complex properties or environments where the output may change over time. If you have several types of properties, you can either add modifiers as parameters to the Property method or you can create additional pseudo-DSL methods such as ReadOnlyProperty. Choose the approach that offers a more readable DSL. You'll probably extend the pseudo-DSL in other ways as well, such as supporting MEF, Windows Communication Foundation or data-annotation attributes.
You can also extend this technique to keep interfaces and the properties of the corresponding implementations in sync. Define the in-line DSL directly at the point of the interface. At the point of the implementation, create a template with a .TT extension that has an include directive that references the in-line DSL definition template. The implementation template can use a different Support.t4 with different include directives to create the implementation output, or you can define a field that indicates whether interface or implementation output is desired.
There are a couple of gotchas to watch out for. In the past and current versions of the T4 processor, relative paths in include directives are always relative to the entry template regardless of where the include directive appears. For example, a relative path in an include directive in the SupportCommon.t4 template would be evaluated relative to the in-line DSL template. This really causes headaches in solutions with a project tree that varies in depth.
Visual Basic will require a modified DSL, and a bit more work. The pseudo-DSL aims for natural English semantics -- the way we'd really speak the code. As a result of this and the case-insensitive nature of Visual Basic, keyword collisions will occur with the pseudo-DSL I used. You also need to track exactly what's being closed rather than the generalized closing of curly brackets, making output a bit more complicated. If your team can remember to add semicolons at the end of lines in the in-line DSL template, you can use C# to output Visual Basic by modifying the output methods in the SupportCommon.t4 file and adding an output directive defining the .VB extension.
Silverlight projects present extra challenges because they don't readily hit the correct System assemblies. You can add assembly directives or generate into another project and link from your Silverlight project. This pattern of local generation works best with properties because they have a regular pattern. Effective use of T4 requires separate files for the generated and handcrafted portions of your classes -- which you can easily provide using partial classes. This approach can reduce the amount of time you spend creating and updating patterns in repetitive sections of code.
Q: In Silverlight I want to display a list of complex bound criteria, which includes data, child data and photos for each item. The requirement is for the list to be displayed horizontally with only one item displayed at a time. Is this possible?
A: There are at least two approaches to solving this: a ListBox and a DataForm. In Silverlight 3, I wasn't able to scroll the ListBox incrementally, resulting in partially displayed items. In some cases this might be desirable, but the DataForm offers a clean incremental scroll. Figure 1 shows the DataForm solution. Both approaches use a DataTemplate that allows reuse of control layouts.
For my tests, I created a class with FirstName, LastName and PhotoUri properties as well as a list of PhoneNumbers. Phone Number is a separate class with a Description and Number property. A shared method in the Customer class returns dummy data for the sample.
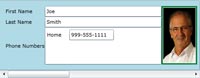
[Click on image for larger view.] |
| Figure 1. One way you can use a DataForm is to pair it with a ScrollBar for horizontal and incremental scrolling behavior. |
App.xaml holds two DataTemplates -- one for the phone number and one for the customer. The phone number DataTemplate is simple; in a real project I'd ask an artist to fix it up later:
<DataTemplate x:Key="PhoneNumberDataTemplate">
         <Grid>
            <Grid.ColumnDefinitions>
               <ColumnDefinition Width="50"/>
               <ColumnDefinition Width="100"/>
            </Grid.ColumnDefinitions>
            <dataInput:Label Content="{Binding Path=Description}" Grid.Row="0" Grid.Column="0"/>
            <TextBox Grid.Row="0" Grid.Column="1" Text="{Binding Path=Number}"/>
         </Grid>
      </DataTemplate>
The customer DataTemplate uses the phone number DataTemplate:
<ListBox Grid.Row="2" Grid.Column="1"
      ItemsSource ="{Binding Path=PhoneNumbers}"
      ItemTemplate="{StaticResource PhoneNumber DataTemplate}" />
The CustomerDataTemplate displays the image using the string URI:
<Image Source="{Binding PhotoUri}" Stretch="Fill" />
This works because the PropertyUri is a string and there is a default converter that changes the string Uri to an actual image. If you are working with a true Uri, you can write a value converter. You can explore the rest of the CustomerDataTemplate in the download.
The CustomerDataTemplate is used by a bound ListBox to display the associated data:
<ListBox Name="verticalListBox"
ItemTemplate="{StaticResource CustomerDataTemplate}" />
Creating a ListBox that scrolls horizontally is not difficult. By default the ListBox uses a VirtualizingStackPanel to display elements. You can replace this panel with any other panel. To create a horizontal ListBox, I defined the ItemsPanel to be a StackPanel with the Orientation set to horizontal:
<ListBox Name="horizontalListBox"
                        ItemTemplate="{StaticResource CustomerDataTemplate}"
                        VerticalAlignment="Top">
                  <ListBox.ItemsPanel>
                     <ItemsPanelTemplate>
                        <StackPanel Orientation="Horizontal" />
                     </ItemsPanelTemplate>
                  </ListBox.ItemsPanel>
               </ListBox>
The downside of using the horizontal ListBox is that it doesn't offer an integral move to the next item with a single click on the left or right scroll button, and as the user scrolls, partial records are displayed.
An easy way to get integral move behavior is to combine a DataForm with a ScrollBar. The DataForm can also reuse the data templates, showing how powerful data templates can be in providing a consistent and stylable user experience:
<StackPanel    >
   <dataFormToolkit:DataForm Name="dataForm"
   EditTemplate="{StaticResource CustomerDataTemplate}"
CommandButtonsVisibility="None"/>
   <ScrollBar Name="dataFormScrollBar" Orientation="Horizontal"
          Scroll="dataFormScrollBar_Scroll"  Minimum="0"
          SmallChange = "1" ViewportSize = "1"/>
</StackPanel>
The rather oddly named ViewportSize is actually the size of the thumbnail. The scroll event synchronizes the DataForm position with the scroll bar position:
   Private Sub dataFormScrollBar_Scroll( _
	ByVal sender As System.Object, _
	ByVal e As Primitives.ScrollEventArgs)
      dataForm.CurrentIndex = CInt(e.NewValue)
   End Sub
Good scroll bar behavior requires setting the maximum values to the count of items in the data set loaded. If you're committed to reducing your code behind, you could do this in a value converter, but in this case I just set the value when I loaded data in the constructor:
   Public Sub New()
      InitializeComponent()
      Dim customers = Customer.GetDummyData()
      Me.DataContext = customers
      dataFormScrollBar.Maximum = customers.Count - 1
   End Sub
Silverlight offers a great opportunity to combine a well-organized application with compelling approaches.
About the Author
Kathleen is a consultant, author, trainer and speaker. She’s been a Microsoft MVP for 10 years and is an active member of the INETA Speaker’s Bureau where she receives high marks for her talks. She wrote "Code Generation in Microsoft .NET" (Apress) and often speaks at industry conferences and local user groups around the U.S. Kathleen is the founder and principal of GenDotNet and continues to research code generation and metadata as well as leveraging new technologies springing forth in .NET 3.5. Her passion is helping programmers be smarter in how they develop and consume the range of new technologies, but at the end of the day, she’s a coder writing applications just like you. Reach her at [email protected].