In-Depth
Building Data-Bound WPF and Silverlight Applications
Microsoft Visual Studio 2010 makes it easier than ever to work with rich, data-bound elements.
- By Mark Boulter
- 05/01/2010
Data binding is an integral part of any Silverlight or Windows Presentation Foundation (WPF) application. Although data binding is extremely powerful and flexible, binding has a compressed and sometimes difficult-to--remember syntax. From RelativeSource bindings to all the glue required for a ValueConverter, bindings aren't very simple to type. Even worse, if you mistype the Path to a property you won't find out until runtime, and then you'll have to spend time tracking down the error. (If you're not familiar with data binding, I'd recommend reading the WPF or Silverlight Data Binding introduction on MSDN.)
Visual Studio 2010 does an excellent job addressing these issues. Drag-and-drop generation of your UI and bindings from your object model save you from having to type in all those property names again, and allow you to avoid those irritating and time-wasting typos that can lead to caffeine-fueled, late-night debugging sessions. A data-binding builder that helps build your bindings with accurate context means that developers no longer have to remember the syntax of RelativeSource bindings or manually type in the ValueConverter glue. Sample data in the designer allows you to immediately see your bindings working and to preview your UI without having to build and run.
With Visual Studio 2010, you not only spend less time creating your UI in the first place, you also spend less time having to debug it later. Ultimately, this will make your development experience much more efficient.
The easiest way to see how these new features help you is to walk through a simple example. I'm going to use Silverlight 3 and C#, but this walkthrough applies equally to Visual Basic and WPF -- and to Silverlight 4.
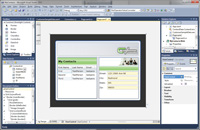
For this simple example, I'm going to build a Contacts master-details form that shows a list of Contacts and the address of each Contact. Rather than show the whole process of creating the form, I'm going to focus on creating the data-bound parts. I already have the project open in Visual Studio, and I've arranged the windows I typically use when creating a form, as shown in Figure 1.
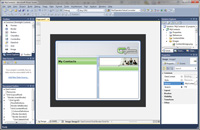
[Click on image for larger view.] |
| Figure 1. Setting up the project in Visual Studio. |
You can see the Toolbox for adding controls; the Data Sources window for creating data-bound UI; the Document Outline, which lets me navigate the structure of the form; and the Properties window for editing control properties. I've already defined my classes, created the basic layout of the form and built the solution -- now I'm ready to start setting up my bindings.
Using the Data Sources Window
I want to add a DataGrid for my list of Contacts and a details form to show the address of the selected contact. Because I've already defined my classes, I can use them to help me create the UI. I start by clicking on the Add New Data Source link in the Data Sources window. This brings up a wizard that lets me choose the data source I want to add.
I'm going to add a plain-old common language runtime (CLR) object: my list of Contacts. Once I've added ContactList to the Data Sources window, I can customize the UI that will be generated on drag and drop. For example, I don't want anything generated for the DateOfBirth, ID or Title properties.
Now I can drag and drop ContactList onto the form. This creates a DataGrid to display my list of Contacts. The Data Sources window takes care of much of the plumbing for me -- it creates a CollectionViewSource to manage the ContactList collection, sets up the Data-Grid so that it's bound to the specific CollectionViewSource, and adds a column to the DataGrid for each property. I then use the DataGrid design time to change the order of the columns in the DataGrid.
I want a "details form" to be generated for Address, so I select the Details option in the Data Sources window. Next, I drag and drop Address onto the designer. This creates a details form. Again, the Data Sources window takes care of much of the plumbing for me. It generates a Grid control with Labels and TextBoxes for each property.
The DataContext of the Grid is set to the same ContactList CollectionViewSource and a binding is created for each TextBox.Text property:
Text="{Binding Path=Address.City, Mode=TwoWay,
ValidatesOnExceptions=true,
NotifyOnValidationError=true}"
You'll notice that the Data Sources window generates default binding options for me. If I want to change these, I can select all the generated controls and use the Binding Picker to edit the options.
The Data Sources window picks default controls based on the property type -- TextBox for string, DatePicker for DateTime and so on. I can customize this to use different controls if I wish.
In addition, I can use the designer to reorder the controls in the Grid. The easiest way to reorder the controls in the Grid is to select both the Label and TextBox in the Document Outline (using Ctrl+Click) and then change the Grid.Row property in the Properties window. I also want to set a style for all the TextBoxes. The easiest way to do this is to select all the TextBoxes and then use the property browser to set the style for all the TextBoxes in one operation.
All I have left to do now is to add the code to load my data. The Data Sources window generates some "stub" code for me in the Loaded event that I can use as a starting point:
private void UserControl_Loaded(object sender,
RoutedEventArgs e) {
// Do not load your data at design time.
// if (!System.ComponentModel
//. DesignerProper ties.GetIsInDesignMode(this))
// {
// Load your data here and assign the
//result to the CollectionViewSource.
// System.Windows.Data.CollectionViewS
//ource myCollectionViewSource = (System.Windows
//.Data.CollectionViewSource)this.Resources
//["Resource Key for CollectionViewSource"];
// myCollectionViewSource.Source = your data
// }
}
I can alter this to load my list of Contacts and set the source of the CollectionViewSource to that list (because this is a simple example, I'm loading some static data; in a real application this would typically be a call to a Web service):
private void UserControl_Loaded(object sender,
RoutedEventArgs e) {
//Do not load your data at design time.
if (!System.ComponentModel.DesignerProperties.
GetIsInDesignMode(this)) {
//Load your data here and assign the result to
//the CollectionViewSource.
System.Windows.Data.CollectionViewSource
myCollection-ViewSource = (System.Windows.Data.
Collection-ViewSource)this.Resources["contactListViewSource"];
ContactData.ContactList cl = new ContactData.ContactList();
cl.LoadContacts();
myCollectionViewSource.Source = cl;
}
}
Now I can press F5, and I have a working application that loads and displays my data and tracks selection across the DataGrid and Details form, as shown in Figure 2.
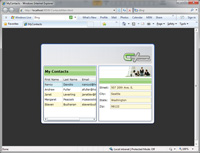
[Click on image for larger view.] |
| Figure 2. The working application. |
How It Works
When I drag and drop the ContactList class onto the design surface, the Data Sources window creates a CollectionViewSource to manage the list of Contacts (for more on the d:DesignSource property, see "d:What?" on opposite page):
<UserControl.Resources>
<CollectionView
Source x:Key="contactListViewSource" d:DesignSource="
{d:DesignInstance my:ContactList}" />
</UserControl.Resources>
In addition, a DataGrid binds to that CollectionViewSource with a column for each property on the Contact class:
<Grid Name="masterGrid" DataContext="{StaticResource
\contactListViewSource}">
. . . .
<data:DataGrid AutoGenerateColumns="False"
ItemsSource="{Binding}" . . . .>
<data:DataGrid.Columns>
<data:DataGridTextColumn Binding="{Binding
Path=Email}" . . . . />
<data:DataGridTextColumn Binding="{Binding
Path=FirstName}" . . . . />
<data:DataGridTextColumn Binding="{Binding
Path=LastName}" . . . . />
</data:DataGrid.Columns>
</data:DataGrid>
. . . .
</Grid>
There are two reasons why the Data Sources window generates a CollectionViewSource.
First of all, you can use the CollectionViewSource and the CollectionView it creates to sort and filter -- and group, in WPF and Silverlight 4 -- the source collection without changing the contents or order of that underlying collection. This allows you to have multiple views of your data. For example, one DataGrid shows
Orders sorted by delivery date and one DataGrid shows Orders sorted by total value. This makes the CollectionView-Source a powerful and useful component.
Second, the CollectionView maintains a current item (Current-Item property) for the collection. This CurrentItem property is used to drive the master-details relationship. We can understand how this works by looking at what the Data Sources window generates for the Details form.
When I drag and drop the Address class onto the design surface, the Data Sources window recognizes that the data source was the same, so it generates a Grid containing a set of Labels and TextBoxes, which binds to that same CollectionViewSource:
<Grid DataContext="{StaticResource
contactListView-S ource}" . . . .>
. . . .
<dataInput:Label Content="City:" . . . ./>
<TextBox Text="{Binding Path=Address.City,
Mode=TwoWay, ValidatesOnExceptions=true,
NotifyOnValidationError=true}" . . . . />
. . . .
</Grid>
If you look closely at this syntax, it looks a little odd because it appears that the Source (via the DataContext) of the binding on the Text property is the CollectionViewSource, but the Path navigates into the Address property on Contact. This works because the binding class recognizes the CollectionViewSource and Collection-View classes and automatically navigates to the current item on the CollectionView. This means that this binding:
Text="{Binding Source={StaticResource contactList
ViewSource}, Path=Address.City}"
is the same as this binding:
Text="{Binding Source={StaticResource contactList
ViewSource}, Path=View.CurrentItem.Address.City,
BindsDirectlyToSource=True}"
BindsDirectlyToSource turns off the automatic navigation.
Now all you need is a little bit of magic on the list controls such as DataGrid. The DataGrid recognizes that its ItemsSource property is actually a CollectionView and keeps SelectedItem and CurrentItem in sync.
This means that as you change selection in the DataGrid, it sets contactListViewSource.View.CurrentItem to the SelectedItem, which in turn causes the Details form -- which is bound to contactListViewSource.View.CurrentItem -- to update. And look, the master details works! More complex master-details forms -- for example, Customers and Orders, shown in Figure 3 -- are an extension of this pattern.
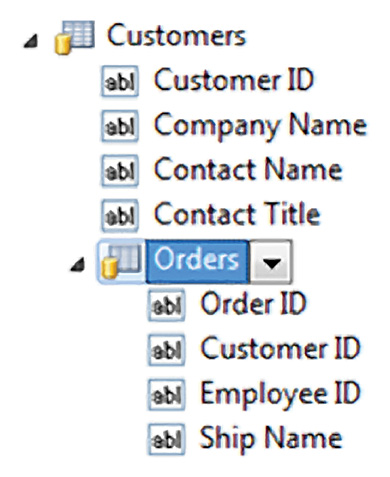 |
| Figure 3. A more complex master-details form. |
When you drag and drop Customers, you get a CollectionView-Source and a DataGrid:
. . . .
<UserControl.Resources>
<CollectionViewSource x:Key="customersViewSource"
d:DesignSource="{d:DesignInstance my:Customers}" />
</UserControl.Resources>
. . . .
<Grid DataContext="{StaticResource
customersView Source}">
. . . .
<DataGrid
AutoGenerateColumns="False"
ItemsSource="{Binding}". . . . >
. . . .
And then when you drag and drop Customers.Orders you get a second CollectionViewSource for Orders and second DataGrid:
. . . .
<CollectionViewSource x:Key="customersOrdersViewSource"
Source="{Binding Path=Orders,
Source={StaticResource customersViewSource}}" />
</UserControl.Resources>
. . . .
<DataGrid AutoGenerateColumns="False"
ItemsSource="{Binding Source={StaticResource
customersOrdersViewSource}}". . . . >
. . . .
Because of the special behavior of the binding class described here, the Source property of customers-Orders-View-Source is actually bound to customers-View-Source.View.Current-Item.Orders. This means that as the selection changes on the Customers Data-Grid, the current item on customers-View-Source changes and, therefore, customers-Orders-View-Source.-Source changes so the Orders Data-Grid displays the Orders for the selected Customer.
Using the Binding Picker
I want to create a "header" for the details form that shows the full name of the currently selected contact. There isn't a FullName property on Contact, and I need to create a Value-Converter that combines the First-Name and Last-Name property values:
public class ContactFullNameConverter :
IValue Converter {
. . . .
public object Convert(object value,
Type targetType. . . .) {
Contact contact = value as Contact;
if (contact == null) return "";
return contact.FirstName + " " + contact.
LastName;
}
. . . .
}
Once I've added the ValueConverter and built my project, I can go back to the designer and add a TextBlock with a binding that uses this ValueConverter. I add the TextBlock and then use the property menu in the Properties window to access the data-binding builder for the TextBlock.Text property.
The data-binding builder lets me create or edit a binding by choosing the Source, Path, binding options and Converter I want to use. I can set the Source to be the DataContext, a resource (Static-Resource) or another control within the form (ElementName, RelativeSource). In this case I set the Source to the contactListViewSource, as shown in Figure 4.
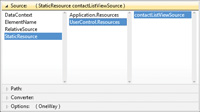
[Click on image for larger view.] |
| Figure 4. Set the source in the data-binding builder. |
I can select the Path I want by using the data-binding builder to navigate my object model. This eliminates an often-frustrating source of errors when manually creating bindings. In this case I set the Path to CurrentItem.
Now I can use the data-binding builder to select the Value-Converter I created earlier so that the TextBlock will display the full name of the current item.
Using Sample Data
I'd like to see what my form looks like when it's populated with data, without having to run the application. I start by adding an empty .XAML file to my project. I can use a Resource-Dictionary as a starting point. I then change the BuildAction for the .XAML file to DesignData and delete the Custom Tool property value. Once I've done that, I can add my sample data to the .XAML file:
<local:ContactList
x:Class="MyContacts.CustomerS ampleData"
xmlns="http://schemas.microsoft.com/winfx/2006/xaml/presentation"
xmlns:x="http://schemas.microsoft.com/winfx/2006/xaml"
xmlns:local="clr-namespace:ContactData">
<local:Contact FirstName="First" LastName="TestPerson"
Email="[email protected]">
<local:Contact.Address>
<local:Address Street="123 156th Ave NE"
City="Redmond" State="WA" Zip="98053"/>
</local:Contact.Address>
</local:Contact>
<local:Contact FirstName="Second" LastName="TestPerson"
Email="[email protected]"/>
<local:Contact FirstName="Third" LastName="TestPerson"
Email="[email protected]"/>
</local:ContactList>
Next, I update my CollectionViewSource to use it:
<CollectionViewSource x:Key="contactListViewSource"
	d:DesignSource="{d:DesignData
	Source=ContactsSampleData.xaml}" />
As shown in Figure 5, I can immediately see that I've set up the bindings on my form correctly. I can also see that the alternating row color on my DataGrid is not correct. And when I update the row color, I can immediately see the results.
[Click on image for larger view.] |
| Figure 5. The bindings on the form are immediately visible on the IDE design canvas. |
Create Accurate Bindings
This article should give you a good idea of how much easier it is in Visual Studio 2010 to create data-bound WPF and Silverlight applications. The Data Sources window and the data-binding builder enable you to quickly and easily set up data-bound forms. Sample data allows you to immediately validate your bindings and to see what your form will look like -- all without having to run your application.
Not only have we made it much easier to create bindings; more importantly, we've made it much easier to create accurate bindings. This alone will save you time, limit frustration and increase your productivity. If you add to this all the other improvements we've made in WPF and Silverlight Designer -- the image picker, the resource picker, the brush editor and so on -- we believe that we have a much-improved experience for WPF and Silverlight developers in Visual Studio 2010.
We welcome your feedback on the features that we've added and suggestions for improvements or new features. You can contact us via our blog or via the MSDN forum.