C# Corner
Working with Windows 7 Thumbnails
In the second of two Windows 7-themed columns, Patrick Steele looks at how to get the most out of thumbnails with the Windows API CodePack.
In my last article, I showed you how to utilize Widows 7's new Jump List feature in your applications. In this article, we'll look at adding your own buttons to your application's thumbnail as well as how to use a custom thumbnail.
Thumbnail Toolbar Buttons
A new feature of the Windows 7 Thumbnail preview (the image that pops up when you hover over the icon of a running application) is the ability to add a few buttons to allow users to do some simple operations without having to actually switch to your application.
A couple of examples of this are media players. Both Windows Media Player (Figure 1) and iTunes (Figure 2) add some buttons to their Thumbnail to allow users to play/pause and jump to the next and previous item without actually switching to the application.
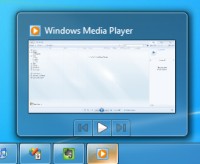
[Click on image for larger view.] |
| Figure 1. Windows Media Player Thumbnail Toolbar buttons. |
Notice that on the Windows Media Player image, the next and previous buttons are disabled. You have the ability to enable and disable these buttons as well as show and hide them. However, you build the toolbar only once, at application startup -- buttons cannot be added or changed while the application is running. And don't go overboard with buttons. Not only could it be confusing to the user, Windows 7 limits the number of buttons you can add to seven.
Toolbar Button Sample
As we did in the last article, we'll use the Windows API CodePack -- a managed wrapper around the new Windows 7 API features. Let's start by adding a simple button that displays a message when clicked. Toolbar buttons are simply icons. For simplicity sake, we'll use some of the built-in icons from System.Drawing.SystemIcons.
using System;
using System.Drawing;
using System.Windows.Forms;
using Microsoft.WindowsAPICodePack.Taskbar;

namespace CustomToolbarButtons
{
	public partial class Form1 : Form
	{
		private ThumbnailToolbarButton infoButton;

		public Form1()
		{
			InitializeComponent();
		}

		protected override void OnShown(EventArgs e)
		{
			base.OnShown(e);

			infoButton =
new ThumbnailToolbarButton(
SystemIcons.Information, "Information");
			infoButton.Click += infoButton_Click;

			TaskbarManager.Instance.ThumbnailToolbars.AddButtons(
this.Handle, infoButton);
		}

		private void infoButton_Click(object sender,
ThumbnailButtonClickedEventArgs e)
		{
			MessageBox.Show("Show Application Information");
		}
	}
}
As you can see, the Windows API CodePack makes this very easy. We simply create a button, hook up a delegate and add the button to the Thumbnail Toolbar. The sample code provided expands on this sample by showing you how to enable/disable buttons as well as hide/show buttons.
Custom Thumbnails
If you look back at the images that show the thumbnail toolbar buttons, you'll notice that the thumbnail images don't give you a whole lot of information. Windows 7 automatically generates a tiny image of your entire application for the thumbnail. However, if you want your own image, that's easy to do.
using System;
using System.Drawing;
using System.Threading;
using System.Windows.Forms;
using Microsoft.WindowsAPICodePack.Taskbar;

namespace CustomThumbnailImage
{
	public partial class Form1 : Form
	{
		private TabbedThumbnail customThumbnail;

		public Form1()
		{
			InitializeComponent();
		}

		protected override void OnShown(EventArgs e)
		{
			base.OnShown(e);

			customThumbnail = new TabbedThumbnail(
this.Handle, this.Handle);
			TaskbarManager.Instance.TabbedThumbnail.AddThumbnailPreview(
customThumbnail);

			Bitmap bitmap = GenerateBitmap();
			customThumbnail.SetImage(bitmap);
		}

		private Bitmap GenerateBitmap()
		{
			Bitmap bitmap = new Bitmap(150, 150);
			using (var g = Graphics.FromImage(bitmap))
			{
				var random = new Random(Environment.TickCount);
				using (var brush = new SolidBrush(
Color.FromArgb(
255, random.Next(255), random.Next(255),
random.Next(255))))
				{
					g.FillEllipse(brush, 10, 30, 130, 90);
				}
			}

			return bitmap;
		}
	}
}
Aside from my lame attempt at creativity (GenerateBitmap), there are only a few lines of code needed to assign a custom bitmap as your toolbar thumbnail.
Updating the Thumbnail
The example above uses a single bitmap generated at application startup. If you're using a custom bitmap, it's probably because you want the image to reflect the state of the application. Since state is always changing, we need a way to update the bitmap while the application is running.
Since generating the bitmap uses some resources, we don't want to do it unless it's necessary. By subscribing to the TabbedThumbnailBitmapRequested event, we can wait to generate the bitmap until Windows actually needs it.
We'll make a few changes to the sample. Instead of generating the bitmap at application startup, we'll subscribe to the TabbedThumbnailBitmapRequested event and generate the bitmap at that time. For performance reasons, Windows 7 will cache whatever bitmap you give it. To update our bitmap during execution of our application, we'll have to call the InvalidatePreview method on our customThumbnail object. In this demo, I accomplish this by starting a background thread which waits two seconds and then invalidate the image. This will cause the TabbedThumbnailBitmapRequested event to fire again and give us a new thumbnail image every two seconds:
using System;
using System.Drawing;
using System.Threading;
using System.Windows.Forms;
using Microsoft.WindowsAPICodePack.Taskbar;

namespace CustomThumbnailImage
{
	public partial class Form1 : Form
	{
		private TabbedThumbnail customThumbnail;

		public Form1()
		{
			InitializeComponent();
		}

		protected override void OnShown(EventArgs e)
		{
			base.OnShown(e);

			customThumbnail = new TabbedThumbnail(
this.Handle, this.Handle);
			TaskbarManager.Instance.TabbedThumbnail.AddThumbnailPreview(
customThumbnail);
			customThumbnail.TabbedThumbnailBitmapRequested +=
customThumbnail_TabbedThumbnailBitmapRequested;
		}

		private Bitmap GenerateBitmap()
		{
			Bitmap bitmap = new Bitmap(150, 150);
			using (var g = Graphics.FromImage(bitmap))
			{
				var random = new Random(Environment.TickCount);
				using (var brush = new SolidBrush(
Color.FromArgb(
255, random.Next(255), random.Next(255),
random.Next(255))))
				{
					g.FillEllipse(brush, 10, 30, 130, 90);
				}
			}

			return bitmap;
		}

		void customThumbnail_TabbedThumbnailBitmapRequested(
object sender,
TabbedThumbnailBitmapRequestedEventArgs e)
		{
			var bitmap = GenerateBitmap();
			customThumbnail.SetImage(bitmap);

			ThreadPool.QueueUserWorkItem(c =>
                           	{
						Thread.Sleep(2000);
			                  this.Invoke(
new MethodInvoker(InvalidateThumbnail));
         	});
		}

		private void InvalidateThumbnail()
		{
			customThumbnail.InvalidatePreview();
		}
	}
}
As you can see, the Windows API CodePack makes it easy to integrate new Windows 7 features into your own applications. If there's a new feature of Windows 7 you're interested in using, let me know and I'll try and cover it in a future column.
About the Author
Patrick Steele is a senior .NET developer with Billhighway in Troy, Mich. A recognized expert on the Microsoft .NET Framework, he’s a former Microsoft MVP award winner and a presenter at conferences and user group meetings.