Inside TFS
Branch By Quality using Team Foundation Server 2010 – Part 2
Mickey Gousset finishes his series on branching patterns with a look at how to implement Branch by Quality in TFS 2010.
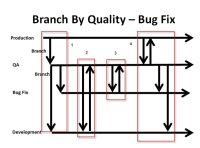
In my previous column, we looked at the theory behind the Branch by Quality branching/merging pattern. In this column, we are going to implement that theory using Team Foundation Server 2010. We are going to see how to create the initial branching structure, and then how to work and resolve bugs found during the QA cycle. Figure 1 shows a high-level outline for what we will be implementing.

[Click on image for larger view.] |
| Figure 1. |
First, we need to create the different branches necessary for this pattern. As you can see in Figure 2, in an example of the new branch visualizations available with TFS 2010, we've already created a basic structure with Prod, QA, and Dev branches. We now need to create the Bug Fix branch, which is branched from QA.
There is no need to go back to Source Control Explorer to create this branch. Instead, it can be created directly from this visualization window. Simply click the QA branch to highlight it, then click the Branch button from the tool bar. A window entitled "Branch from QA" will open. Enter the name of the new branch ("Bug Fixes"), and select the branching criteria (in this case, we will use "Latest Version"). Click the Branch button on this window to start the branching process.
A dialog box will pop up, shown in Figure 3.
This dialog alerts us that this branch is going to be automatically committed and checked into TFS 2010. The changes will NOT be marked pending locally, requiring them to be checked in. Click Yes to complete the branch process. Click the Refresh button and the branch visualization window will now show the new branch structure.
With the branching structure in place, we begin coding on the Dev branch. Once we are done, and ready for final QA testing, we need to merge the code into the QA branch. This is done in the same manner as in previous columns. In Source Control Explorer, right-click on Dev branch and select Branching and Merging | Merge. By default, in the merge wizard, it will merge from Dev to QA, as the QA branch is the parent branch to Dev. Walk through the merge wizard and select Latest Version as the merge criteria. Remember, the merge happens locally, so you will still need to check in the changes to finish the merge.
During QA testing, a bug is found that needs to be fixed. Remember, no code changes are allowed directly to the QA branch. All code changes for QA problems must happen on the Bug Fixes branch. Using similar steps to those listed above, merge the code from the QA branch to the Bug Fixes branch. Then in the Bug Fixes branch, resolve the bug.
Next, we need to move the fixed code back into the QA branch, so we can re-run our QA tests. While we could merge the code as we have done previously, let's perform the merge in a different way. I can select the changeset that contains the bug fix (for my example, it was Changeset 103), right-click on it, and select Track Changeset. This shows me a visualization of the branches and this particular changeset, allowing me to see what branches that changeset has been moved to (Figure 5).
Currently, this changeset only exists in the Bug Fixes branch. To merge this changeset back into the QA branch, drag Changeset 103 onto the QA timeline. This will create a pending change in the local workspace, which will need to be checked in. Once the check-in is complete, click the Re-run button on this changeset visualization to see the updates(Figure 6).
Once the code passes the QA tests, merge it into the Prod branch, using either of the methods shown above. Finally, take the bug fixes made in QA and move them to the Dev branch, because those bugs still exist in the DEV branch. Remember, however, that the developers have continued to work on the DEV branch, so merge conflicts may be encountered that will have to be resolved. Chances are, if any merge conflicts are found, they will need to be resolved using the Merge tool. Figure 7 shows an example of a merge conflict being resolved using the Merge tool.
The merge tool allows you to navigate through the different changes, and then pick changes from one file or both files to be included in the final merged file. You can also make changes directly to the final merged file in the bottom window. Once all the merge conflicts have been resolved, check in the merged changes to the DEV branch.
Figure 8 and Figure 9 show how to use the visualization tools in TFS 2010 to track the progress of code changes. In Figure 8, you can see the original changeset (Changeset 100) that was moved from Dev to QA, then to Bug Fixes, and ultimately to PROD. Figure 9 traces the path of the bug fix (Changeset 103) from the Bug Fix branch back to the DEV branch.
As mentioned in the previous column, and as demonstrated here, the Branch By Quality pattern can start to get complicated quickly, especially with multiple or rapid bug fixes. However, the power and flexibility offered by this branching pattern help to offset this added complexity.
About the Author
Mickey Gousset spends his days as a principal consultant for Infront Consulting Group. Gousset is lead author of "Professional Application Lifecycle Management with Visual Studio 2012" (Wrox, 2012) and frequents the speaker circuit singing the praises of ALM and DevOps. He also blogs at ALM Rocks!. Gousset is one of the original Team System/ALM MVPs and has held the award since 2005.