C# Corner
Advanced AOP Techniques
Aspect Oriented Programming is great for handling cross-cutting concerns such as logging, security, and threading.
In my previous article Clear Cross-Cutting Concerns with Aspect Oriented Programming in .NET, I covered the basics of Aspect Oriented Programming (AOP). Since then I've received some feedback asking for ways to utilize AOP for more advanced tasks such as security and threading, and will cover those here. I'll also go over how to apply your custom aspects to a full sample application.
Handling Security
First let's look at how to handle authentication and authorization using aspects. Our authentication aspect will check to see if the user's authenticated. If the user isn't authenticated, we'll prevent the method from executing by throwing an unauthorized user exception.
The AuthenticatedAttribute aspect intercepts the entry point of the applied method(s) and throws an UnauthorizedAccessException if the current user isn't authenticated. We declare that our attribute will provide a security aspect. We also set up some dependences to ensure that our aspect will be applied before any Threading or Authorization aspects. These dependencies will come in handy later when we begin applying multiple attributes to a target method.
Start by adding the following namespaces to the file:
using System.Threading;
using PostSharp.Aspects;
using PostSharp.Aspects.Dependencies;
[Serializable]

  [ProvideAspectRole(StandardRoles.Security)]

  [AspectRoleDependency(AspectDependencyAction.Order, AspectDependencyPosition.Before,
 StandardRoles.Threading)]

  [AspectRoleDependency(AspectDependencyAction.Order, AspectDependencyPosition.Before,
 "Authorization")]

  public class AuthenticatedAttribute  : OnMethodBoundaryAspect

  {

  public override  void OnEntry(MethodExecutionArgs  args)

  {

  if (!Thread.CurrentPrincipal.Identity.IsAuthenticated)

  {

  throw  new UnauthorizedAccessException  ("You are not a valid user.");

  }

  }

  }
The AuthorizationAttribute aspect is very similar in its implementation. We intercept the entry point of the applied method(s) and check to see if the user is in the given roles passed to the attribute. If the user is not in all of the given roles, we throw an UnauthorizedAccessException. Our AuthorizationAttribute is declared to provide an Authorization role aspect. This custom aspect role is used by the Authentication aspect to ensure Authorization role aspects are executed prior to any Authorization role aspects.
Be sure to add the following namespaces:
using System.Threading;
using System.Security.Principal;
using PostSharp.Aspects;
using PostSharp.Aspects.Dependencies;
[Serializable]

  [ProvideAspectRole("Authorization")]

  public class AuthorizedAttribute  : OnMethodBoundaryAspect

  {

  private string  _roles = string.Empty;
      public AuthorizedAttribute(string roles)

  {

  _roles = roles;

  }
      public override  void OnEntry(MethodExecutionArgs  args)

  {

  if (!Thread.CurrentPrincipal.IsInRole(_roles))

  {

  throw  new UnauthorizedAccessException("You are not authorized to use this  application.");

  }

  }

  }
Handling Threading
Beyond security, AOP is also well suited for handling threading within an application. A common WPF problem is an inability to update the UI thread from another thread. Wouldn't it be great if you could just decorate the method that updates the UI element(s) with an attribute, instead of duplicating the dispatching logic everywhere? Fear not, PostSharp allows us to easily encapsulate this oft-repeated task!
To implement our custom RunOnUIThreadAttribute aspect, we utilize the MethodInterceptionAspect base class to intercept the method invocation. Instead of directly executing the method, we check to see if we're already on the UI thread through the CheckAccess method of the DispatcherObject. If we are, we simply call the method as usual; if we're on another thread, we dispatch the method call to the UI thread through WPF's Dispatcher. Like our custom security aspects, we make sure to declare an aspect provider role, which can be used to resolve conflicts between aspects. Both of our threading aspects are declared with the StandardRoles.Threading aspect role.
You will need to import the following namespaces:
using System.Threading;
using PostSharp.Aspects;
using PostSharp.Aspects.Dependencies;
[Serializable]

  [ProvideAspectRole(StandardRoles.Threading)]

  public class RunOnUIThreadAttribute  : MethodInterceptionAspect

  {

  public override  void OnInvoke(MethodInterceptionArgs  args)

  {

  DispatcherObject dispatchedObj = (DispatcherObject)args.Instance;
         if (dispatchedObj.CheckAccess())

  {

  args.Proceed();

  }

  else

  {

  dispatchedObj.Dispatcher.Invoke((Action)(() => args.Proceed()));

  }

  }

  }
There are often times you'll want to execute a particular task on a background thread. A good example is running a resource-intensive task such as a database query or web service request. To handle these cases, we can utilize a custom aspect that will execute any method to which it's applied on the thread pool. We'll make use of the MethodIncerceptionAspect base class once again to intercept the target method's point of invocation to queue the method call to the thread pool.
You'll need to import the following namespaces:
using System.Threading;
using System.Windows.Threading;
using PostSharp.Aspects;
using PostSharp.Aspects.Dependencies;
You'll also need add a reference to WindowsBase.
[Serializable]

  [ProvideAspectRole(StandardRoles.Threading)]

  public class RunOnThreadPoolAttribute  : MethodInterceptionAspect

  {

  public override  void OnInvoke(MethodInterceptionArgs  args)

  {

  ThreadPool.QueueUserWorkItem(methodState  => args.Proceed());

  }

  }
Applying Aspects in a Sample Application
Now that we've created our power aspects to handle security and threading concerns, let's put them to good use. Our sample application consists of two forms: login and search. The search form will be accessible only to an authenticated user in the Admin role. An authenticated user will get a status update displaying "Logged in as x", where x is the authenticated username.
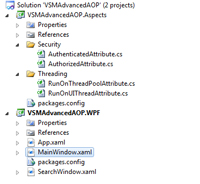
Start off by creating a new WPF C# 4.0 application. Add a C# Class Library named VSMAdvancedAOP.Aspects. Within the Aspects project add two folders -- one named Security and the other, Threading. As shown in Figure 1, Add authentication and authorization attributes to the Security folder and the threading aspects to the Threading folder.

[Click on image for larger view.] |
| Figure 1. Project Setup |
Setting up the UI
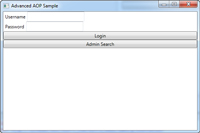
Next, open the MainWindow.xaml file in your WPF project and paste the following markup into the root <Grid> element. It should look similar to Figure 2.
 <StackPanel>

  <StackPanel  Orientation="Horizontal">

  <Label  MinHeight="15">Username</Label>

  <TextBox  Name="txtUsername" MinWidth="150"  MinHeight="15" />

  </StackPanel>

  <StackPanel  Orientation="Horizontal">

  <Label  MinHeight="15">Password</Label>

  <PasswordBox  Name="txtPassword" MinWidth="150"  MinHeight="15" />

  </StackPanel>

  <Button  Name="btnLogin" Click="btnLogin_Click">Login</Button>

  <Button  Name="btnSearch" Click="btnSearch_Click">Admin  Search</Button>

  <Label  Name="lblLoginStatus"></Label>

  </StackPanel>

[Click on image for larger view.] |
| Figure 2. The Login Form |
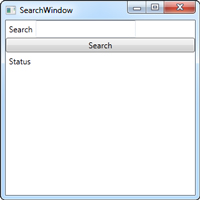
Now create a new Window in the WPF project named SearchWindow. Open up SearchWindow.xaml and paste in the following markup in the root <Grid> element. It should look like Figure 3.
 <StackPanel>

  <StackPanel  Orientation="Horizontal">

  <Label  MinHeight="15">Search</Label>

  <TextBox  Name="txtSearch" MinWidth="150"  MinHeight="15" />

  </StackPanel>

  <Button  Name="btnSearch" Click="btnSearch_Click">Search</Button>

  <StackPanel  Orientation="Horizontal">

  <Label>Status</Label>

  <Label  Name="lblStatus"></Label>

  </StackPanel>

  </StackPanel>

[Click on image for larger view.] |
| Figure 3. The Search Form |
Login Form
Now that the UI is set for both our Login and Search forms, let's implement the login form. Open up MainWindow.xaml.cs and add the following to the namespace imports:
using System.Threading;
using System.Security.Principal;
using VSMAdvancedAOP.Aspects.Security;
using VSMAdvancedAOP.Aspects.Threading;
Next we'll add the Login method that authenticates the user.
public bool Login(string  userName, string password)

  {

  bool valid = false;
      Dictionary<string, string[]> validUsers = new Dictionary<string, string[]>();

  validUsers["user"] = new string[] { "User" };

  validUsers["admin"] = new string[] { "User", "Admin"  };
      if (validUsers.ContainsKey(userName)  && userName == password)

  {

  Thread.CurrentPrincipal  =

  new  GenericPrincipal(new  GenericIdentity(

  userName, "Passport"),  validUsers[userName]);

  valid = true;

  }
      return valid;

  }
To authenticate the user, we simply do a lookup on a dictionary of valid users. If the user exists in the valid users lookup, create a GenericPrinical for the given username along with its accessible roles. In a real-world system you'll most likely be authenticating against a database, Web service or active directory. For demonstrations purposes I've opted to create a very simple login mechanism.
Next, wire up the Login button Click to call the PerformLogin method. The PerformLogin method clears the status label, authenticates the user, and updates the login status label for an authenticated user.
private void PerformLogin(string username, string password)

  {

  UpdateLoginStatus(string.Empty);

  if (Login(username, password))

  {

  UpdateLoginStatus(String.Format("Logged  in as {0}",username));

  }

  }
 private void UpdateLoginStatus(string  status)

  {

  lblLoginStatus.Content = status;

  }
 private void btnLogin_Click(object  sender, RoutedEventArgs e)

  {

  PerformLogin(txtUsername.Text, txtPassword.Password);

  }
Now it's time to wire up the Admin Search button to show the Search Window for an authenticated and authorized user through use of our custom aspects. The Authenticated aspect will be executed first, followed by the Authorized aspect. The Authorized aspect is passed a role of "Admin" to ensure the user is in the "Admin" user role.
[Authenticated]

  [Authorized("Admin")]

  private void btnSearch_Click(object  sender, RoutedEventArgs e)

  {

  new SearchWindow().Show();

  }
Search Form
Now that the Login form is fully created, we implement the Search Window. Open up SearchWindow.xaml.cs and add the following using statements:
using System.Threading;
using VSMAdvancedAOP.Aspects.Security;
using VSMAdvancedAOP.Aspects.Threading;
Now, add the Authenticated and Authorized aspects to the SearchWindow constructor. This will ensure that the user is both authenticated and in the Admin user role.
[Authenticated]

  [Authorized("Admin")]

  public  SearchWindow()

  {

  InitializeComponent();

  }
Next, add the PerformSearch method, which utilizes the RunOnThreadPool aspect. The entire method will be executed on the ThreadPool. The PerformSearch method called UpdatedSearchStatus sets the initial search status to "Searching for x", where x is the given search criteria. A Thread.Sleep call is added to simulate a search being performed for two seconds. Once the search is done the UpdateSearchStatus method is called to update the search status to "Done".
 [RunOnThreadPool]

  public void PerformSearch(string  criteria)

  {

  UpdateSearchStatus("Searching...");

  Thread.Sleep(2000);

  UpdateSearchStatus("Done");

  }
The UpdateSearchStatus method simply sets the text of the search status label. The method is decorated with the RunOnUIThread aspect to ensure it's executed on the UI thread.
 [RunOnUIThread]

  public void UpdateSearchStatus(string  status)

  {

  lblStatus.Content = status;

  }
Finally, set the Search Click event to call the PerformSearch method and pass it the search value. The completed forms should look like those in Figure 4.
 private void btnSearch_Click(object  sender, RoutedEventArgs e)

  {

  PerformSearch(txtSearch.Text);

}

[Click on image for larger view.] |
| Figure 4. The completed program UI. |
AOP Benefits
AOP has many practical applications for handling cross-cutting concerns such as logging, security and threading. By utilizing AOP techniques, you not only reduce code clutter, but increase the ease of maintenance of your application by both experienced and new developers alike.