Inside TFS
Putting the 'Team' in Team Foundation Server 2012
TFS 2012 has improved on the team concept to create logical teams, or groups, of members for different projects.
If you’ve been reading this column awhile, you know one of the main reasons Team Foundation Server was created was to facilitate better communication among team members. Team Foundation Server 2012 has upped the ante with the ability to create logical teams (groups) of members for different projects. While this column continues our focus on TFS in the cloud, the team member concept also applies to on-premise installs of TFS 2012.
Previous columns have covered how to set up Team Foundation Service using http://www.tfspreview.com, and how to create a site for tracking this column called http://insidetfs.tfspreview.com. With the hosted site up and running, and the team project created, the next step is to add team members to the team project. Once team members are added, you can start assigning work items to them, and begin tracking what needs to get done.
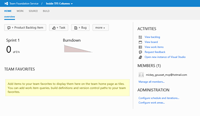
On the main page of the hosted site is a section named MEMBERS. This shows all the current members for this team project. As you can see in Figure 1, right now there is only one member: [email protected]. To add more team members, click the Manage all members link to open the Manage Members window.
[Click on image for larger view.] |
| Figure 1. The Current Team Member list. |
From here, you can remove existing members, as well as add new members. To add a new member, click the
Add button and select
Add User. Enter the Windows Live ID of the user and click the Save Changes button. The user is now a team member of your team project.
Figure 2 shows the second Hotmail account:
[email protected]. This account is already a member of other projects at tfspreview.com, so it automatically pulls the display name and picture configured for the other projects. Click the
Close button to close the Manage Members window.
Once you’ve added your new team members, you should send them an email with the URL for your hosted TFS Site (in my case, http://insidetfs.tfspreview.com). They can go to the site, log in, and access the home page of the TFS Project (again, in my case, Inside TFS Columns). They can also use that URL to access the team project from with Team Explorer in Visual Studio 2012.

[Click on image for larger view.] |
| Figure 2. The Manage Members window after adding a new user. |
New team members should take it upon themselves to configure a couple of options at the site. Once on the main page of the site, they need to click their name in the upper-right corner of the screen. This gives them three options: My Profile, My Alerts and Sign Out.
The My Profile option allows the user to configure basic information; encourage team members to both edit their display name and set a user profile picture. In the settings window they can also configure a preferred email address, as well as local information (such as language and time zone). Finally, if they’re working with applications that require basic authentication, such as the Team Explorer Everywhere command-line client or the git-tf utility, they can configure their authentication information.
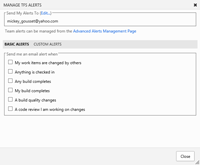
If you’ve used the alerts options in Team Foundation Server and Team Explorer before, the options under My Alerts -- shown in Figure 3 -- will be familiar. This allows you to subscribe to different events thrown by TFS and receive email notifications about them, such as when a work item is assigned to you, or a build completes. From here you can configure the email address to which TFS will send alerts, as well as select what information you want to be alerted on.
There are some basic preconfigured alerts you can choose, or you can select Custom Alerts to build your own. There are several options around which to build custom alerts, including builds, check ins, code reviews and work items. As a team member, any alerts you configure can only be sent to you.
[Click on image for larger view.] |
| Figure 3. The Managed TFS Alerts window allows a team member to configure alerts. |
Speaking of alerts, the team project administrator can also configure alerts for individuals or the entire team. Clicking the Advanced Alerts Management Page link takes you to a similar page where the administrator can configure the same types of alerts, for both individuals and teams.
One other nice feature about teams is that you can assign permissions at the team level in your team project. For example, by default, the team group is part of the Contributors group for the team project. If you needed to quickly set all team members to have read-only access to the team project, you could move the team group into the Readers group.
At this point, your team members have been added, and configured alerts for events that apply to them. The next step (covered in the next column) will be to perform some basic configuration on the team project, and start assigning work items to the members (in this case, me, since I have to write the columns).
Would you like to be a team member on my insidetfs.tfspreview.com team project? Send me an email with your Windows Live ID to [email protected]. I’ll add you as a team member, and you can watch via reports and the backlog as I try and use this site to both explore hosted TFS, as well as get my columns turned in on time. Maybe I’ll even open it up where you can give column submission ideas. You won’t know unless you join.
About the Author
Mickey Gousset spends his days as a principal consultant for Infront Consulting Group. Gousset is lead author of "Professional Application Lifecycle Management with Visual Studio 2012" (Wrox, 2012) and frequents the speaker circuit singing the praises of ALM and DevOps. He also blogs at ALM Rocks!. Gousset is one of the original Team System/ALM MVPs and has held the award since 2005.