In-Depth
Creating Custom HTTPClient Handlers
Accessing Web APIs can be easily done using the HTTPClient Handler. This class expedites the development process in accessing data from a Web API, and allows for customizing the client handlers when the need arises.
HTTPClient is an object used for accessing request and response messages to and from Web APIs. Like traditional client-server calls, the HTTPClient calls the server using a specific URI, waits for the result, then returns a response object to the caller.
As with everything else in software development, a need will eventually arise for custom development. Luckily, the HttpClient class allows for that. A single message handler, or a number of handlers, can be created and added in a specific order to the call stack using the HttpClientFactory.Create method.
One or more custom message handlers can be created and organized in a chain of handlers that automatically get called with every request and response. Once the message handler class is created, it can be used to perform custom operations during the call sequence. Looking at the diagram in Figure 1, the sequence begins with the client request, then continues through the chain of handlers. Once the message reaches the server, the response is sent back propagating through the chain of handlers in reverse order.
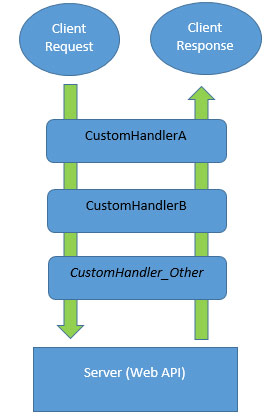 Figure 1. Message Flow for Client Request and Response
To demonstrate the custom handlers on the client, a Web API will be needed to send requests to and receive responses from. In a previous article, I demonstrated how a Web API can be created. The code used in that article will serve as the Web API for this article, with one small modification. In the Register method of the App_Start\WebApiConfig.cs file, I'll add the statement config.Formatters.Add(new JsonMediaTypeFormatter());. This will allow the Web API to format the output data in JSON format. You can see the complete code in Listing 1.
Listing 1: Contents of WebApiConfig.cs (in Web API Project) After Modification
using System.Net.Http.Formatting;
using System.Web.Http;

namespace CarInventory21
{
  public static class WebApiConfig
  {
    public static void Register(HttpConfiguration config)
    {
      // Web API configuration and services

      // Web API routes
      config.MapHttpAttributeRoutes();

      config.Routes.MapHttpRoute(
        name: "DefaultApi",
        routeTemplate: "api/{controller}/{id}",
        defaults: new { id = RouteParameter.Optional }
      );

      config.Formatters.Clear();                             // Remove all other formatters
      config.Formatters.Add(new BsonMediaTypeFormatter());   // Enable BSON in the web service
      config.Formatters.Add(new JsonMediaTypeFormatter());
    }
  }
}
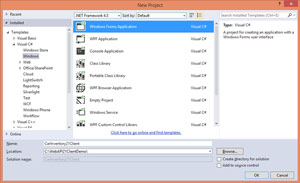
Now the Web API is ready to be used with the new client application demo. For this, I'll create a new Windows Forms application, as seen in Figure 2.
 [Click on image for larger view.]
Figure 2. Creating a Windows Forms Application As a Web API Client
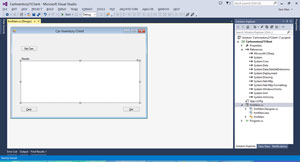
The UI for the application is kept simple for demonstration purposes, as seen in Figure 3. The demo client application is intended to run from C:\WebAPI21ClientDemo.
 [Click on image for larger view.]
Figure 3. UI for Web API Client Demo
After setting up the UI in Figure 3, I'll add the Car class to the frmMain.cs. The Car class is a model of the data received from the Web API call. It's the same model used in the Web API project. Be sure to add this after the class frmMain in the CarInventory21Client namespace of the frmMain.cs file. Otherwise, an error will be displayed when attempting to view the form designer. Here's the Car class:
public class Car
{
  public Int32 Id { get; set; }
  public Int32 Year { get; set; }
  public string Make { get; set; }
  public string Model { get; set; }
  public string Color { get; set; }
}
Next, I'll create a new custom class handler called CustomHandlerA, as seen in Listing 2. This class will also be in the CarInventory21Client namespace of the frmMain.cs file, but below frmMain class. I will explain the reason for this later.
Listing 2: The CustomHandlerA Class
class CustomHandlerA : DelegatingHandler
{
  public CustomHandlerA()
  {
  }

  protected override async Task<HttpResponseMessage> SendAsync(HttpRequestMessage request,
    CancellationToken cancellationToken)
  {
    // Add custom functionality here, before or after base.SendAsync()
    WriteLog("CustomHandlerA() - before inner handler");
    HttpResponseMessage response = await base.SendAsync(request, cancellationToken);
    WriteLog("CustomHandlerA() - after inner handler; response.StatusCode=" +
      response.StatusCode);

    return response;
  }

  public void WriteLog(string Msg)
  {
    StreamWriter sw = new StreamWriter("C:\\WebAPI21ClientDemo\\LogFile.txt", true);
    sw.WriteLine(DateTime.Now.ToString() + " " + Msg);
    sw.Close();
  }
}
The functionality of this class is minimal and kept simple for demonstration purposes. The handler simply logs a message to a log file before and after the call to the base.SendAsync method. These messages are logged to a text file using the WriteLog method.
To demonstrate the sequence of calls using multiple custom handlers during a Web API call, I'll also create CustomHandlerB. This class will have the same functionality as CustomHandlerA, but will be used to demonstrate the sequence of calls from one handler to another.
When completed, the file frmMain.cs will contain four classes used in this example:
- frmMain: class for Windows Forms functionality
- Car: Data model used for de-serializing the data received
- CustomHandlerA: class for custom HttpClient handler
- CustomHandlerB: class for custom HttpClient handler
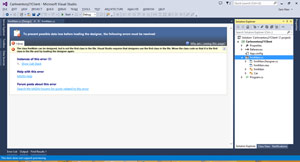
All classes will be in the CarInventory21Client namespace. Typically, the order of objects inside a file is irrelevant. However, in a Windows Forms application, the error in Figure 4 will be encountered if the Windows Forms class isn't the first class in the listing.
 [Click on image for larger view.]
Figure 4. Error Due to Form Class Not Being First in the File
The error reads: "The class frmMain can be designed, but is not the first class in the file. Visual Studio requires that designers use the first class in the file. Move the class code so that it's the first class in the file and try loading the designer again." To resolve this error, simply move the form class to the top of the namespace.
Looking at the CustomHandlerA class in more detail, first it'll inherit from System.Net.Http.DelegatingHandler. The DelegatingHandler class is a base type for HTTP handlers, delegating the processing of HTTP response messages to another handler, known as the "inner handler." To read more about this class, see the MSDN Library page, "DelegatingHandler Class."
Once the DelegatingHandler class is inherited, the SendAsync method can be overridden. This will be the method to execute custom code, before or after the call to the inner handler (base.SendAsync). The base.SendAsync is the method that sends the request to the next handler in the chain.
Looking at the event handler code for btnGet_Click in Listing 3, first the method signature was modified to return asynchronously, using the "async" keyword.
Listing 3: btnGetClick from frmMain.cs
private async void btnGet_Click(object sender, EventArgs e)
{
  CustomHandlerA chA = new CustomHandlerA();
  CustomHandlerB chB = new CustomHandlerB();
  HttpClient client = HttpClientFactory.Create(chA, chB);

  client.BaseAddress = new Uri("http://localhost:15324/");
  client.DefaultRequestHeaders.Accept.Clear();
  client.DefaultRequestHeaders.Accept.Add(
    new MediaTypeWithQualityHeaderValue("application/json"));

  HttpResponseMessage response = await client.GetAsync("api/car");
  if (response.IsSuccessStatusCode)
  {
    Car[] myCarArray = await response.Content.ReadAsAsync<Car[]>();
    foreach (Car myCar in myCarArray)
    {
      txtResults.AppendText(string.Format("{0}\t {1}\t {2}\n\n", myCar.Id, myCar.Make,
        myCar.Model));
    }
  }
}
Next, instances of the CustomHandlerA and CustomHandlerB are instantiated. Those instances are then used when creating an HttpClient object. By passing instances of the custom handlers to the Create method, I'm setting up a client object with a specific order of delegating handlers. The next three statements in the code set URI and the JSON Media type formatter.
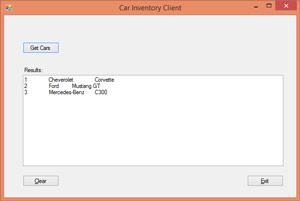
After the required properties of the client object are set, the client.GetAsync call is executed. This returns an HttpResponseMessage object containing the requested data in JSON format. The data can then be parsed from the response.Content object. The results will appear in the application window, as seen in Figure 5.
 [Click on image for larger view.]
Figure 5. Results Displayed After Calling the Web API
Looking at the contents of the log file (LogFile.txt), seen in here, you'll see the order of execution:
6/12/2014 12:07:52 PM CustomHandlerA() - before inner handler
6/12/2014 12:07:52 PM CustomHandlerB() - before inner handler
6/12/2014 12:07:52 PM CustomHandlerB() - after inner handler; response.StatusCode=OK
6/12/2014 12:07:52 PM CustomHandlerA() - after inner handler; response.StatusCode=OK
When the "Get Cars" button is clicked and the event handler eventually executes the call to client.GetAsync("api/car"), a sequence of other calls is made. First, CustomHandlerA is executed until it calls base.SendAsync. This then calls CustomHandlerB and executes until it calls base.SendAsync. Because CustomHandlerB is the last handler in the chain, it waits until the Web API returns with the results, and execution resumes up the chain. When CustomHandlerB completes, execution resumes in CustomHandlerA where it left off and runs to completion.
To better understand this, please refer back to Figure 1. In the diagram, you'll see when a message originates from the client, it proceeds through all the custom handlers before reaching the Web API. When a response message is returned from the API, execution resumes in reverse order.
Wrapping Up
Accessing Web APIs can be implemented easily using the HttpClient object. In addition, using this object allows for the use of custom HttpClient handlers. By doing so, it allows for custom functionality to be added in the chain of calls. Furthermore, multiple handlers can be added in a specific order providing more control of the placement of custom functionality when the need arises.
About the Author
Sam Nasr has been a software developer since 1995, focusing mostly on Microsoft technologies. Having achieved multiple certifications from Microsoft (MCAD, MCTS(MOSS), and MCT), Sam develops, teaches, and tours the country to present various topics in .Net Framework. He is also actively involved with the Cleveland C#/VB.Net User Group, where he has been the group leader since 2003. In addition, he also started the Cleveland WPF Users Group in June 2009, and the Cleveland .Net Study Group in August 2009, and is the INETA mentor for Ohio. When not coding, Sam loves spending time with his family and friends or volunteering at his local church. He can be reached by email at [email protected].