Code Focused
How To Take Control of Amazon Web Services from Within Your .NET Application
See how the .NET SDK uses consistent naming and patterns, making it easy to work with the myriad of Web services that AWS provides.
- By Ondrej Balas
- 12/30/2014
Amazon Web Services (AWS) provides a myriad of Web services that many developers are using as their cloud platform of choice. And while AWS provides a management portal, there's also a need for custom instrumentation that can interact with the AWS API. For that, AWS provides a powerful .NET SDK that lets developers query or modify the state of virtually every aspect of the system, and it does it in a way that is consistent across many of its offerings.
One of the most well-known of the AWS services is the Elastic Compute Cloud (EC2), an Infrastructure as a Service (IaaS) that provides virtual infrastructure within AWS datacenters. Using this service you can launch virtual machines (VMs) that are provisioned within minutes, with billing by the hour. This can be incredibly powerful for a number of reasons, especially when you can start launching or terminating those VMs from within your code. Before I dive into that code, I need to explain the components required to launch an EC2 instance.
The Components of an EC2 Instance
The first component of an EC2 instance is the AMI, or Amazon Machine Image. The AMI is a disk image that's copied to the disk of the instance when it's first created. The first time you create an instance you'll need to choose one of the hundreds of pre-existing AMIs that range from fresh OS installs to disks with preinstalled software. Some notable ones are Windows Server, Windows Server with SQL Server, many flavors of Linux, MEAN stack and LAMP stack. A complete list is available at the AWS Marketplace.
Once you've decided which AMI to base your VM on, the next thing you'll need is a security group. A security group is basically like a firewall; it contains a set of rules that allows either inbound or outbound connections on a certain port to a range of IP addresses. If using Windows you'll typically want to open inbound connections on port 3389 for Remote Desktop, as well as whichever services your VM will be running. Outbound rules can be configured, too, but by default all outbound traffic is allowed.
The final component is something called a key pair. As the name implies, a key pair has two parts: the private key and the public key. When you generate a key pair through the management console it will automatically start a download of a file named yourkeyname.pem. This is your private key and must be used to unlock instances and log into them. This works differently depending on the chosen OS, but with Windows the private key file must be provided to decrypt the Administrator password.
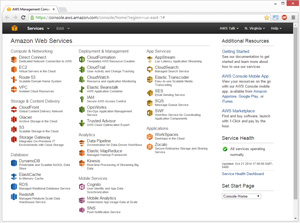
Within AWS each of these components will have a unique identifier. Because I don't usually switch out these components between the VMs I launch, I log into the AWS Management Console to get the identifiers that I'll later use in my code to launch the instances. When you first log into the AWS Management Console you'll see a list of the Web services, as shown in Figure 1.
 [Click on image for larger view.]
Figure 1. List of the Web services in the AWS Management Console
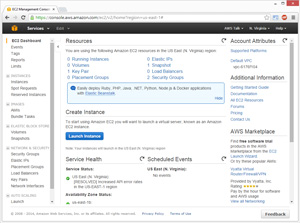
To follow along with me, choose the EC2 service, which will take you to the EC2 Dashboard shown in Figure 2.
 [Click on image for larger view.]
Figure 2. The EC2 Dashboard
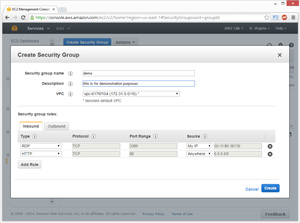
Next, select Security Groups on the left side to see a list of security groups and their identifiers, listed under the Group ID column. Here you can add security groups by adding rules as shown in Figure 3.
 [Click on image for larger view.]
Figure 3. Adding Security Groups by Adding Rules
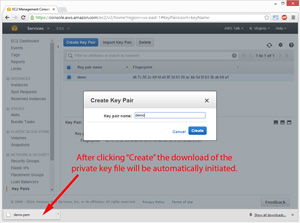
The next step is to create a key pair. Select Key Pairs on the left, choose Create Key Pair, and give it a name. Once you hit the Create button the private key file will be automatically downloaded (see Figure 4).
 [Click on image for larger view.]
Figure 4. The Create Button Will Automatically Download the Private Key
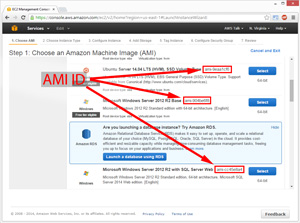
The final step is to get the AMI identifier. The first time you go through this process you won't have a custom AMI, but if you select Instances and choose Launch Instance, you'll be prompted to select an AMI. This screen has the AMI IDs for all of the public AMIs, as shown in Figure 5.
 [Click on image for larger view.]
Figure 5. AMI IDs for All of the Public AMIs
Gaining Access to the API
The final item needed to programmatically gain access to your instances is a set of credentials known as an access key and secret key (not to be mistaken with the key pair I mentioned earlier, which is unrelated).
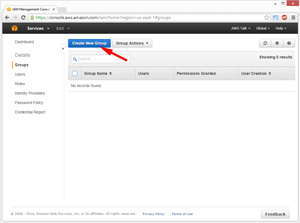
To create the access key, you'll need to go back to the main list of services displayed in Figure 1 and choose IAM. Once you're in IAM, go to the Groups page and choose Create New Group like in Figure 6.
 [Click on image for larger view.]
Figure 6. Choose Create New Group in the IAM Groups Page
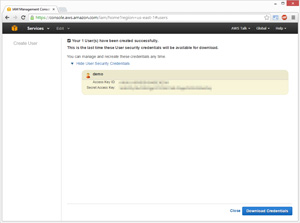
Then the site will walk you through the steps to create the group. After the group is made, go to the Users page and follow the steps to create a user. Make sure to keep the checkbox selected to "Generate an access key for each user" if you want to use that user to gain access through the API. Once the users are created you'll be brought to a confirmation page (see Figure 7) where you can see the access key and secret key, or you can download them to a CSV file.
 [Click on image for larger view.]
Figure 7. Confirmation Page Showing the Access Key and Secret Key
Once you leave this page you'll be unable to retrieve these credentials again and will have to re-create the user if you misplace them. You can then go into the new user's details page and choose Add User to Groups to add the user to the group.
Accessing Instances Programmatically
To show off how simple it is to work with the AWS SDK I'm going to show off some interactions that can be done with EC2. To get the SDK you can either download it from the AWS Resources page or get it through NuGet by searching for "AWS SDK."
The first thing I'll do is get a list of my running instances in a given region:
AWSCredentials credentials = new BasicAWSCredentials("MyAccessKey", "MySecretKey");

IAmazonEC2 client = AWSClientFactory.CreateAmazonEC2Client(credentials, RegionEndpoint.USEast1);

DescribeInstancesResponse describeInstancesResponse = client.DescribeInstances();
List<Reservation> reservations = describeInstancesResponse.Reservations;

foreach (Instance instance in reservations.SelectMany(x => x.Instances))
{
  Console.WriteLine("Instance with ID {0} is currently {1}",
    instance.InstanceId, instance.State.Name);
}
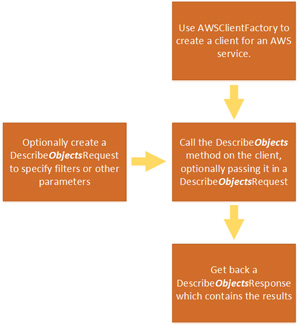
In this code, I first create a BasicAWSCredentials object, passing it the access key and secret key I generated earlier. Next, I use the AWSClientFactory to create an Amazon EC2 client, which requires the credentials object and the RegionEndpoint of the region I'm querying. Then, I call the DescribeInstances method of the client, which returns the DescribeInstancesResponse. The response object has a Reservations property, and each reservation has an Instances property. To get a list of all the instances and iterate through them I use the SelectMany LINQ query. Note that this is a common pattern when working with the SDK, and I've illustrated it in Figure 8.
 [Click on image for larger view.]
Figure 8. Listing and Iterating Through All Instances Using the SelectMany LINQ Query
As you may have guessed by the setup leading up to this, creating an instance is somewhat more complex than just listing the ones that are already running. The complete code is shown in Listing 1.
Listing 1: Create and Launch a New EC2 Instance
string amiId = "ami-904be6f8";
string securityGroupId = "sg-ab4241ce";
string keyPairName = "demo";
string instanceSize = "t2.micro";

AWSCredentials credentials = new BasicAWSCredentials("MyAccessKey", "MySecretKey");
IAmazonEC2 client = AWSClientFactory.CreateAmazonEC2Client(credentials, RegionEndpoint.USEast1);

string subnetId = client.DescribeSubnets().Subnets.First().SubnetId;
InstanceNetworkInterfaceSpecification networkSpecification = new InstanceNetworkInterfaceSpecification()
{
  DeviceIndex = 0,
  SubnetId = subnetId,
  Groups = new List<string>() { securityGroupId },
  AssociatePublicIpAddress = true
};
List<InstanceNetworkInterfaceSpecification> networkSpecifications = new List<InstanceNetworkInterfaceSpecification>() { networkSpecification };

RunInstancesRequest launchRequest = new RunInstancesRequest()
{
  ImageId = amiId,
  InstanceType = instanceSize,
  MinCount = 1,
  MaxCount = 1,
  KeyName = keyPairName,
  NetworkInterfaces = networkSpecifications
};

client.RunInstances(launchRequest);
I first defined all of the variables that I'll need right at the top: The AMI ID, security group ID and key pair name. I also included a variable to hold the instance size, which in this case is t2.micro. The full list of instance sizes can be found on the AWS site. And, as before, I had to create a credentials object and an EC2 client. The rest of the code is to fill in the requirements of the client's RunInstances method, which requires a RunInstancesRequest. And the RunInstancesRequest requires a list of InstanceNetworkInterfaceSpecifications, with one item per network interface on the VM. And because each interface must be on one of the subnets that exist within the region, I chose the ID of the first subnet returned in the DescribeSubnets method of the client.
Terminating instances is easy to do, as the only bit of data I need is the ID of the instance that I want to terminate, as shown here:
string instanceId = "i-00261cee";

AWSCredentials credentials = new BasicAWSCredentials("MyAccessKey", "MySecretKey");
IAmazonEC2 client = AWSClientFactory.CreateAmazonEC2Client(credentials, RegionEndpoint.USEast1);

TerminateInstancesRequest deleteRequest = new TerminateInstancesRequest()
{
  InstanceIds = new List<string>() { instanceId }
};

client.TerminateInstances(deleteRequest);
Wrapping Up
AWS can seem intimidating at first, especially given the sheer number of services it encompasses. I hope this article was able to give you a brief overview of EC2, the AWS IaaS offering, and also to show the common patterns that you'll encounter when working with the AWS SDK.
EC2 is one of the more complex offerings that Amazon has, so once you're able to work and interact with it, that knowledge will translate to the other services pretty well.
About the Author
Ondrej Balas owns UseTech Design, a Michigan development company focused on .NET and Microsoft technologies. Ondrej is a Microsoft MVP in Visual Studio and Development Technologies and an active contributor to the Michigan software development community. He works across many industries -- finance, healthcare, manufacturing, and logistics -- and has expertise with large data sets, algorithm design, distributed architecture, and software development practices.