Cross Platform C#
Navigation with Xamarin Forms
Xamarin Forms makes the hard work of navigation in apps from device to device a much simpler developer proposition. Here's what I've learned so far.
Xamarin Forms was released a bit more than a year ago. Since then, the product has grown, gone through rounds of features and bug fixes, and feels very much like it's ready for use in applications. And since then, mobile apps are no longer relegated to one screen. Mobile apps should work on multiple screens of functionality. And even then, users must be able to navigate between screens in a standard way. In this column, I'll look at how Xamarin Forms can be used to implement the various approaches to navigating on various devices.
Note: In early-to-mid 2014, this column featured articles on standard navigation in iOS and Android, but this column will show how to implement standard navigation with Xamarin.Forms. Also, graphics are not my specialty -- please excuse the graphics.
Page
Xamarin.Forms has an object type that's referred to as a Page. A Page is a screen of information that corresponds to a View Controller in iOS. In Android, a Page corresponds to an Activity. The first page in an application is set by the .MainPage property of the class called App. This is similar in concept to iOS setting the RootViewController property in the AppDelegate class.
Navigation Page
Rarely can applications have all of their functionality on a single screen of information. Developers need to be able to move between Xamarin.Forms pages. A stack is typically used for this type of navigation. There is a Navigation object to help with this. It is the basis for a stack of page objects that's last in, first out. Pages are pushed and popped into display. Navigation is handled by the NavigationPage object, which is similar in concept to the UINavigationController in iOS.
The following code shows the App class and setting up a NavigationPage:
public class App : Application
{
  public App()
  {
    var np = new NavigationPage(new WelcomePage());
    MainPage = np;
  }
}
To set up the NavigationPage, create a new instance and pass in an instance of a page object that the application should display. In this example, an instance of "WelcomePage" is passed in. This is similar to the UINavigationController where a UIViewController is passed into the constructor.
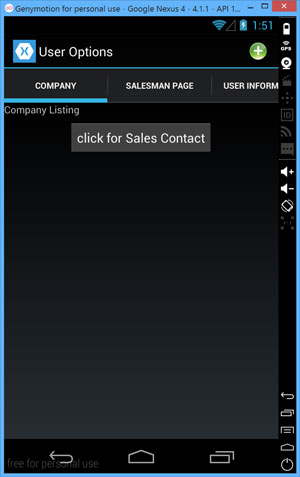
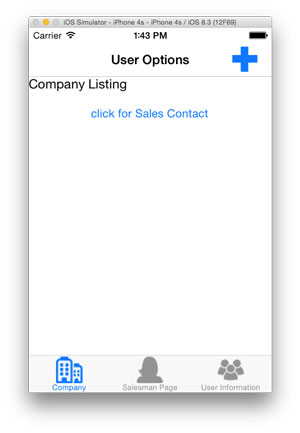
Figure 1 shows the startup screen of the application in an Android-based device. Notice that there's nothing in Android that maps directly to a NavigationPage, or UINavigationController. Figure 2 shows the startup screen of the application in iOS on an iPhone.
 [Click on image for larger view.]
Figure 1. Application Running in Android
[Click on image for larger view.]
Figure 1. Application Running in Android
 [Click on image for larger view.]
Figure 2. Same App in iOS. NavigationPage Maps to UINavigationController, So App has Familiar UINavigationController at Screen Top
[Click on image for larger view.]
Figure 2. Same App in iOS. NavigationPage Maps to UINavigationController, So App has Familiar UINavigationController at Screen Top
Tabbed Page
Next, I'll look at the "WelcomePage" class. This class is a tabbed display where the user of the application can select from one of several items. In this specific example, there are three tabs. These are company listing tab, sales assistant tab and a user information tab where the user can change between the tabs. By clicking on the tab, the user is taken to the associated Xamarin.Forms page.
The setup for the tabbed page is fairly simple, as shown in Listing 1. The specific class will inherit from the Xamarin.Forms TabbedPage class and add Children as necessary for the application. An additional item in this example is the ToolbarItem. The toolbar item is property of a page. Toolbar items can be easily added via the .Add method. In this example, a toolbar item has been added with a plus icon; when a user clicks on the icon, a message is displayed.
Listing 1: Setup of "WelcomePage" with Three Tabs
using System;
using System.Collections.Generic;
using System.Linq;
using System.Reflection.Emit;
using System.Text;
using Xamarin.Forms;

namespace XamarinFormsNavigation
{
  public class WelcomePage : TabbedPage
  {
    public WelcomePage()
    {
      Title = "User Options";
      Children.Add(new CompanyListing());
      Children.Add(new SalesmanListing());
      Children.Add(new UserInformation());

      ToolbarItem tbi = new ToolbarItem();
      tbi.Text = "Logout";
      tbi.Icon = "plus.png";
      tbi.Clicked += tbi_Clicked;
      this.ToolbarItems.Add(tbi);
    }

    void tbi_Clicked(object sender, EventArgs e)
    {
      DisplayAlert("Alert", "You have been alerted", "OK");
    }
  }
}
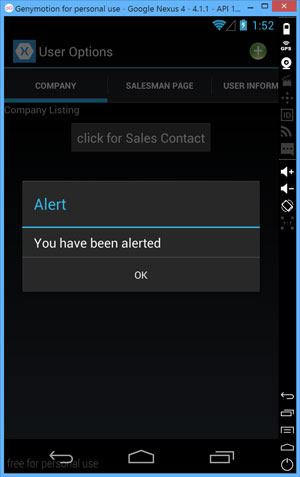
Notice that the tabbed page is shown within iOS and Android, with the text display in Android and the text and the icons display in iOS. When working with the icons, notice that they're stored within the individual platform projects. Figure 3 shows the alert dialog after the toolbaritem is tapped in Android. Figure 4 shows the same alert dialog in iOS.
 [Click on image for larger view.]
Figure 3. Alert Dialog After the User Selects Toolbaritem
[Click on image for larger view.]
Figure 3. Alert Dialog After the User Selects Toolbaritem
 [Click on image for larger view.]
Figure 4. Alert on iOS After the User Selects Toolbaritem
[Click on image for larger view.]
Figure 4. Alert on iOS After the User Selects Toolbaritem
Pushing and Popping in the Navigation Page
As mentioned previously, pushing and popping of pages on to the stack is provided via the NavigationPage object. This is done easily by using the Navigation property and calling PushAsync and PopAsync as appropriate. Listing 2, shows the code that places a button on the screen. When a click is performed on the button, a new page is loaded. In iOS, the UINavigationController loads in the new page. In Android, the new page is still loaded in, despite being within the NavigationPage.
Listing 2: Using a Button To Call PushAsync
public class CompanyListing : ContentPage
  {
    public CompanyListing()
    {
      var btn = new Button { Text = "click for Sales Contact",
                    HorizontalOptions = LayoutOptions.CenterAndExpand,
              };
      btn.Clicked += btn_Clicked;
      Content = new StackLayout
      {
        Children = {
          new Label { Text = "Company Listing" },
          btn
      }
      };
      Title = "Company";
      Icon = "company.png";
    }

    void btn_Clicked(object sender, EventArgs e)
    {
      this.Navigation.PushAsync(new SalesmanListing());
    }
  }
Wrapping Up
And that's navigation with Xamarin.Forms. The key things to remember are that the NavigationPage object is used to provide a UINavigationController experience in Xamarin.Forms, and that the Navigation property is used to Push/Pop pages onto and off of the stack. If you want to learn more about navigation, check out my two articles on navigation with Xamarin here and here.
About the Author
Wallace (Wally) B. McClure has authored books on iPhone programming with Mono/Monotouch, Android programming with Mono for Android, application architecture, ADO.NET, SQL Server and AJAX. He's a Microsoft MVP, an ASPInsider and a partner at Scalable Development Inc. He maintains a blog, and can be followed on Twitter.