Tips and Tricks
Accessing Office 365 Services via Visual Studio
Office 365 platforms keep getting better with every update, and now the Office 365 API for Visual Studio provides a great way to interact with Office 365 resources.
- By Malin De Silva
- 08/11/2015
Office 365 provides great ways to collaborate in more productive, effective and efficient manners. Office apps that were once only available from desktop machines now can be accessed from the cloud and with many types of devices in a seamless manner. As such, modern businesses need many types of applications to access the same data. Apart from the great functionality provided with Office 365, there are some customized capabilities that might be required to make the organizational work much effective.
Here's an example: While Exchange Online adds e-mail capabilities to Office 365, there are some scenarios in which the task of composing an e-mail is overkill, such as inviting a colleague to a review meeting. For a handful of employees, that's fine. But imagine a large company, where there are a large number of employees, and where usually HR would typically resort to using a fixed template for an e-mail that's sent to a number of employees up for review. Each e-mail would have an invite attached to it, which is an inefficient way to work. There are other ways to be more effective and simplify this process, and Office 365 has the tools.
A better way would be to store a list in SharePoint that contains information on the estimated timeframe for each employee's review. As employees approach their review date, a member of the HR team is sent a notification to their mobile or Web applications.
Upon clicking a "Schedule Review" button and selecting a date and inviting the reviewers, the app creates a calendar event and sends an invitation to all reviewers and employees with a predefined mail template.
This can be further extended so that reviewers can see the performance indexes of the employee. Whatever the necessary calculations, evaluations can be made and the necessary data retrieved and sent to the reviewers related to the person who is to be interviewed, which can be added to the meeting invitation. The logic and implementation can get even more complex, but making it work can be done more simply with the new Office 365 tools.
And of course this is just one example. There are many scenarios that can be helped with integrations to Office 365 APIs that can help building great applications with Visual Studio.
With that, let's create a Universal App that allows scheduling a review and sending an e-mail to the necessary employees going up for review.
Getting Started
Office 365 API tools are available with the Office Developer Tools for Visual Studio with the November 2014 update. If you have installed the one before that, you can try downloading the Office 365 API Tools from here. This will add the necessary NuGet libraries to get you going with the Office 365 API integration to Visual Studio solutions.
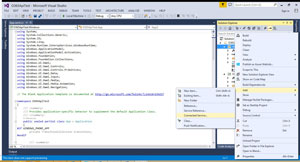
In this example, I will create a universal App and connect the Office 365 API to it. Open Visual Studio and navigate to the New Project window. Locate the Blank App (universal Apps) template. Set the name as "O365ApiTest" as shown in Figure 1 and create the solution.
 [Click on image for larger view.]
Figure 1: Creating O365ApiTest
[Click on image for larger view.]
Figure 1: Creating O365ApiTest
Now right-click on the project and select Add, then Connected Service (see Figure 2).
 [Click on image for larger view.]
Figure 2: Adding Connected Services
[Click on image for larger view.]
Figure 2: Adding Connected Services
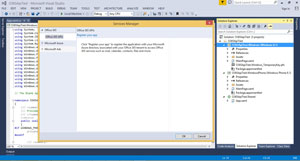
This opens The Service Manager window (Figure 3). All the available service types that can be integrated easily with Visual Studio are shown here. As you can see, I have Office 365, Microsoft Azure and Microsoft Ads available.
 [Click on image for larger view.]
Figure 3: Service Manager Window
[Click on image for larger view.]
Figure 3: Service Manager Window
Access Configuration
Now click on Register your App link and sign into Office 365 site. If you focus on the Visual Studio output window after sign-in, note the following logs printed under the General output logs:
Registering the directory application…
Registered the directory application with client id 'xxxxxxx-xxxx-xxxx-xxxx-xxxxxxxxxxxx'.
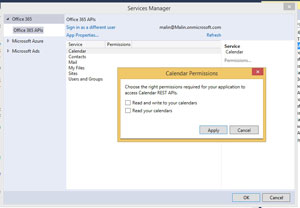
Also you will see different services become available in the middle pane with the various permission options (Figure 4).
 [Click on image for larger view.]
Figure 4: Services and Permissions
[Click on image for larger view.]
Figure 4: Services and Permissions
Here is a full list of services available under each service:
| Calendar |
- Read and write to your calendars
- Read your calendars
|
| Contacts |
- Read and write to your contacts
- Read your contacts
|
| Mail |
- Send mail as you
- Read and write to your mail
- Read your mail
|
| My Files |
- Read and write your files
- Read your files
|
| Sites |
- Run search queries
- Have full control of all site collections
- Read and write items and lists in all site collections
- Read and write items in all site collections
- Read items in all site collections
|
| Users and Groups |
- Read directory data
- Read and write directory data
- Sign you in and read your profile
- Access your organization's directory
|
You need relevant administrator access to perform following operations among these:
-
Run search queries
- Have full control of all site collections
- Read directory data
- Read and write directory data
Once you've' selected the necessary services and the operations, the required references will be added and make it ready for development.
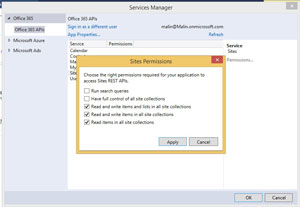
Select the following options:
-
Read and write items and lists in all site collections
-
Read and write items in all site collections
-
Read items in all site collections
Permissions are available under sites service as shown in Figure 5; click Apply.
 [Click on image for larger view.]
Figure 5: Site Service Permission
[Click on image for larger view.]
Figure 5: Site Service Permission
Then click on the OK button in the Service Manager window to add the necessary references. You will see many references added if you expand the References folder of the both Windows and Windows Phone projects.
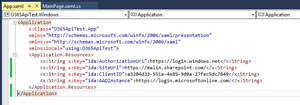
Once you registered your app, you will get a unique identifier as the app client ID. This is available with the App.xaml file of the Universal app under the application resources. This record is added to the Azure Active directory under the applications. Therefore it can be manually configured and added to the App.xaml file as well.
Install Active Directory Authentication Library
Before using the Office 365 SharePoint Online services, we need to use Azure Active Directory to authenticate the users. Right-click on the "References" folder of the Windows project and select "Manage Nuget Packages." Search under the online packages for a package named "Active Directory Authentication Library," Download and install it; this will also install the assemblies necessary to authenticate Windows Active Directory and Azure Active Directory.
After that add the Authentication url property and the site url which you expect to access to bring data in to the App.xaml file under the application resources:
<x:String x:Key="ida:AuthorizationUri">https://login.windows.net</x:String>
<x:String x:Key="ida:SiteUrl"><Your SharePoint online site url></x:String>
After the last additions, the App.xaml file should look similar to the Figure 6.
 [Click on image for larger view.]
Figure 6: App.xaml File Should Now Look Like This
[Click on image for larger view.]
Figure 6: App.xaml File Should Now Look Like This
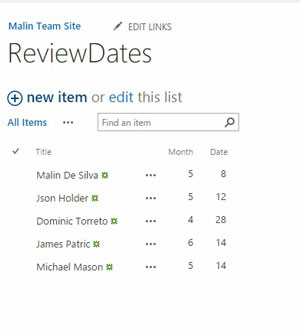
To create the Review Dates list, navigate to your Office 365 SharePoint site and create a list named "ReviewDates" with following Fields.
-
Title: The existing title field of the list where we will store the employee name.
-
Month: Number, Required
-
Date: Number, Required
Populate the list with sample data as shown in Figure 7.
 [Click on image for larger view.]
Figure 8: Populate the List with Sample Data
[Click on image for larger view.]
Figure 8: Populate the List with Sample Data
Creating Data Context Classes
Now we need to create the context data classes. Before going to the implementation of the data retrieval, I am going to create three classes that will be useful in defining the data contexts. They will be for representing the following:
-
Request: Represents the HTTP Request that will be send to query data from the REST API
-
Response: Represents the HTTP Response that will be returned from SharePoint
-
Review Date: An entity mapping to a SharePoint list item that will represent a SharePoint list Item in the "ReviewDates" list
Now select the Shared project and add the new classes in Listing 1, 2, and 3, for each and add following properties and constructors.
Listing 1: RequestItem Class
class RequestItem
    {
        public string RequestUrl { get; set; }
        public JsonObject Headers { get; set; }
        public string Body { get; set; }
        public string Method { get; set; }

        public RequestItem(Uri requestUrl, string method, JsonObject headers, string body)
        {
            this.RequestUrl = requestUrl.OriginalString;
            this.Method = method;
            this.Headers = headers;
            this.Body = body;
        }
    }
Listing 2: ResponseItem Class
class ResponseItem
    {
        public Uri ResponseUri { get; private set; }
        public JsonObject Headers { get; private set; }
        public string Body { get; private set; }
        public string Status { get; private set; }

        public ResponseItem(Uri responseUri, string status, JsonObject headers, string body)
        {
            this.ResponseUri = responseUri;
            this.Status = status;
            this.Headers = headers;
            this.Body = body;
        }
    }
Listing 3: ReviewDate Class
public class ReviewDate
    {
        public int Id { get; set; }

        public string Name { get; set; }

        public int Month { get; set; }

        public int Date { get; set; }

        public string ReviewDateString
        {
get
            {
                return this.Date + "/" + this.Month + " - " + this.Name;
            }
        }

        public ReviewDate(int id, string name, int month, int date)
        {
            this.Id = id;
            this.Name = name;
            this.Month = month;
            this.Date = date;
        }
    }
To authenticate users, first we need to add the CallBackUri property to App.xaml.cs file in order to get the authentication call back uri:
Uri CallBackUri
{
get { return WebAuthenticationBroker.GetCurrentApplicationCallbackUri(); }
}
Then add the following token to the same page that will store the access token on local storage once we retrieve one through authentication.
Now we need to get an authentication token which is specific to the Active Directory we are accessing and has a logical mapping with the client application id. That's in Listing 4.
Listing 4: AccessToken
internal static string AccessToken
{
get
       {
       	if (ApplicationData.Current.LocalSettings.Values.ContainsKey("AccessToken")
              && ApplicationData.Current.LocalSettings.Values["AccessToken"] != null)
              {
              	return ApplicationData.Current.LocalSettings.Values["AccessToken"].ToString();
               }
               else
               {
               	return null;
               }
     	}
       set
       {
       	ApplicationData.Current.LocalSettings.Values["AccessToken"] = value;
}
}
Add the GetAccessToken method in Listing 5 that returns the access token to the MainPage.xaml.cs page.
Listing 5: GetAccessToken Method
private async Task<string> GetAccessToken()
        {
            string serviceResourceUrl = App.Current.Resources["ida:SiteUrl"].ToString();
            string clientId = App.Current.Resources["ida:ClientID"].ToString();
            string returnUrl = App.Current.Resources["ida:AADInstance"].ToString();
            string commonAuthority = App.Current.Resources["ida:AuthorizationUri"].ToString() + @"/Common";

            AuthenticationContext _authenticationContext = new AuthenticationContext(commonAuthority);

            App currentApp = (App)App.Current;

            AuthenticationResult authenticationResult;

            //Try to get authenticated without prompting credentials
            authenticationResult
                = await _authenticationContext.AcquireTokenSilentAsync(serviceResourceUrl, clientId);

            if (authenticationResult.Status != AuthenticationStatus.Success)
            {
                // Try to authenticate by prompting for credentials
                authenticationResult
                    = await _authenticationContext.AcquireTokenAsync(
                    serviceResourceUrl,
                    clientId,
                    currentApp.CallBackUri);

                // Check the result of the authentication operation
                if (authenticationResult.Status != AuthenticationStatus.Success)
                {
                    return null;
                    // Something went wrong, probably the user cancelled the sign in process
                }

            }

            // Store the new acces token
            App.AccessToken = authenticationResult.AccessToken;

            return App.AccessToken;
        }
Next let's add Listing 6, which adds the functionality to read the review dates from the SharePoint list as follows in the MainPage.xaml.cs.
Listing 6: ReadReviewDates Function
private async void ReadReviewDates()
        {
            HttpWebRequest endpointRequest;

            string siteUrl = App.Current.Resources["ida:SiteUrl"].ToString();
            Uri endpointUri = new Uri(new Uri(siteUrl), "_api/web/lists/getbytitle('ReviewDates')/items");

            endpointRequest = (HttpWebRequest)HttpWebRequest.Create(endpointUri.AbsoluteUri);
            endpointRequest.Method = "GET";
            endpointRequest.Accept = "application/json;odata=verbose";
            endpointRequest.ContentType = "application/json;odata=verbose";
            endpointRequest.Headers["Authorization"] = "Bearer " + App.AccessToken;

            Stream responseStream = null;
            WebHeaderCollection responseHeaders;
            string status;
            Uri responseUri;
            string responseString = string.Empty;

            HttpWebResponse endpointResponse = (HttpWebResponse)await endpointRequest.GetResponseAsync();
            status = (int)endpointResponse.StatusCode + " - " + endpointResponse.StatusDescription;
            responseStream = endpointResponse.GetResponseStream();
            responseUri = endpointResponse.ResponseUri;
            responseHeaders = endpointResponse.Headers;

            List<ReviewDate> reviewDates = new List<ReviewDate>();

            using (StreamReader reader = new StreamReader(responseStream, Encoding.UTF8))
            {
                responseString = await reader.ReadToEndAsync();

                JObject joResponse = JObject.Parse(responseString);
                JObject ojObject = (JObject)joResponse["d"];
                JArray array = (JArray)ojObject["results"];

                foreach (JObject item in array)
                {
                    string name = item["Title"].ToString();
                    int id = int.Parse(item["Id"].ToString());
                    int month = int.Parse(item["Month"].ToString());
                    int date = int.Parse(item["Date"].ToString());

                    ReviewDate reviewDate = new ReviewDate(id, name, month, date);
                    reviewDates.Add(reviewDate);
                }
            }

            this.ReviewDatesListView.ItemsSource = reviewDates;
        }
Here, we are binding the review dates that are queried through the SharePoint list to a listview named ReviewDatesListView. It will show you an error in Visual Studio as we have not yet added the listview component to the page user interface.
Next up is connecting the reading of review dates and getting the access token. It will throw an unauthorized exception if the user is not authenticated by the time the list is read. Therefore that connection will be made with the GetReviewDates method in the MainPage.xaml.cs class:
private async void GetReviewDates()
        {
            string accessToken = await GetAccessToken();
            if (!string.IsNullOrEmpty(accessToken))
            {
                ReadReviewDates();
            }
        }
Thereafter, replace the constructor of the MainPage.xaml.cs with following. Adding the method call to the constructor is not the best practice, but will be sufficient to get our functionality done quicker and easier:
public MainPage()
        {
            this.InitializeComponent();
            this.GetReviewDates();
        }
If you prefer not to add the method call to the constructor, you can choose the PageLoaded method equivalent in the Universal Apps depending on the Windows or Windows Phone platform.
What is left is adding the listview element to the MainPage.xaml page. Navigate to the MainPage.xaml page where the user interface is designed and replace the Grid element, the descendent of the Page element at the top with following stackpanel element and its content inside:
<StackPanel>
        <ListView Name="ReviewDatesListView" >
            <ListView.ItemTemplate>
                <DataTemplate>
                    <StackPanel Orientation="Horizontal" >
                        <TextBlock Text="{Binding ReviewDateString}" />
                    </StackPanel>
                </DataTemplate>
            </ListView.ItemTemplate>
        </ListView>
    </StackPanel>
The functionality implementation for the example is now complete. To make sure the Windows App stays as the starter project, run it in Simulator.
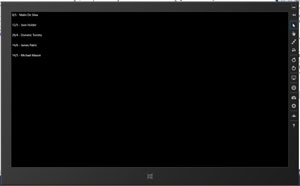
If you have defined the correct site url and logged in with a user who has necessary permission to that site, you would be able to see the list of users with their review dates as shown in Figure 8.
 [Click on image for larger view.]
Figure 8: User and Review Dates Now Listed
[Click on image for larger view.]
Figure 8: User and Review Dates Now Listed
You can modify the date range you require to query the list by passing the parameters through the request url. Now you can integrate many native behaviors that comes with Universal apps and improve your functionality.
So if you want the same functionality as it is for the Windows Phone, simply drag and drop the MainPage.xaml file to the Shared project and delete the ones exist in both Windows and Windows Phone projects. You will be able to see the functionality same as you saw in the Windows simulator.
Mobile Office
As you can see the Office 365 APIs are exposed as REST services. They are authenticated through the Azure Active Directory Single Sign-on. They get specified as different SDKs for Windows, iOS and Android for the different SDKs while exposing a REST API by default. There is so much potential for building custom functionality.
And the ability to integrate with native smart devices is a huge additional advantages of having offline accessibility, location-centric features, reminders and many more. If you haven't yet tried out these great capabilities and the rich set of features, sign up for a free Office 365 evaluation license for one month and start building apps today.