Cross Platform C#
How To Programmatically Customize iOS Keyboards with C#
Developers will always look to customize everything, and keyboards aren't out of bounds. Here's how to customize the iOS keyboard that pops up in your mobile apps to address any shortcomings.
Nearly all applications require that users interact with your app via a keyboard. It could be a search bar, a text field, or something else -- users typically use the keyboard in some way for input. iOS comes with different types of keyboards that can solve just about any need, but there are times when some additional feature would be great. In Google's Gmail app for iOS, for instance, maybe you'd like to make things a bit easier by adding e-mail addresses for .net, .org, and other domain suffixes. This article will look at how to modify the existing iOS Keyboard to better fit the needs of the application.
Built-in Keyboards
To speed up data input in an iOS application, the iOS operating system has several keyboards that can be used. Different text controls on a screen can display different keyboards as necessary to optimize the users' input. This is handled by the .KeyboardType property. The keyboard property allows a program to get the current keyboard value as well as set the desired keyboard value. The getter/setter property accepts an enum value. The KeyboardType property accepts values based on the UIKeyboardType enum. The allowed values of the UIKeyboardType enum are:
-
ASCIICapable. This keyboard displays the standard ASCII characters.
-
DecimalPad. This keyboard displays numeric values as well as the decimal point.
-
Default. This is the default keyboard.
-
EmailAddress. This keyboard is optimized for inputting e-mail addresses. It contains the @ symbol as well as numbers and punctuation.
-
NamePhonePad. This keyboard provides access to characters and numbers.
-
NumberPad. This keyboard specifically displays numbers.
-
NumbersAndPunctuation. This keyboard provides access to numbers and punctuation.
-
PhonePad. This keyboard provides access to numbers, #, *, "pause", and "'wait."
-
Twitter. This keyboard provides access to common Twitter characters, numbers, and punctuation as well as the twitter @ and # symbols.
-
URL. This keyboard is optimized for Web-based URLs, with characters, numbers, punctuation, period, slash, and ".com" keys.
-
WebSearch. This keyboard is optimized with keys for doing a general web search.
Along with the keyboards, there are additional properties for the UITextField:
AdjustsFontSizeToFitWidth. This property adjusts the font size to fit text as necessary.
-
Appearance. This property controls the appearance style of the keyboard.
-
Capitalization. This property determines whether or not to capitalize words, sentences, or all input.
-
Clear Button. This property determines when to display the clear button.
- The clear button can be hidden, permanently visible, or shown.
-
Correction. This property determines whether or not spell checking is enabled.
-
Placeholder. This property will determine if some text is displayed when the text field has nothing in it. This property is used to explain to the user the data that is expected.
-
MinimumFontSize. This property will set the minimum font size to be used. This is used with the AdjustsFontSizeToFitWidth property.
-
Secure. This property will determine whether or not the input is masked. This is useful for passwords and other secure input.
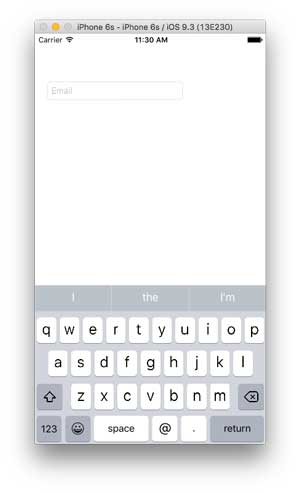
By modifying the settings in the UI controls, it is possible to provide the user with an optimized experience. Let's look at a few keyboard examples. Figure 1 shows the e-mail optimized keyboard being set as the preferred keyboard on an iPhone 6S simulator.
 [Click on image for larger view.]
Figure 1: iPhone 6S Simulator with E-Mail-Optimized Keyboard
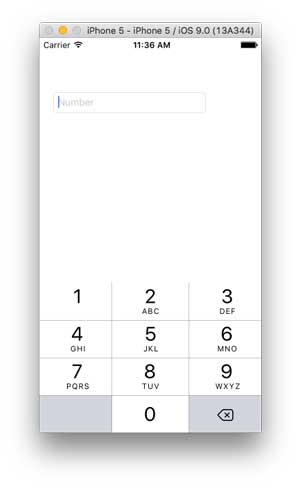
Figure 2 shows the numeric keypad being set as the keyboard on an iPhone 5 simulator. Both of these examples were created using a storyboard, and the values were set in the UITextField's keyboard properties. The benefit to the user is that the keyboard that is displayed is optimized for the data that is being input. This makes the time the user spends in your application shorter and ultimately makes the user's life easier.
 [Click on image for larger view.]
Figure 2: iPhone 5 Simulator with Numeric Keypad
Customizing the Keyboard
Providing the user with a customized keyboard definitely helps them with input. Input on a mobile device with a virtual keyboard is challenging, to say the least. What happens when it is necessary to provide additional functionality? What if, for example, an application is designed for e-mail and the developer wants to provide a quick way to add a top-level domain name? In this example, the user needs to easily add ".com", ".net", ".org", or ".gov" to the end of their e-mail. It's time to look at some code. In Listing 1, the basic items to note are:
-
Create a UIToolbar object. In this example, the UIToolbar is created programmatically.
-
Assign an array of UIBarButtonItems to the toolbar's Items property.
-
Finally, assign the toolbar to the UITextField's InputAccessoryView property.
With these simple steps, the user can now receive a customized keyboard instead of the default E-mail keyboard.
Listing 1: Code for Default E-Mail Keyboard
UIToolbar toolbar;
public override void ViewDidLoad ()
{
     base.ViewDidLoad ();
     toolbar = new UIToolbar(new CoreGraphics.CGRect(new nfloat(0.0f), new nfloat(0.0f), this.View.Frame.Size.Width, new nfloat(44.0f)));
     toolbar.TintColor = UIColor.White;
     toolbar.BarStyle = UIBarStyle.Black;
     toolbar.Translucent = true;
     var myButton = new UIBarButtonItem ("TLDs",
          UIBarButtonItemStyle.Bordered, AddTLD );
     toolbar.Items = new UIBarButtonItem[]{
          myButton,
          new UIBarButtonItem(".com",
               UIBarButtonItemStyle.Plain, AddTLD),
          new UIBarButtonItem(".net",
               UIBarButtonItemStyle.Plain, AddTLD),
          new UIBarButtonItem(".org",
               UIBarButtonItemStyle.Plain, AddTLD),
          new UIBarButtonItem(UIBarButtonSystemItem.FlexibleSpace),
          new UIBarButtonItem(UIBarButtonSystemItem.Done, delegate {
               this.ExampleTextField.ResignFirstResponder();
          })
     };
     ExampleTextField.KeyboardAppearance = UIKeyboardAppearance.Default;
     ExampleTextField.InputAccessoryView = toolbar;
}

public override void DidReceiveMemoryWarning ()
{
     base.DidReceiveMemoryWarning ();
     // Release any cached data, images, etc that aren't in use.
}
private void AddTLD(object sender, EventArgs e)
{
    if (sender == null)
    {
        return;
    }
    var txt = ((UIBarButtonItem)sender).Title;
	if ((txt.Length > 0) && (txt.IndexOf (".") == 0)) {
		ExampleTextField.Text = String.Format ("{0}{1}", ExampleTextField.Text, txt);
	}
}
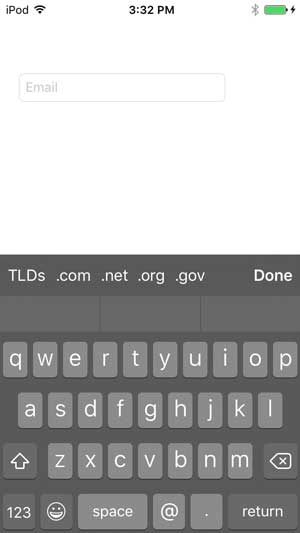
Figure 3 shows the TLD toolbar running in the iOS e-mail optimized iOS keyboard. This image is taken from an iPod running iOS 9.3.
 [Click on image for larger view.]
Figure 3: iPod with iOS 9.3 Running E-Mail-Optimized Keyboard
What About an Exclusive Keyboard?
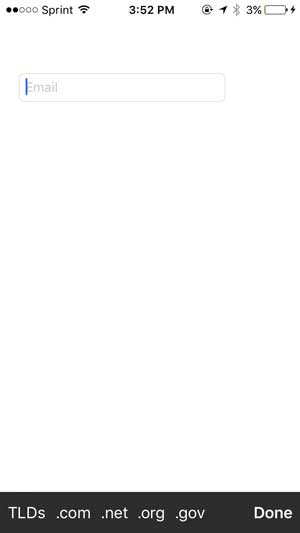
There may be situations where having a very specific keyboard is of value. This can be done using all of the existing code shown in Listing 1. The only difference is that instead of assigning the toolbar to the InputAccessoryView, the toolbar should be assigned to the InputView. The result of that one change is shown in Figure 4.
 [Click on image for larger view.]
Figure 4: Default Keyboard, with Different Toolbar
Getting Your Input
It is fairly easily to customize the keyboard. In this article, we have discussed providing one of the built-in optimized keyboards, customizing an existing keyboard, and providing an exclusive keyboard in an application. These optimizations allow users to get in and out of an application quickly. They can input their data and get back to their business.
References
Many thanks go out to Nish Anil of Xamarin for his assistance; you can find the information that I found helpful here.
Apple's documentation on customizing the keyboard is here.
About the Author
Wallace (Wally) B. McClure has authored books on iPhone programming with Mono/Monotouch, Android programming with Mono for Android, application architecture, ADO.NET, SQL Server and AJAX. He's a Microsoft MVP, an ASPInsider and a partner at Scalable Development Inc. He maintains a blog, and can be followed on Twitter.