In-Depth
Building onto the AWS Cloud with Visual Studio
Amazon offers solutions specifically for Visual Studio developers who want to start deploying services on its cloud. Here's a guide to do it with minimal effort and all it takes is digging into the AWS Toolkit for Visual Studio.
As cloud services and offerings become ever more ubiquitous, enterprises are bound to move among the cloud offerings available, and that's a good thing for those involved in DevOps decisionmaking. It could be pricing, manageability, service availability and reliability, compliance, and a whole host of other reasons. Some companies facilitate the migration process much more easily than others. Amazon is one, which provides a streamlined option for Visual Studio developers who want to move deployments on its Amazon Web Services.
The beauty of Amazon's solution comes in the form of the AWS Toolkit for Visual Studio, a simple and elegant solution. Here, I'll explain how to deploy this tool and how to attach Visual Studio to your AWS subscription.
Prerequisite Components
There are some prerequisites that must be adhered to when connecting Visual Studio to AWS, but these prerequisites are very straightforward, and most developers probably won't have any trouble meeting them.
The first two requirements, of course, are an AWS account and a copy of Visual Studio. The AWS Toolkit supports the use of Visual Studio 2010 and higher. The one caveat to this second requirement is that although Visual Studio Express is supported, its capabilities are very limited. Visual Studio Express does not allow for the use of third-party extensions. This means that those who are using Visual Studio Express will only be able to work with AWS project templates and the standalone deployment tools.
The final requirement is that Visual Studio must be installed onto a supported operating system. Amazon supports the use of Windows Vista, Windows 7, and Windows 8. The AWS documentation does not mention Windows 10, so one can only assume that Windows 10 is not officially supported as of the writing of this article. Even so, Windows 10 was used in writing this article (along with Visual Studio 2015), and all seems to work.
Deploying The AWS Toolkit for Visual Studio
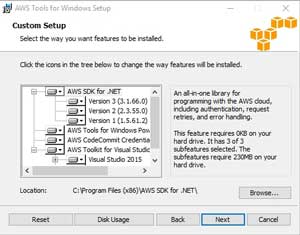
Amazon makes the AWS Toolkit for Visual Studio available for download at http://aws.amazon.com/visualstudio/. The installation process consists of working through a relatively standard Windows Setup wizard. When the wizard begins, click Next to clear the Welcome screen. You will now see a screen prompting you to accept the terms of the license agreement. After doing so, click Next again, and you will be taken to the screen shown in Figure 1, which asks you which components you wish to install. You should use the default selections, unless you have a compelling reason to choose a different subset of features to install. Click Next, followed by Install to install the AWS Toolkit for Visual Studio. When the installation process completes, click Finish.
 [Click on image for larger view.]
Figure 1: The AWS Tools for Windows Setup Wizard Asks Which Components You Wish to Install
[Click on image for larger view.]
Figure 1: The AWS Tools for Windows Setup Wizard Asks Which Components You Wish to Install
Creating an IAM Account
In order for Visual Studio to gain access to AWS resources, it must be able to authenticate into the AWS cloud. In order to do so, you will need to provide the AWS Tool for Visual Studio with a set of credentials that it can use to access AWS. Although the AWS root account can be used for this purpose, doing so would constitute a significant security risk. As such, Amazon recommends that you create an IAM user instead, and use the credentials that are associated with the IAM account.
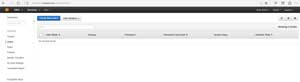
To create an IAM account, you will need to log into the AWS cloud and go to https://console.aws.amazon.com/iam/home#home. Next, select the Users tab, as shown in Figure 2, and click on the Create New User button.
 [Click on image for larger view.]
Figure 2: Select the Users container and Click on the Create New User Button
[Click on image for larger view.]
Figure 2: Select the Users container and Click on the Create New User Button
You will now be prompted to enter a name for each user account that you want to create. Enter a name for your new IAM account into the space provided. Make sure that the Generate an Access Key for Each User checkbox is selected, and click Create. Upon doing so, you should see a message telling you that your user account has been created successfully. Now, click on the link to show the user security credentials. As an alternative, there is a button that you can click to download the credentials. Regardless of which method you use, you will need to know the account's credentials in order to associate the account with the AWS Toolkit for Visual Studio.
Downloading the credentials is often the preferred option, because doing so allows you to copy and paste the credentials on an as needed basis. The credentials consist of a user name, an access key ID, and a secret access key. If you choose the download option, the credentials will be downloaded to a CSV file.
Creating a New Group
It is generally advisable to control permissions at the group level, rather than attempting to assign permissions to an individual user account. As such, you should create a group, add the applicable permissions, and then join your IAM account to the group.
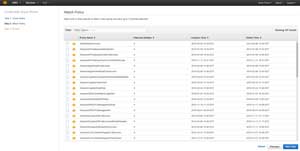
To create a group, return to the main dashboard screen and click on the Groups tab, shown in Figure 2. Next, click on the Create New Group button. When you do, you will be prompted to enter a name for the group. Enter a group name, and click on the Next Step button. At this point, you will be taken to a screen that prompts you to choose one or more policies to assign to the group, as shown in Figure 3. Ideally, you should choose the policy that best matches the level of access that will be required by your IAM account. If you are unsure of which policy to choose, then try the AdministratorAccess policy. When you have made your selection, click the Next Step button.
 [Click on image for larger view.]
Figure 3: Choose the Policy Name That Corresponds to the Level of Access that your IAM Account Requires
[Click on image for larger view.]
Figure 3: Choose the Policy Name That Corresponds to the Level of Access that your IAM Account Requires
At this point, the interface will show you a Review screen, detailing the group that you are about to create. Take a moment to verify that the information that is shown on this screen is correct, and then click on the Create Group button.
Once AWS finishes creating the group, you must add your IAM account to the group. To do so, return to the Groups tab. You should see your newly created group listed on the tab. Click on the group that you just created to access the group's Summary screen. Now, make sure that the Group's Users tab is selected, and click on the Add Users to Group button. The console will now display all of the user accounts that you have created within the AWS environment. Select the checkbox corresponding to the IAM user account, and then click on the Add Users button. The account will now be added to the group.
Linking the IAM Account to the AWS Toolkit for Visual Studio
Now it's time to connect your IAM account to the AWS Toolkit for Visual Studio. Begin the process by launching Visual Studio. Next, go to the View menu and choose the AWS Explorer option, as shown in Figure 4. This option was added to the view menu by the Setup wizard that you completed earlier.
 [Click on image for larger view.]
Figure 4: Choose the AWS Explorer Option from Visual Studio's View Menu
[Click on image for larger view.]
Figure 4: Choose the AWS Explorer Option from Visual Studio's View Menu
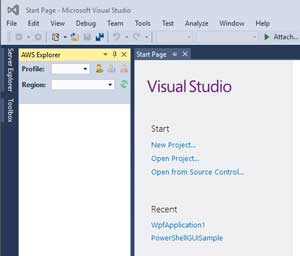
The next thing that you will need to do is to create a new account profile. If you look at Figure 5, you will notice a Profile field, with three icons to the right of it. The left most of these three icons is the New Account Profile button. Click this button to access the New Account Profile dialog box.
 [Click on image for larger view.]
Figure 5: Click on the New Account Profile Icon
[Click on image for larger view.]
Figure 5: Click on the New Account Profile Icon
In case you are wondering, the reason why it is necessary to create a profile is because Visual Studio treats each set of credentials as a profile. Hence, any time that you need to provide Visual Studio with a set of credentials, it will be necessary to create a new profile. Each profile is bound to a single set of credentials, and the credentials are encrypted and stored in Visual Studio's SDK Store.
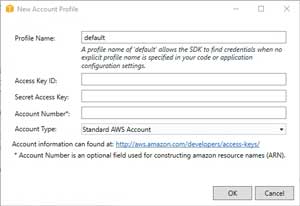
Creating a profile for an AWS subscription is a relatively straightforward process. You can see what the New Account Profile dialog box looks like in Figure 6. As you can see in the figure, there are several pieces of information that you will have to provide.
 [Click on image for larger view.]
Figure 6: New Account Profile Dialog
[Click on image for larger view.]
Figure 6: New Account Profile Dialog
The first thing that you will have to do is to assign a name to the new profile. Visual Studio uses the name "default" by default (as shown in Figure 6), but it is a good idea to use a more descriptive name. After all, you never know when it may become necessary to create additional profiles. If you do use multiple profiles, then it will be important to be able to tell them apart.
The next two pieces of information that you will need to provide are the Access Key ID and the Secret Access Key. You can get both of these from the CSV file that you downloaded after creating the IAM account.
The next bit of information that you will need to provide is an account number. Technically, the account number is optional, but it is still a good idea to include it, because the account number is used in the construction of Amazon Resource Names (ARNs).
You can find your account number by opening the AWS dashboard, clicking on your name (in the upper, right corner), and then clicking on My Account. The Account Settings screen lists an Account ID. This is your account number.
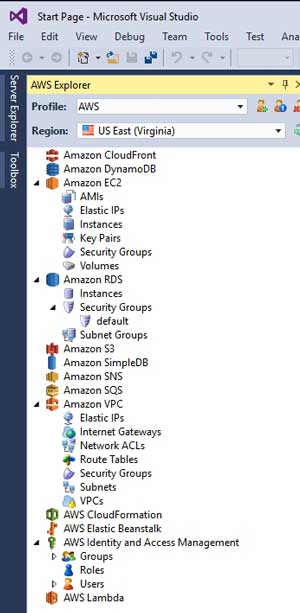
Once you have entered all of the required information, click OK. When you do, you will see the toolbox contents updated to reflect AWS connectivity. If you look at Figure 7 for example, you can see that the currently selected profile is AWS (AWS is the name that I assigned to the profile that I created). The Region field allows you to select your current geographic region. It is worth noting that this setting might not be correct by default, so you may need to manually select your region. Finally, the Toolbox contains a number of AWS related items, such as Amazon S3, Amazon Lambda, and Amazon EC2.
 [Click on image for larger view.]
Figure 7: The Toolbox Shows a Variety of Amazon Services
[Click on image for larger view.]
Figure 7: The Toolbox Shows a Variety of Amazon Services
The methods used for interacting with the various tools vary somewhat from one tool to the next. In some cases, it is possible to click on a tool to reveal an interface that is related to that tool. For example, if you were to expand the Amazon EC2 container and click on Volumes, then the EBS Volumes interface would be displayed. This interface contains buttons for performing tasks such as creating and deleting volumes, creating snapshots, and refreshing the display. It is worth noting that these options are displayed on a tab. Clicking on additional containers may result in additional tabs being added to the screen, although not every container has a corresponding tab,
Containers that do not contain tabs do not appear to do anything when clicked. However, right clicking on this container reveals an option to create a bucket. Some of the other containers also provide right click functionality.
Up In Your Cloud
Working in an AWS environment does not necessarily mean that developers have to give up the tools that they use on a day to day basis. Visual Studio can be linked to AWS with relative ease. In fact, the entire process can be completed in a matter of a few minutes.
About the Author
Brien Posey is a 22-time Microsoft MVP with decades of IT experience. As a freelance writer, Posey has written thousands of articles and contributed to several dozen books on a wide variety of IT topics. Prior to going freelance, Posey was a CIO for a national chain of hospitals and health care facilities. He has also served as a network administrator for some of the country's largest insurance companies and for the Department of Defense at Fort Knox. In addition to his continued work in IT, Posey has spent the last several years actively training as a commercial scientist-astronaut candidate in preparation to fly on a mission to study polar mesospheric clouds from space. You can follow his spaceflight training on his Web site.