In-Depth
Solving UWP App-to-App Communication in IoT Apps
Writing Universal Windows Platform (UWP) apps that rely on inter-process communication is actually easy. Debugging and making them fault-tolerant is the tricky part, but it can be done with the AppServiceConnection for UWP and IoT Apps.
- By Lee Richardson
- 02/27/2017
Communicating between apps on the Universal Windows Platform (UWP) may seem obscure for desktop, Xbox or HoloLens apps, but it turns out to be extremely useful for Internet of Things (IoT) apps where you are likely to architect your solution into multiple, independent micro-esque services. Unfortunately, app services -- the solution to UWP inter-process communication -- are hard to debug, poorly documented, and tricky to make robust and fault tolerant.
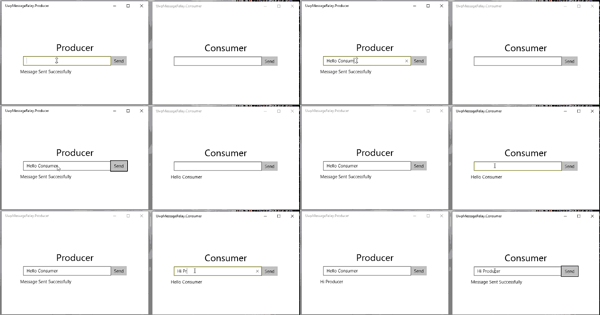
Here, I'll provide a relatively hardened solution for communicating between multiple UWP processes. My solution (see Figure 1) and this article are geared toward a Windows IoT platform (for example, Raspberry Pi), but it works fine for desktop UWP apps and probably any other UWP app, as well.
 [Click on image for larger view.]
Figure 1. Sample UWPMessageRelay App
I'll walk through the problem, describe a high-level architecture, explain some of the key points of the solution, then leave comments in the associated GitHub project for anyone needing more details.
A Piece of the Pi
Imagine you want to build an app on a single-board computer such as a Raspberry Pi that has multiple services (a sort of microservices architecture). One of these services might be an always-on headless app, such as a temperature or humidity monitor (or perhaps a CI server monitor).
Another headless component might spin up a Web server to provide an admin console. The Web server should be a purely optional component so users in less-secure environments can turn it off to reduce attack surface (if only all IoT device manufacturers took this view).
A third component might be a GUI app designed to display live sensor data via HDMI to a projector or monitor. Like the Web server, it also might get turned off to conserve resources.
Now, imagine you need these components to communicate between each other and gracefully handle the case where any one of them is spun up or spun down. Fortunately, this is exactly the solution that app services solve.
App Service Types
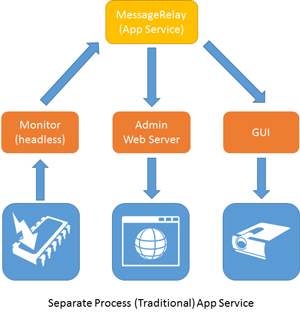
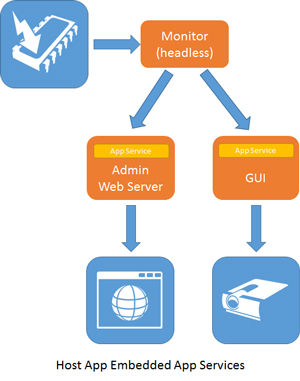
There are two types of app services: those that live in their own process (as shown in Figure 2), and --new as of Windows 10 Anniversary update (1607) -- those that live in a host app (see Figure 3).
 [Click on image for larger view.]
Figure 2. App Service Living In Its Own Process
 [Click on image for larger view.]
Figure 3. App Service Living In a Host App
The peer-to-peer nature of the host app kind of app service may sound appealing due to its simplicity, but it would be inappropriate for this scenario. For one thing, anyone who initiates a message must have a single destination for their message. In other words, it isn't possible to have a producer send a message to any consumers that might be around and turned on. Furthermore, messages sent to a specific process wakes up the destination process, which you don't want.
The traditional app service living in its own process is ideal for scenarios where you need more control such as the broadcast-based message system. Having a dedicated process allows you to actively track new connections, re-broadcast out to all live connections excluding the sender and prune dead connections. You could even incorporate additional security measures, or add specific types of messages such as peer-to-peer or sub-groups.
App Services 101
To create an app service, start with a background app and modify it slightly. If you've installed the Windows IoT Core Project Templates (see "Getting Started with Windows IoT and Raspberry Pi") then you can find "Background Application" in the Windows IoT Core folder of File | New Project. The result is Figure 4.
 [Click on image for larger view.]
Figure 4. Background App from Windows IoT Core Project Template
Next, modify the element of Package.appxmanifest like this:
<Extensions>
  <uap:Extension Category="windows.appService"
    EntryPoint="UwpMessageRelay.MessageRelay.StartupTask">
    <uap:AppService Name="UwpMessageRelayService" />
  </uap:Extension>
</Extensions>
The relevant attributes are:
- Category="windows.appService" -- This says you want this application to be of type AppService (as opposed to the original "windows.backgroundTasks" value, as this should be a headless background service).
- EntryPoint -- The namespace and class name of an IBackgroundTask. Both background tasks and app services use an IBackgroundTask interface, so the pre-generated StartupTask is sufficient, no need to change that here.
- Name -- Any unique name, this will be required by anyone wishing to send messages to this service via an AppServiceConnection (as you'll see in "Instantiating Background Services," later).
The final, fault tolerant, version of StartupTask that acts as a message relay is too much code to describe in detail, but the key parts are:
public sealed class StartupTask : IBackgroundTask
{
  private Guid _thisConnectionGuid;
  private static readonly Dictionary<Guid, AppServiceConnection> Connections =
    new Dictionary<Guid, AppServiceConnection>();
StartupTask is like a traditional IoT background application with the exception that it gets instantiated every time any client creates an AppServiceConnection and connects. Consequently, static variables get shared between every instance of every connection, and fields and properties get instantiated once per connection.
The MessageRelayService project exploits this to store a per-connection unique identifier in a field and then store every incoming connection in a static dictionary of identifiers and connections.
Run
A Run method is required by the IBackgroundTask interface:
public async void Run(IBackgroundTaskInstance taskInstance)
{
  _thisConnectionGuid = Guid.NewGuid();
  var triggerDetails = (AppServiceTriggerDetails)taskInstance.TriggerDetails;
  var connection = triggerDetails.AppServiceConnection;
  Connections.Add(_thisConnectionGuid, connection);
  connection.RequestReceived += ConnectionRequestReceived;
  ...
Like a StartupTask constructor it gets called every time a client tries to connect. However, it receives a taskInstance, which is of type AppServiceTriggerDetails. This allows it to access the incoming connection via taskInstance.TriggerDetails.AppServiceConnection. When you store this connection in a static variable, the StartupTask may send messages to it at any time in the future.
RequestReceived
The RequestReceived event in Listing 1 fires every time a sender sends a message.
Listing 1: RequestReceived Event
private async void ConnectionRequestReceived(AppServiceConnection sender, AppServiceRequestReceivedEventArgs args)
{
  // Take out a deferral since we use await
  var appServiceDeferral = args.GetDeferral();
  try
  {
    foreach (var connection in Connections)
    {
      await SendMessage(connection, args.Request.Message);
    }
  }
  finally
  {
    appServiceDeferral.Complete();
  }
}
When this occurs the relay service simply iterates through outstanding connections (optionally excluding its own) and relays the message back to them in a SendMessage function that looks roughly like this:
var result = await connection.Value.SendMessageAsync(valueSet);
if (result.Status == AppServiceResponseStatus.Failure)
{
  RemoveConnection(connection.Key);
  return;
}
If the resulting status is Failure, the message probably failed to send because the service was turned off (for example, someone terminated the service). In this case, you remove the connection from the static list of connections so you don't keep re-sending to a dead endpoint.
Instantiating AppServiceConnection
UWP UI or background apps can send and receive messages with a service like MessageRelayService that manages an underlying AppServiceConnection. AppServiceConnection is designed for sending and receiving messages to UWP app services (in this case to and from the UwpMessageRelayService).
To receive messages MessageRelayService should be a singleton, and should get started once, on startup. Startup for a UI app would be in App.xaml, like this:
public App()
{
  ...
  LeavingBackground += OnLeavingBackground;
}

private async void OnLeavingBackground(object sender,
  LeavingBackgroundEventArgs leavingBackgroundEventArgs)
{
  await _connection.Open();
}
The Open call uses a memoization pattern but ultimately travels down to a MakeConnection method that creates an AppServiceConnection:
private async Task<AppServiceConnection> MakeConnection()
{
  var appServiceName = "UwpMessageRelayService";
  var listing = await AppServiceCatalog.FindAppServiceProvidersAsync(appServiceName);
  var packageName = listing[0].PackageFamilyName;
  var connection = new AppServiceConnection
  {
    AppServiceName = appServiceName,
    PackageFamilyName = packageName
  };
  await connection.OpenAsync();
  return connection;
}
AppServiceConnection requires the name of the app service as defined in the Package.appxmanifest, from which it can extract a package name and then call OpenAsync.
Receiving Messages
Once an AppServiceConnection exists and has been opened, then receiving events looks very much like what we saw in the StartupTask:
_connection.RequestReceived += ConnectionOnRequestReceived;

private void ConnectionOnRequestReceived(AppServiceConnection sender,
  AppServiceRequestReceivedEventArgs args)
{
  var appServiceDeferral = args.GetDeferral();
  try
  {
    ValueSet valueSet = args.Request.Message;
    OnMessageReceived?.Invoke(valueSet);
  }
  finally
  {
    appServiceDeferral.Complete();
  }
}
Retrieving the deferral and calling .Complete within a finally block is important if there is any asynchronous work to be performed.
Sending Messages
Sending messages also looks very like what we saw in StartupTask:
private async Task SendMessageAsync(KeyValuePair<string, object> keyValuePair)
{
  var connection = await CachedConnection();
  var result = await connection.SendMessageAsync(new ValueSet { keyValuePair });
  if (result.Status == AppServiceResponseStatus.Success)
  {
    return;
  }
  ...
}
Just like before, checking the result for Success will ensure that the destination process hasn't been shut down.
Deploying
Deploying an app service is not what you'd expect. Neither F5 (Start Debugging) nor anything related work with app services. Instead, you must right-click on the project, select Deploy and sort of trust that it worked.
If you want to debug, it's possible via Project Properties | Debug tab | change Start action to Do not launch, but debug your code when it starts. Now you can hit F5 and breakpoints will get hit.
What's Left To Say
Those are the main elements of a sample message relay service. While I've glossed over some of the details of the solution that handle services going down, error recovery and so on, I hope you've seen enough to be able to dig into the details.
If the details do interest you I strongly encourage you to download the source from GitHub, run the app, try turning on and off various services while sending messages, and then to copy and paste with reckless abandon (in particular StartupTask and MessageRelayService). All code is MIT licensed.
I hope this helped explain how to share data between UWP services. As always, please comment here, submit pull requests for any issues in the code, or tweet me with any questions.
About the Author
Lee Richardson is the author of Siren of Shame, a USB siren currently monitoring continuous integration builds in more than 300 companies in 28 countries. He has contributed dozens of technical articles to various Web sites since 2006, and blogs regularly at LeeRichardson.com. He has worked in software development in the Washington, D.C., area for two decades and speaks at user groups and conferences. Lee is a senior developer at InfernoRed where he builds cross-platform iOS and Android applications for the banking industry with Xamarin. Follow Lee on Twitter @lprichar.