Practical ASP.NET
Writing Precompiled Azure Functions in Visual Studio 2017
See how the latest version of Visual Studio 2017 can be used to create Azure Functions using familiar development tools and techniques.
- By Jason Roberts
- 10/12/2017
With the latest releases of Visual Studio 2017 and associated tools, it’s now possible to create Azure Functions from within the IDE using the same techniques (such as unit testing) as other types of .NET projects.
With this newest iteration of Azure Functions, not only is the developer workflow more familiar, but cold start function execution performance is also improved.
Once the latest version of Visual Studio 2017 has been installed, the next step is to ensure the Azure Functions and Web Jobs Tools extension is installed and updated as Figure 1 shows.
 [Click on image for larger view.]
Figure 1. Azure Functions and Web Jobs Tools Installed in Visual Studio 2017
Once everything is installed and up-to-date, a new Azure Functions project can be created in Visual Studio -- this project template can be found under the Cloud section in the New Project dialog window.
Once the new project is created, you can right-click and add a new function as Figure 2 demonstrates.
 [Click on image for larger view.]
Figure 2. Adding a New Function Item to the Project
In this example the default name Function1.cs will be used. The actual name of the function isn’t tightly coupled to the class name.
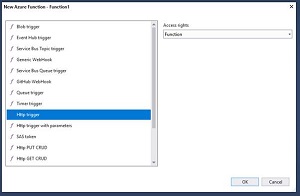
Clicking Add will open a new dialog that allows the choice of template for the creation of the new function (see Figure 3).
 [Click on image for larger view.]
Figure 3. Choosing a Function Template Type
In Figure 3 an HTTP-triggered function has been selected. Clicking OK will create the Function1.cs file with the default code shown in Listing 1.
Listing 1: Default HTTP-Triggered Function Code
using System.Linq;
using System.Net;
using System.Net.Http;
using System.Threading.Tasks;
using Microsoft.Azure.WebJobs;
using Microsoft.Azure.WebJobs.Extensions.Http;
using Microsoft.Azure.WebJobs.Host;

namespace MathFunctions
{
  public static class Function1
  {
    [FunctionName("Function1")]
    public static async Task<HttpResponseMessage> Run([HttpTrigger(AuthorizationLevel.Function, "get", "post", Route =
  null)]HttpRequestMessage req, TraceWriter log)
    {
      log.Info("C# HTTP trigger function processed a request.");

      // parse query parameter
      string name = req.GetQueryNameValuePairs()
        .FirstOrDefault(q => string.Compare(q.Key, "name", true) == 0)
        .Value;

      // Get request body
      dynamic data = await req.Content.ReadAsAsync<object>();

      // Set name to query string or body data
      name = name ?? data?.name;

      return name == null
        ? req.CreateResponse(HttpStatusCode.BadRequest,
          "Please pass a name on the query string or in the request body")
          : req.CreateResponse(HttpStatusCode.OK, "Hello " + name);
    }
  }
}
In Listing 1 the [FunctionName] attribute is used to name the function. This can be different; for example, it could be changed to [FunctionName("Add")]. Also note the use of the [HttpTrigger] trigger attribute on the req parameter. Unlike previous versions of Azure Functions, in the code-first/precompiled method, attributes are used to configure bindings rather than a function.json configuration file. Using the HttpTrigger attribute, the function authorization level can be configured along with the HTTP verbs that will be allowed -- along with any custom routing.
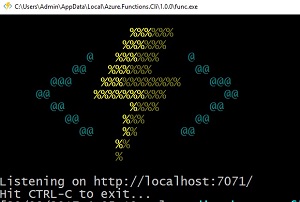
Running the project will fire up the local Azure Functions runtime environment and host the functions contained in the project. Notice in Figure 4 the local runtime is "Listening on http://localhost:7071/."
 [Click on image for larger view.]
Figure 4. Local Functions Runtime
Now that the local runtime is up and running, an HTTP request can be sent to the function at the URL http://localhost:7071/api/Add?name=Sarah. Sending this request will return the result "Hello Sarah."
As an example, the function code could be changed to that in Listing 2. The request http://localhost:7071/api/Add?number1=3&number2=8 could now be sent, which would return the response "The sum is 11."
Listing 2: Modified Function Code
using System.Linq;
using System.Net;
using System.Net.Http;
using Microsoft.Azure.WebJobs;
using Microsoft.Azure.WebJobs.Extensions.Http;
using Microsoft.Azure.WebJobs.Host;

namespace MathFunctions
{
  public static class Function1
  {
    [FunctionName("Add")]
    public static HttpResponseMessage Run(
      [HttpTrigger(AuthorizationLevel.Function, "get", "post", Route =
        null)]HttpRequestMessage req,
        TraceWriter log)
    {
      log.Info("C# HTTP trigger function processed a request.");

      try
      {
        var numbersToAdd = ParseQueryStringParams(req);

        int sum = numbersToAdd.number1 + numbersToAdd.number2;

        return req.CreateResponse(HttpStatusCode.OK, $"The sum is {sum}");
      }
      catch
      {
        return req.CreateResponse(HttpStatusCode.BadRequest,
          "Please ensure number1 and number2 are being passed as query string parameters");
      }

    }

    private static (int number1, int number2) ParseQueryStringParams(HttpRequestMessage req)
    {
      return
      (
          int.Parse(req.GetQueryNameValuePairs().FirstOrDefault(q =>
            string.Compare(q.Key, "number1", true) == 0).Value),
          int.Parse(req.GetQueryNameValuePairs().FirstOrDefault(q =>
            string.Compare(q.Key, "number2", true) == 0).Value)
      );
    }
  }
}
Once the function is working correctly locally, it can be published to Azure to make it available to users. This can be done by right-clicking the project, choosing Publish and following the publishing wizard.
The ability to now create Azure Functions as normal projects in Visual Studio makes the development experience more familiar to existing .NET developers. It also means that standard testing tools and libraries can be employed to test function code in the same way as other .NET project types.