Mobile Corner
Windows Phone 7: Building a YouTube Search App
New VSM columnist Nick Randolph kicks off his Mobile Corner column by showing how to build a YouTube search app using Visual Studio 2010 and Expression Blend.
- By Nick Randolph
- 04/01/2011
Welcome to a brand-new column dedicated to Windows Phone 7 development. In the coming months we'll step through the major features of the latest mobile platform from Microsoft. You'll learn how to work with both Visual Studio 2010 and Expression Blend 4 to develop and design applications for Windows Phone 7.
The best place to go to get started building Windows Phone 7 applications and games is here. From this site, the first things you'll need are the Windows Phone Developer Tools -- follow the link on the main page to download and install the latest release. If you don't already have either Visual Studio or Expression Blend, the installer will download and install the Express versions of these tools.
Let's get right to it with a quick example application -- a YouTube search application -- that offers a 10,000-foot view of designing and developing a Windows Phone 7 program. Because you'll be switching between Visual Studio and Expression Blend, I'll note the when we move to a different tool by placing either [Visual Studio 2010] or [Blend] in front of the paragraph where discussion of the new tool starts. This will indicate which application you should work in.
Before we get started, you'll need to ensure you have the necessary tools. Go to create.msdn.com and follow the link to download the free tools. If you already have the professional versions of Visual Studio or Expression Blend, this will install the SDK components into these products. Alternatively, as I've already mentioned, if you don't have one of these products, an Express version will be installed for use in building Windows Phone 7 applications.
Designing the Search Application
[Visual Studio 2010] To get started building a Windows Phone 7 application, open Visual Studio and select File | New | Project. This will open the New Project dialog where you can select the Windows Phone Application project template. Give the project a name, YouTubeSearch, and click OK to proceed.
You'll most likely see the first page of your application displayed in the designer, along with the corresponding XAML. I'm not a fan of the Visual Studio Designer, so I've chosen to always open XAML files in XAML-only mode. If you want this to be your default, just check the "Always open documents in full XAML view" option in the Options dialog (Tools | Options menu item, followed by selecting the Text Editor | XAML | Miscellaneous node on the tree). Rather than trying to guess what the page looks like while you edit XAML, open Expression Blend by right-clicking the YouTubeSearch project node in the Solution Explorer tool window and selecting "Open in Expression Blend."
[Blend] You'll notice that the application starts with a default Windows Phone 7 look, which includes the application title and the name of the page. Select each of these TextBlock elements by clicking them in the designer, and change the Text property in the Properties tool window to match Figure 1.
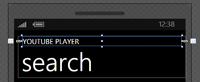
[Click on image for larger view.] |
| Figure 1. The TextBox design in Expression Blend. |
Next, add a TextBox to accept user search terms, a Button to submit the search and a ListBox to display the search results. Each of these can be found in the Assets tool window. You can either expand out the tree on the right of this tool window, or you can type the name of the control you want to locate in the search box at the top of the tool.
Find, select and drag a TextBox, a Button and a ListBox onto the design surface. Arrange the controls so that they make good use of the screen real estate (you can see an example of a layout in Figure 2). The Background of the ListBox has been set to a solid color, #33FFFFFF, so that it can be seen against the Background of the application. You'll also notice that the Text property of the TextBox has been cleared and that the Content property of the Button has been set to Search. The controls have also been given names so that they can be referenced from code: SearchText, SearchButton and ResultsList, respectively.

[Click on image for larger view.] |
| Figure 2. The basic layout. |
The only design work that's left is to specify how each of the search result elements will appear in the ListBox. This is done by altering the ItemTemplate for the ListBox. Rather than doing this blindly and guessing at how the search results will appear, you can create and use sample data within Blend. From the Data tool window, select "New Sample Data ..." from the drop-down menu.
Give the new sample data a name, YouTubeSampleData, and uncheck the "Enable sample data when application is running" option, as you'll be using real search results at run time. Clicking OK will create some initial sample data that consists of a property called Collection that exposes an array of objects with two properties: Property1, which is a String, and Property2, which is a bool. Double-click each of these elements to change the property name, and click the down arrow on the far right of each property to change the property type. Each of the array items has a property, a Title that's a string, and another property called VideoImageUrl that's an Image. The Location attribute of the VideoImageUrl property has been set to a folder that contains a number of images. These images will be used to populate the sample data.
Now that you have some sample data to work with, it's just a matter of dragging the SearchResults node from the Data tool window onto the ListBox in the designer. As you drag this node across you should see a prompt indicate that Blend will be data binding the ItemsSource property of the ListBox with the SearchResults property. Complete the data binding by releasing the drag while hovering over the ListBox.
You should now have a list that contains alternating text and images, where each pair represents an item in the list. To improve the layout, right-click on the ListBox in the designer and select Edit Additional Templates | Edit Generated Items (ItemTemplate) | Edit Current. If you look in the Objects and Timeline tool window you can now see that the ItemTemplate is made up of a StackPanel in which there's a TextBlock and an Image control. In this case we want to use a Grid instead of a StackPanel, so right-click the StackPanel and select Change Layout Type | Grid. This will allow you to rearrange the TextBlock and Image so that they're alongside each other.
Each change you make in the designer is modifying the XAML file for the page you're editing. To view the XAML that's being generated, change the layout of the document area to Split View. Select Active Document View | Split View from the View menu. Now, as you select different elements in the design area, you'll notice that the corresponding item is highlighted in the XAML area. The XAML for the ItemTemplate should be similar to the following:
<phone:PhoneApplicationPage.Resources>
  <DataTemplate x:Key="SearchResultsItemTemplate">
    <Grid Margin="0,0,0,30">
      <TextBlock Text="{Binding Title}" VerticalAlignment="Top"
         HorizontalAlignment="Left" Width="355" Margin="100,0,0,0" TextWrapping="Wrap"/>
      <Image Source="{Binding VideoImageUrl}" HorizontalAlignment="Left" Width="100"
         Height="100" Stretch="UniformToFill"/>
    </Grid>
  </DataTemplate>
</phone:PhoneApplicationPage.Resources>
The last change we'll make is to increase the size of the font in the TextBlock. Rather than explicitly setting the font size, we'll make use of the built-in styles that are available to all Windows Phone 7 applications. Right-click the TextBlock in the Objects and Timeline window and select Edit Style | Apply Resource | PhoneTextLargeStyle.
G
[Visual Studio 2010] With the design of the page complete, it's time to head back to Visual Studio and add the logic that will perform the search. In the MainPage.xaml file, locate the XAML that defines the button and add an event handler for the Click event:
<Button x:Name="SearchButton" Content="Search" HorizontalAlignment="Right" VerticalAlignment="Top" Click="SearchButton_Click"/>
Right-click in the middle of the text "SearchButton_Click" and select Navigate to Event Handler. This will open the MainPage.xaml.cs file and create the event handler, SearchButton_Click. YouTube exposes a REST API that can be used to search for videos. In this case you're going to search for videos that contain the text typed into the TextBox, and you're going to restrict the search to videos that are supplied in MP4 format (format=6). The following code uses an instance of the WebClient class to download the XML search results:
private void SearchButton_Click(object sender, RoutedEventArgs e){
  var wc = new WebClient();
  wc.DownloadStringCompleted += DownloadStringCompleted;
  var searchUri = string.Format(
    "http://gdata.youtube.com/feeds/api/videos?q={0}&format=6",
    HttpUtility.UrlEncode(SearchText.Text));
  wc.DownloadStringAsync(new Uri(searchUri));
}
Before writing the logic to handle the XML search result, you're going to need an object model that will represent each search result. You'll parse the XML search result into an array of these objects, which in turn can be connected to the ListBox you designed earlier. The following YouTubeVideo class exposes both the Title and VideoImageUrl properties that match the sample data created previously:
public class YouTubeVideo{
  public string Title { get; set; }
  public string VideoImageUrl { get; set; }
  public string VideoId { get; set; }
}
[Visual Studio 2010] Now all that remains is to parse the XML search results. To use XLinq to parse the XML, you'll need to add a reference to System.Xml.Linq (select Add Reference from the Project menu). The following code parses out an array of YouTubeVideo objects from the XML search results; it then applies this to the ItemsSource property of the ResultsList ListBox:
void DownloadStringCompleted(object sender, DownloadStringCompletedEventArgs e)
{
  var atomns = XNamespace.Get("http://www.w3.org/2005/Atom");
  var medians = XNamespace.Get("http://search.yahoo.com/mrss/");
  var xml = XElement.Parse(e.Result);
  var videos = (
    from entry in xml.Descendants(atomns.GetName("entry"))
    select new YouTubeVideo{
      VideoId = entry.Element(atomns.GetName("id")).Value,
      VideoImageUrl = (
        from thumbnail in entry.Descendants(medians.GetName("thumbnail"))
        where thumbnail.Attribute("height").Value == "240"
        select thumbnail.Attribute("url").Value).FirstOrDefault(),
      Title = entry.Element(atomns.GetName("title")).Value}).ToArray();
  ResultsList.ItemsSource = videos;
}
From the drop-down in the Standard toolbar, select either Windows Phone 7 Device, if you have an actual Windows Phone 7 device to debug on, or Windows Phone 7 Emulator. Press F5 or click the Start Debugging button on the Standard toolbar to run the project. After entering a search term and clicking the Search button you should see results populate the ListBox, as shown in Figure 3.
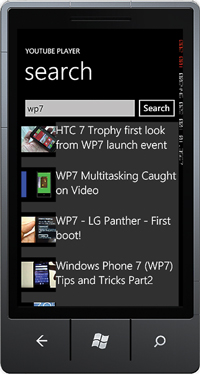
[Click on image for larger view.] |
| Figure 3. The YouTube search results. |
Ready for Launch
The last thing to do is to launch the YouTube video when the user taps on one of the items in the ListBox. To do this you need to wire up an event handler to the SelectionChanged event on the ListBox. Open MainPage.xaml and locate the XAML for the ListBox. Update the XAML to include the SelectionChanged event handler, as shown in the following code:
<ListBox x:Name="ResultsList" Margin="0,76,0,0" Background="#33FFFFFF" ItemTemplate="{StaticResource SearchResultsItemTemplate}" ItemsSource="{Binding SearchResults}" SelectionChanged="VideoListSelectionChanged" />
Right-click in the middle of the VideoListSelectionChanged text and select Navigate to Event Handler. Update the event handler with the following code, which strips out the video identifier from the VideoId and combines it with the vnd.youtube protocol prefix:
private void VideoListSelectionChanged(object sender, SelectionChangedEventArgs e)
{
  var video = ResultsList.SelectedItem as YouTubeVideo;
  if (video != null){
    var parsed = video.VideoId.Split('/');
    var id = parsed[parsed.Length - 1];
    var playbackUrl = "vnd.youtube:" + id;

    var task = new WebBrowserTask { URL = playbackUrl };
    task.Show();
  }
}
The last part of this code uses the WebBrowserTask to launch the YouTube video in the YouTube application on the device. Actually, what happens is that Internet Explorer is launched and it attempts to load the supplied URL, which in this case starts with vnd.youtube. Internet Explorer realizes that this isn't a protocol it can handle, so it passes it off to the OS, which knows to load it in the YouTube application. Run the application again and you'll notice that Internet Explorer appears briefly before YouTube is launched and the video is played.
The first time you run this you'll be prompted to download and install the YouTube application from the Windows Marketplace. Unfortunately, the emulator doesn't support installing applications from the Windows Marketplace, requiring an actual device in order to see the video play.
This has been a whirlwind tour of a Windows Phone 7 project. Hopefully you'll join me in the coming months as we dive deeper into this exciting space. Also, watch the Visual Studio Magazine Web site, where I'll be writing frequent columns about building better Windows Phone 7 applications and games.
About the Author
Nick Randolph runs Built to Roam, a consulting company that specializes in training, mentoring and assisting other companies build mobile applications. With a heritage in rich client applications for both the desktop and a variety of mobile platforms, Nick currently presents, writes and educates on the Windows Phone platform.