Inside TFS
Team Foundation Version Control - Workspaces
Mickey explains the basics of workspaces in Team Foundation Version Control and how they can help you manage code changes.
When working with Team Foundation Version Control, one of the concepts you need to understand is the workspace. Team Foundation Version Control stores your code, but when you begin to make changes to the code, those changes have to happen on your local machine. The code files need to be checked out from TFS to a local area on your computer. A "workspace" in TFS defines where the code resides locally.
In essence, a workspace is a folder, or multiple folders, mapped to areas in TFS. When code is checked out of TFS, the code is stored locally based off your workspace mappings. When you make changes to your code files, you are making those changes locally, to the files contained in your workspace.
One of the main reasons for workspaces is isolation. It provides a private sandbox where code changes can be made without having to worry if the changes will affect other team members. The changes remain in the local workspace until are checked into TFS.
TFS was designed to allow for one or more workspaces on the same machine. A single workspace can be created that contains multiple team projects and their code, or a more targeted workspace that only contains a particular project. There is no hard and fast rule for the best way to create workspaces. It will depend on personal preference, methodology, environment and the like.
Create a Workspace
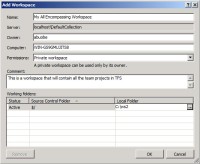
Creating a workspace involves mapping local folders to Team Foundation Version Control folders. To get started, open Visual Studio 2010 and select File | Source Control | Workspaces. This will open the Manage Workspaces window, where you can control the settings of all the workspaces on the machine. To create a new workspace, click the Add button. This opens the Add Workspace window, shown in Figure 1.

[Click on image for larger view.] |
| Figure 1. The Add Workspace window |
Every workspace has a name, which is used to identify the workspace. As you can see from Figure 1, workspaces are tied to a Team Project Collection, so you cannot create a workspace that spans multiple project collections. Workspaces can span multiple Team Projects in a single Team Project Collection though. Workspaces are also tied to a computer and a user, which makes sense, since a workspace is a user's personal sandbox on a specific machine.
One of the new features with workspaces in TFS 2010 was the addition of permissions. There are three types of workspace permissions:
- Private workspace
- Public workspace (limited)
- Public workspace
A private workspace is the default. This is how the previous versions of TFS have implemented workspaces. Essentially, it locks the workspace down to where it can only be used by its owner. If a user tries to use the workspace of another user that is marked private, they will receive an error message.
There are some development shops that want users to be able to share the same workspace. To allow for this, TFS 2010 implemented public workspaces. The Public workspace (limited) allows the workspace to be used by a valid TFS user, but they do not have check-in or administrative privileges. The Public workspace, on the other hand, is a fully functional workspace where users can check files in and out, as well as administer the workspace.
Workspaces contain local folders that are mapped to Team Foundation Version Control folders. A workspace can contain just one folder mapping, as shown in Figure 1, or multiple folder mappings. A majority of the time, a workspace contains 1-2 folder mappings. In Figure 1, I've mapped the root of the team project collection (shown as "$/") to a folder on the local machine ("c:\ws2"). This means that, when I am working with this workspace, any team project in this collection that I work with will have its contents stored locally in the c:\ws2 folder on my machine.
Notice that a workspace folder mapping has a Status field. There are two potential values: Active and Cloaked. Active indicates that a workspace mapping should be used, and that files should be synchronized between TFS and the local workspace. When you cloak a folder though, you are telling TFS to exclude that folder from certain tasks, such as adding new files and getting files.
Cloaking provides a way to cut down on the number of files retrieved and used from TFS. For example, you may have a workspace mapping for a team project. As part of that team project you may be storing binary files, which you don't need in your local workspace, in a folder in that project. You could create a second folder mapping to the location of those binary files, and mark that folder as cloaked. The next time you synch your workspace, it will get all the files from the team project, except for those binary files.
Workspaces are an important concept to understand to utilize Team Foundation Version Control. How they will be configured should be taken into account to ensure all team members are using workspaces in an effective and consistent manner.
About the Author
Mickey Gousset spends his days as a principal consultant for Infront Consulting Group. Gousset is lead author of "Professional Application Lifecycle Management with Visual Studio 2012" (Wrox, 2012) and frequents the speaker circuit singing the praises of ALM and DevOps. He also blogs at ALM Rocks!. Gousset is one of the original Team System/ALM MVPs and has held the award since 2005.