Mono for Android
Databinding a ListView with Mono for Android
How do we as developers present data to a user? In Android, we use the ListView in its various forms.
The world lives on data. Data is all around us and in many forms: salespeople need to know what customers have spent; twitter users want to know what their friends are saying. How do we as developers present data to a user? In Android, we use the ListView in its various forms. In this article, we'll look at using a ListView, how we can work with it, then discuss what we need to do to overcome some of the challenges in a mobile environment.
The Mobile Environment
Let's think for a moment about the world of mobile. Mobile, by definition, means that an application is going to have to communicate over some type of wireless connection. Wireless networks, whether it's a wi-fi connection backed up by a dedicated high-speed connection or an edge, 3G or 4G connection provided by a major cell provider, all increase the time required for data to be sent and to arrive; thus, a request takes longer. Just by being mobile, any connection will take longer than sitting in your office with several megabits per second plugged directly into a 1 gigabit connection.
And on the Android platform, there's the added overhead of a watchdog timer built in. If an application becomes unresponsive after a set amount of time, usually 10-20 seconds, Android closes the application.
With an awareness of the particular challenges of mobile, let's think through a request for data, such as Twitter. You first make an HTTP Web request. That request gets routed to the Twitter API; the request is processed; some data is returned; the data is processed in the device; and, finally, it's displayed on the screen. Even on a good day, that request can take some time.
How can developers resolve this issue? What happens if there's some type of hiccup in the network connection during the request? Should the application just quit working? Thankfully, Mono for Android supports threading, asynchronous operations, .NET tasks, and all the C#/.NET Framework features that developers are used to. We can use these features to make a remote request and be a good citizen on the device so that our application doesn't incur the ire of the watchdog timer.
What is a ListActivity?
First, some background. In Android, UI applications are typically based on an activity. There are several activities optimized for various operations. When working with a ListView, a developer can continue to use an activity, or use an activity a little more optimized for the ListView. This optimized activity is called a ListActivity.
A ListActivity has a default layout consisting of a single, full-screen list in the center of a screen. For this article, we'll be using an Activity. However, it's important to know that a ListActivity exists and can be used as well. For more coverage of other Activities in Android, please check out my book on Mono for Android listed in the resources at the end of this article.
Data Formats
The .NET world primarily uses WSDL, SOAP and XML as the various standards necessary to make a Web services connection. This isn't true in the mobile world. Mobile applications tend to use Representational State Transfer (REST)-based Web services and Javascript Object Notation (JSON). I'm not going to get into the pros and cons of these choices; I just want to recognize that this is the general trend.
Mono for Android provides support for calling REST-based services and JSON data. The REST-based services are handled via the .NET WebRequest object that many .NET developers are familiar with. What about JSON? There is no System.Json in the .NET 4 Framework. Thankfully, Microsoft included a System.Json namespace to provide support for processing data in JSON in Silverlight. Because the .NET Client profile that Mono for Android (MfA) (and MonoTouch (MT)) implements is closely aligned with Silverlight, this namespace is included in MfA and MT. (Note: System.Json was added to .NET 4.5.)
This example code demonstrates how a request is made to the Twitter Search API, processes a request, and gets data back in a JSON format. Listing 1 shows how to make a request:
Now that we have made a request, let's look at processing the request, as shown in Listing 2.
Some things to note in the code:
- The standard Begin/End asynchronous call pattern will be familiar to .NET developers.
- System.Json is used to iterate through the values and get the necessary data returned.
- Because this is an asynchronous call, any calls that effect the user interface must be called from the UI thread, to fill UI controls from within the async result. This is accomplished by the RunOnUIThread method. Attempting to make a change to a UI element from a background thread can result in nothing changing in the UI element to the application crashing.
Displaying Data
Now that we have some data, we need to put it into a displayable format. In the .NET world, there are a variety of tables and grid controls that can be used. Unfortunately, those controls are all designed for a relatively widescreen, 20-plus-inch monitor.
Android has developers covered with the ListView. The ListView is a view group that displays a list of scrollable items (in the .NET world, it's a container). These items are automatically inserted into the list using an Adapter. It's the Adapter's job to pull content from a data source and convert each item into a view displayed in the list.
First off, let's look at the types of built-in row views that can be used. Android contains four default row views:
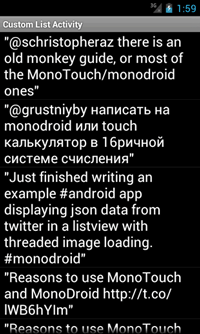
- SimpleListItem1 has one TextView within each row. This is shown in Figure 1.
[Click on image for larger view.] |
| Figure 1. A SimpleListItem, with one TextView per row. |
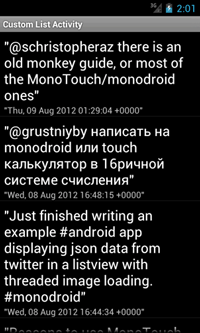
- SimpleListItem2 has two TextViews within it. In this example, each cell has a TextView that contains the text of a tweet and a TextView that contains a date of that tweet. This is shown in Figure 2.
[Click on image for larger view.] |
| Figure 2. SimpleListItem2, which has two TextViews. |
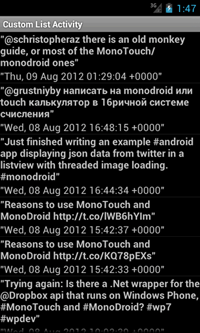
- TwoLineListItem is similar to SimpleListItem2, with some slightly different default formatting. Once again, there are two TextViews. One TextView control is used to hold a tweet, and the other TextView holds the date of the posting of that tweet, as shown in Figure 3.
[Click on image for larger view.] |
| Figure 3. TwoLineListIem, with slightly different formatting than SimpleListItem2. |
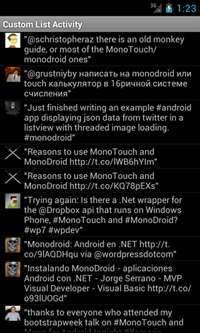
- ActivityListItem is a more more visually appealing default binding. The ActivityListItem contains an ImageView on the left-hand side of the screen and a TextView to the right of the ImageView. In this example, the ImageView is used to hold the avatar of the tweeter and the TextView contains the content of the tweet. This is shown in Figure 4.
[Click on image for larger view.] |
| Figure 4. ActivityListItem contains an image. |
Each one of these can be created within a custom adapter, which is in charge of binding your data, via a similar call to this one:
var view = context.LayoutInflater.Inflate(Android.Resource.Layout.SimpleListItem2, null);
The next obvious question is how to reference the display controls within each layout format. The display controls within each layout can be found via a reference to:
- Android.Resource.Id.Text1. This is the first/top text displayed to a user.
- Android.Resource.id.Text2. This is the second/bottom text displayed to a user.
- Android.Resource.Id.Icon. This is the image that will be displayed to a user.
Note: If the view that the program is binding against does not contain the UI widget, then a null reference exception will most likely occur in code at some place.
If you're familiar with programming in iOS, a developer can provide a hint that there are more options in a UITableView. This is called an accessory. Android has similar concepts, which are:
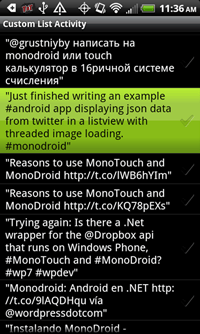
- Android.Resource.Layout.SimpleListItemChecked. While the checkboxes don't show up very well in Figure 5, they show up much better on the device.
[Click on image for larger view.] |
| Figure 5. The SimpleListItem with the Checked option. |
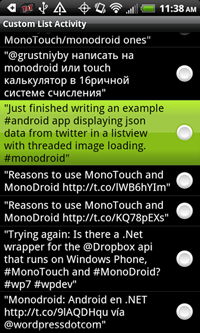
- Android.Resource.Layout.SimpleListItemSingleChoice. In this layout, the radio buttons are displayed in each row. This is shown in Figure 6.
[Click on image for larger view.] |
| Figure 6. SimpleListItemSingleChoice, displaying a radio button. |
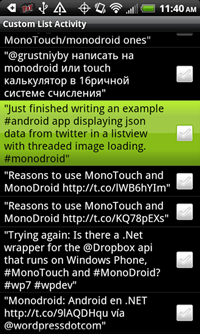
- Android.Resource.Layout.SimpleListitemMultipleChoice. In this layout, the checkboxes are displayed in each row. This is shown in Figure 7.
[Click on image for larger view.] |
| Figure 7. The SimpleListItemMultipleChoice, with a checkbox in each row. |
Listing 3 shows the override of GetView to handle the display of the records. In this code, the display of the records will be in a single list item and will have a checkbox.
Here's what you need to know to interact with an item in a ListView.
- The following code can be used to select element 1:
listView.SetItemChecked(1, true);
- To detect single selections:
FindViewById<ListView>(Android.Resource.Id.List).CheckedItemPosition
- To detect multiple selections:
var items = FindViewById<ListView>(Android.Resource.Id.List).CheckedItemPositions;
for (var i = 0; i < items.Size(); i++ ){
// do something with items.KeyAt(i) and items.ValueAt(i)
}
Custom Layout
What happens if one of the built-in layouts doesn't work for the application, and more control is needed? Have no fear -- Android has the ability to use custom layouts. Developers can then design a layout and use it within their ListView.
Let's take a look at the layout for a custom ListView. This ListView file is called tweet.axml and is stored within an application's Resource\Layout folder. The source code for the layout is shown in Listing 4.
Within the layout, developers should note several things:
- The master LinearLayout orientation is horizontal. By default, a LinearLayout's orientation is horizontal.
- The ImageView will be on the left-hand side, and will be used to display the poster's Twitter image.
- Text will be displayed to the right of the ImageView. The text will be displayed within two TextViews, and will have the tweet on the top and the date on the bottom. The text is contained within a LinearLayout that's vertically oriented.
The GetView method is shown as part of Listing 5. Within the GetView method, there are several things to notice:
- The layout for a single record is contained in Resource.Layout.tweet. The setup is slightly different from the built-in layouts in that there's a test to determine if a layout already exists and is being reused. This helps a little bit with memory reuse.
- The calls to get a reference to the various TextViews and ImageViews are fairly standard. Because the existing containing layout already exists, a call to FindViewById is within the layout.
- The text is assigned to each TextView fairly easily by setting the .Text property.
- Regarding the ImageView, you should notice that it's not filled directly within the same thread setting the values. The reason is that downloading images across a wireless network on the UI thread will result in jerk scrolling of the ListView and may cause the application to get shut down by the watchdog timer.
To resolve this, a ThreadPool thread is spun up, and the image is downloaded on this background thread. While this example uses a ThreadPool thread, other background operations can be used as well.
- What should happen if a program has to download the same image more than once? Don't download it twice: pull it out of a local cache of images. Remember, bandwidth is precious. Pulling an image down once is much better than pulling it down twice. It sounds like a small thing, but if you're in Las Vegas (3G is horrible in Vegas across all providers) and want to see an Instagram image of your friend from home, pulling the image from a local cache and showing it to a user five seconds quicker can mean the difference between a happy and not-so-happy customer.
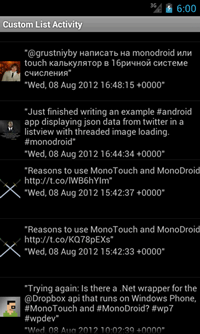
Listing 5 results in the output in Figure 8.
[Click on image for larger view.] |
| Figure 8. The result of using GetView(). |
Selecting a Row in the ListView
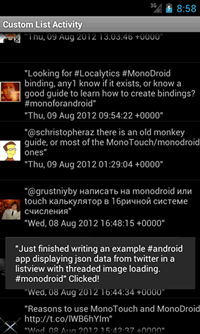
Now that the user has the high-level data, they may want to dig into it a little bit more. How does the program respond to a user selecting a row? There's a very simple event in Mono for Android to handle this: the ListView exposes the .ItemClick event, like this:
listView.ItemClick += HandleItemClick;
This event is set up exactly like .NET developers expect. The HandleItemClick event for this example is:
void HandleItemClick (object sender, AdapterView.ItemClickEventArgs e)
{
    //Get our item from the list adapter
    var item = this.listAdapter.GetItemAtPosition(e.Position);

    //Make a toast with the item name just to show it was clicked
    Toast.MakeText(this, item.Status + " Clicked!", ToastLength.Short).Show();
}
This code will display a toast to the user of what item was clicked. The output is shown in the next image. In the code, it will get the position of the clicked item, then get the item within the adapter, and finally output a toast to the user. This is shown in
Figure 9.
[Click on image for larger view.] |
| Figure 9. Outputting a toast to the user. |
In Review
I hope you've enjoyed this look at databinding with the ListView. You should now know how to:
- Request data from a web service via a REST command.
- Make a request asynchronously.
- Get data back from the request.
- Process the JSON data.
- Use an adapter.
- Learn about the various ListView layout options.
- Bind data to a ListView.
- Process an ItemClick event, so that a user can drill down deeper into information.
- Pull image data down on a background thread.
- Store image data in a local Dictionary to cache the images.
I don't know about you, but I'm tired.
References