Cross Platform C#
Integrating iOS Apps with Twitter and Facebook
Use the Apple iOS 6 social framework to deliver a compelling experience to your users.
- By Greg Shackles
- 05/24/2013
When Apple released iOS 5, the company introduced built-in support for integrating apps with Twitter. With the release of iOS 6, Apple extended this even further by creating a more general social framework that you can take advantage of, allowing for easy integration with several social-networking sites. Currently this framework comes with support for integrating with Twitter, Facebook and Sina Weibo. Taking advantage of social-network services in your apps can help you deliver a much deeper, compelling experience to your users. In this article I'll take a look at how to use this framework to integrate your apps with both Twitter and Facebook, for publishing information as well as consuming data from them.
Project Setup
Start by creating an app in either Visual Studio 2010 or 2012. In the Add New Project dialog, select iOS | iPhone | Empty Project and name it SocialFrameworkDemo. This will give you a blank slate for creating your app.
There are a couple of new dependencies you'll need to add for later use. The first is a reference to MonoTouch.Dialog, a very useful library that ships with Xamarin.iOS. You can find this in the list of available assemblies when adding a new reference to the project. In addition to MonoTouch.Dialog, you're also going to use Json.NET to parse JSON data that comes back from Twitter and Facebook. You might be familiar with this library already from other platforms, but you can use it in your mobile apps too.
Json.NET doesn't ship with Xamarin.iOS, but is made easily available through the Xamarin Component Store. In the project's Solution Explorer you'll see an empty Components folder. Right-click on this and select Get More Components, which will bring up the list of available components. If you've used NuGet this should feel familiar, as it serves a similar purpose.Find Json.NET in this list and add it to your app.
Next, you'll need some simple entity classes to handle the data that comes back from Twitter and Facebook. Add new classes to your project named Tweet, TwitterUser and FacebookUser, as shown in Listing 1.
Listing 1. Adding new classes to your project.
class Tweet
{
  public string Text { get; set; }

  public TwitterUser User { get; set; }
}

class TwitterUser
{
  [JsonProperty("screen_name")]
  public string ScreenName { get; set; }

  public string Name { get; set; }
}

class FacebookUser
{
  public string Name { get; set; }
  public string Gender { get; set; }

  public string UserName { get; set; }
}
As you can see, you're using the JsonProperty attribute to tell the project how to deserialize the responses where the C# property names don't directly line up with what comes back in JSON. Finally, add a new class to the project named DemoViewController (which you'll use to try out the social APIs in iOS), as shown in Listing 2.
Listing 2. Adding a new class called DemoViewController.
public class DemoViewController : DialogViewController
{
  public DemoViewController()
    : base(UITableViewStyle.Grouped, null)
  {
    Root = new RootElement("Social Framework Demo")
      {
        new Section("Twitter")
          {
            new StringElement("Compose Tweet", composeTweet),
            new StringElement("Read Latest Tweet", readTweets),
          },
        new Section("Facebook")
          {
            new StringElement("Compose Update", composeFacebookUpdate),
            new StringElement("Read Profile", readFacebookProfile),
          },
      };
  }

  private void alert(string title, string message)
  {
    InvokeOnMainThread(() =>
      new UIAlertView(title, message, null, "Ok", null).Show());
  }

  private void composeTweet()
  {
  }

  private void readTweets()
  {
  }

  private void composeFacebookUpdate()
  {
  }

  private void readFacebookProfile()
  {
  }
}
If you've never used MonoTouch.Dialog before, this code might look a bit strange. MonoTouch.Dialog is a topic worthy of its own article, but it's essentially a library that makes it very easy to code up UIs in iOS that would normally require a lot of boilerplate code to achieve. In this case, you can quickly code up a list of tappable items and provide callbacks to handle when they're tapped. You'll fill in those empty handler methods throughout the rest of the article. If you run the app now it should look like Figure 1.
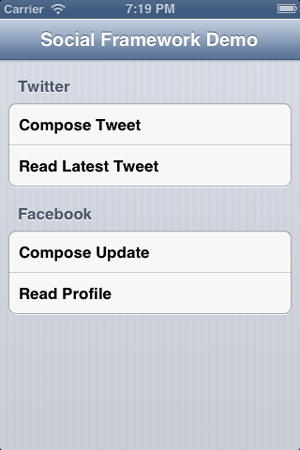 Figure 1. Starting the Social Framework Demo app.
Twitter
Now that the project's ready to go, start by integrating this app with Twitter. First, connect a Twitter account to your device through the Settings tab (see Figure 2). This will allow applications on the device to publish updates to the connected Twitter account, but not without the user's knowledge.
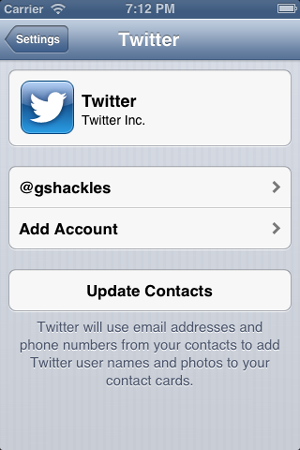 Figure 2. Connect a Twitter account to your device through the Settings tab.
Now that a Twitter account's connected, use it to publish updates from the app. Update the composeTweet callback method to look like Listing 3.
Listing 3. The updated composeTweet callback method.
private void composeTweet()
{
  if (!SLComposeViewController.IsAvailable(SLServiceKind.Twitter))
  {
    alert("Error", "You have not connected a Twitter account to this device");

    return;
  }

  var tweetComposer = SLComposeViewController.FromService(SLServiceType.Twitter);
  tweetComposer.SetInitialText("The social framework is easy!");
  tweetComposer.CompletionHandler =
    result => InvokeOnMainThread(() => tweetComposer.DismissViewController(true, null));

  PresentViewController(tweetComposer, true, null);
}
That's actually all the code required to bring up a view that lets the user edit the message and send it off to Twitter using their account (see Figure 3). After the user is done they'll return to your app right where they left off. You can also use this API to add photos to the update, and it's all done through a UI that will be familiar for the user, because it's the same thing other apps use.
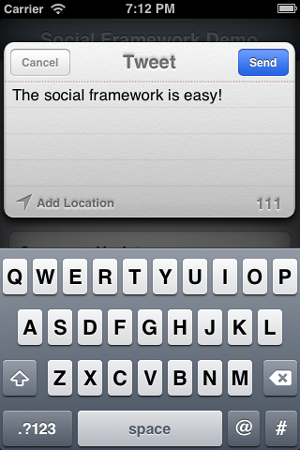 Figure 3. A view that lets the user edit the message and send to Twitter using their account.
The API is pretty generic, and simply takes Twitter in as a parameter. iOS is handling all underlying magic, so all you need to do is say that it's Twitter you want to update. One thing to be aware of is that the SLComposeViewController.IsAvailable method always returns true in the iOS simulator, regardless of whether an account is actually connected or not.
That's what the social framework API looks like for publishing updates, so now I'll take a look at what it provides for other types of requests. The API provided by Apple also provides a generic way of making HTTP requests to the service you're targeting through the SLRequest class, which queries the Twitter API to ask for the list of tweets from the connected user and display an alert with the latest one. Update the readTweets method to look like Listing 4.
Listing 4. The updated readTweets method.
private void readTweets()
{
  if (!SLComposeViewController.IsAvailable(SLServiceKind.Twitter))
  {
    alert("Error", "You have not connected a Twitter account to this device");

    return;
  }

  var accountStore = new ACAccountStore();
  var accountType = accountStore.FindAccountType(ACAccountType.Twitter);

  accountStore.RequestAccess(accountType, null,
    (granted, accessError) =>
    {
      if (!granted) return;

      var twitterRequest = SLRequest.Create(
        SLServiceKind.Twitter,
        SLRequestMethod.Get,
        new NSUrl("http://api.twitter.com/1.1/statuses/user_timeline.json"),
        null);
      twitterRequest.Account = accountStore.FindAccounts(accountType).First();

      twitterRequest.PerformRequest(
        (data, response, error) =>
        {
          if (response.StatusCode == (int)HttpStatusCode.OK)
          {
            var tweets = JsonConvert.DeserializeObject<IList<Tweet>>(data.ToString());
            var tweet = tweets.First();

            alert("@" + tweet.User.ScreenName, tweet.Text);
          }
          else
          {
            alert("Error", "Error reading the Twitter API");
          }
        });
    });
}
First, you request access to the user's Twitter account so that you can pass that information along to Twitter (because Twitter requires an authorization token in order to fulfill the request). Once you've been granted access to the account, create a request that goes to Twitter and asks for the user's timeline. When that's returned, use Json.NET to deserialize the data into a list of C# objects, and then pop up an alert with the first one. If everything works correctly, your app should look like Figure 4.
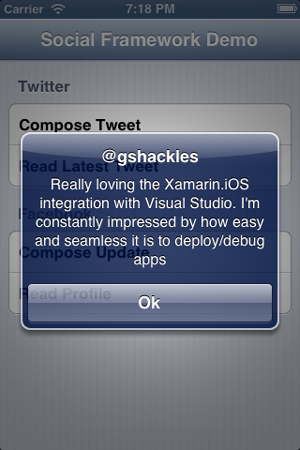 Figure 4. A pop-up alert in the newly created app.
Facebook
Now that you've integrated with Twitter, I'll take a look at how to do the same things with Facebook. The code for Facebook will be very similar to the code for Twitter, because it all leverages the same generic social framework. Also, as with Twitter, you'll need to link a Facebook account to the device through the Settings tab (see Figure 5).
 Figure 5. Link a Facebook account to the device through the Settings tab.
After you've linked an account, start out by updating the composeFacebookUpdate method, as shown in Listing 5.
Listing 5. Updating the composeFacebookUpdate method.
private void composeFacebookUpdate()
{
  if (!SLComposeViewController.IsAvailable(SLServiceKind.Facebook))
  {
    alert("Error", "You have not connected a Facebook account to this device");

    return;
  }

  var facebookComposer = SLComposeViewController.FromService(SLServiceType.Facebook);
  facebookComposer.SetInitialText("The social framework is easy!");
  facebookComposer.CompletionHandler =
    result => InvokeOnMainThread(() => facebookComposer.DismissViewController(true, null));

  PresentViewController(facebookComposer, true, null);
}
This looks just like it did in the Twitter example, except that you specify targeting Facebook. Now you can send updates to Facebook using the linked account, as seen in Figure 6.
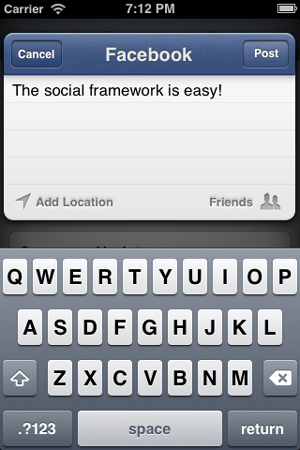 Figure 6. Send updates to Facebook using the linked account.
Next, I'll take a look at using the same generic HTTP framework used earlier to retrieve the linked user's basic profile information. Before you can do this from your app you'll need to create an application on Facebook to link this app to. This is required so that Facebook can keep track of who is making the request, and possibly tie it together with other functionality. Once you create the application, you'll need to provide Facebook with the Bundle ID of the native iOS app with which you'd like to integrate it. In this case you can provide "socialframeworkdemo" (see Figure 7).
 [Click on image for larger view.]
Figure 7. Provide Facebook with the Bundle ID of the native iOS app with which you'd like to integrate it.
[Click on image for larger view.]
Figure 7. Provide Facebook with the Bundle ID of the native iOS app with which you'd like to integrate it.
Now that Facebook knows about the app, update the implementation for the readFacebookProfile method, as shown in Listing 6.
Listing 6. Updating the implementation for the readFacebookProfile method.
private void readFacebookProfile()
{
  if (!SLComposeViewController.IsAvailable(SLServiceKind.Facebook))
  {
    alert("Error", "You have not connected a Facebook account to this device");

    return;
  }

  var accountStore = new ACAccountStore();
  var accountType = accountStore.FindAccountType(ACAccountType.Facebook);

  accountStore.RequestAccess(accountType,
    new AccountStoreOptions { FacebookAppId = "Your App ID Goes Here!" },
    (granted, accessError) =>
    {
      if (!granted) return;

      var facebookAccount = accountStore.FindAccounts(accountType).First();
      var parameters = NSDictionary.FromObjectsAndKeys(
        new[] { "access_token" }, new[] { facebookAccount.Credential.OAuthToken });

      var facebookRequest = SLRequest.Create(
        SLServiceKind.Facebook,
        SLRequestMethod.Get, new NSUrl("https://graph.facebook.com/me"),
        parameters);
      facebookRequest.Account = facebookAccount;

      facebookRequest.PerformRequest(
        (data, response, error) =>
        {
          if (response.StatusCode == (int)HttpStatusCode.OK)
          {
            var facebookUser = JsonConvert.DeserializeObject<FacebookUser>(data.ToString());

            alert(facebookUser.UserName, facebookUser.Name);
          }
          else
          {
            alert("Error", "Error reading the Facebook API");
          }
        });
    });
}
Again, this looks very similar to the previous example with Twitter, except that it targets the Facebook Graph API and provides a Facebook App ID. You'll need to substitute your own App ID that you get after you've created your Facebook app. Once you've been granted access to the account, make a request to the Graph API to ask for the user's information and deserialize that into a FacebookUser object. Once you have that, display the username and full name in an alert dialog, as seen in Figure 8.
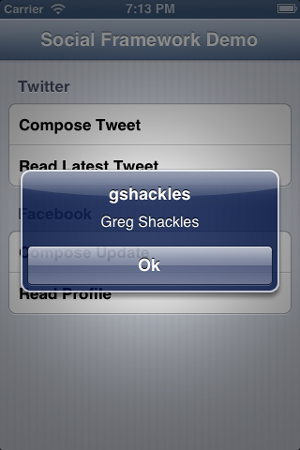 Figure 8. Display the username and full name in an alert dialog.
Wrapping Up
This demo only begins to scratch the surface of what you can do in your apps by integrating them with social services such as Twitter and Facebook. These services allow you to provide a much richer experience for your users -- they can share content however they wish, and see content that their friends like. These services also allow you to provide users with a much more personalized experience based on who they are and what they like. The built-in social integrations within iOS make it incredibly easy to extend your apps in new directions, so go be social!