C# Corner
Virtual Reality in the .NET Framework, Part 2
Last time, Eric Vogel provided an overview of the Oculus Rift VR headset. In Part 2, he starts building a game with it.
More on this topic:
Welcome to Part 2 of this series on programming for the Oculus Rift Virtual Reality headset in the .NET Framework. Today I'll cover how to render a stereoscopic 3D scene using Mono Game, which is an open source implementation of XNA.
First, let's cover the basics of stereoscopic 3D. Stereoscopic 3D utilizes the fact that when the left and right eyes view different images of a scene that are parallel and offset by the interpupilary distance, a single 3D image is perceived by the eye. This visual effect has been used in stereoscopes since 1838, and is well known and proven.
Today I'll cover how to create a basic 3D stereoscopic scene with Mono Game. To get started, download and install the Mono Game 3.0.1 build. Then open Visual Studio 2012 and create a new Mono Game for Windows project, as seen in Figure 1.
 [Click on image for larger view.]
Figure 1. Creating a new mono game.
[Click on image for larger view.]
Figure 1. Creating a new mono game.
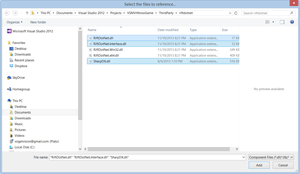
Next, add references to RiftDotNet.dll, RiftDotNet.Interface.dll, and SharpDx.dll from the ThirdParty\riftdotnet folder in the code download, as seen in Figure 2. I've updated the assemblies from the latest RiftDotNet GitHub clone from user VirusFree.
 [Click on image for larger view.]
Figure 2. Adding RiftDotNet references.
[Click on image for larger view.]
Figure 2. Adding RiftDotNet references.
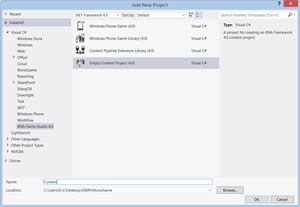
Then you'll need to download and install the Windows Phone 8 SDK, which is needed to load content into the game. The Mono Game contributors are currently working on their own implantation of the XNA Game Content pipeline as well. Once the WP8 SDK is installed, add a new XNA Game Studio 4.0 Empty Content Project named Content (Figure 3).
 [Click on image for larger view.]
Figure 3. The XNA 4.0 empty content project.
[Click on image for larger view.]
Figure 3. The XNA 4.0 empty content project.
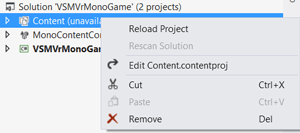
Next, unload the Content project from the solution and edit the Content.contentproj by right-clicking on the unloaded Content project and clicking on the Edit option, as seen in Figure 4.
 [Click on image for larger view.]
Figure 4. Edit Content.contentproj.
[Click on image for larger view.]
Figure 4. Edit Content.contentproj.
Next copy and paste Content.contentproj file contents from Listing 1 into your Content.contenproj file. These changes are needed in order to link the Content project to the Mono Game project.
Listing 1: Content.contentproj.
<?xml version="1.0" encoding="utf-8"?>
<Project DefaultTargets="Build" xmlns="http://schemas.microsoft.com/developer/msbuild/2003" ToolsVersion="4.0">
  <PropertyGroup>
    <ProjectGuid>{2CB3F9BA-BBC3-4307-B2A8-CE7A62BED0A0}</ProjectGuid>
    <ProjectTypeGuids>{96E2B04D-8817-42c6-938A-82C39BA4D311};{FAE04EC0-301F-11D3-BF4B-00C04F79EFBC}</ProjectTypeGuids>
    <Configuration Condition=" '$(Configuration)' == '' ">Debug</Configuration>
    <Platform Condition=" '$(Platform)' == '' ">x86</Platform>
    <PlatformTarget Condition=" '$(PlatformTarget)' == '' ">x86</PlatformTarget>
    <OutputType>Library</OutputType>
    <AppDesignerFolder>Properties</AppDesignerFolder>
    <TargetFrameworkVersion>v4.0</TargetFrameworkVersion>
    <XnaFrameworkVersion>v4.0</XnaFrameworkVersion>
    <OutputPath>bin\$(Platform)\$(Configuration)</OutputPath>
  </PropertyGroup>
  <PropertyGroup>
    <RootNamespace>Content</RootNamespace>
  </PropertyGroup>
  <ItemGroup>
    <Reference Include="Microsoft.Xna.Framework.Content.Pipeline.EffectImporter, Version=4.0.0.0, Culture=neutral, PublicKeyToken=842cf8be1de50553, processorArchitecture=MSIL" />
    <Reference Include="Microsoft.Xna.Framework.Content.Pipeline.FBXImporter, Version=4.0.0.0, Culture=neutral, PublicKeyToken=842cf8be1de50553, processorArchitecture=MSIL" />
    <Reference Include="Microsoft.Xna.Framework.Content.Pipeline.TextureImporter, Version=4.0.0.0, Culture=neutral, PublicKeyToken=842cf8be1de50553, processorArchitecture=MSIL" />
    <Reference Include="Microsoft.Xna.Framework.Content.Pipeline.XImporter, Version=4.0.0.0, Culture=neutral, PublicKeyToken=842cf8be1de50553, processorArchitecture=MSIL" />
    <Reference Include="Microsoft.Xna.Framework.Content.Pipeline.AudioImporters, Version=4.0.0.0, Culture=neutral, PublicKeyToken=842cf8be1de50553, processorArchitecture=MSIL" />
    <Reference Include="Microsoft.Xna.Framework.Content.Pipeline.VideoImporters, Version=4.0.0.0, Culture=neutral, PublicKeyToken=842cf8be1de50553, processorArchitecture=MSIL" />
  </ItemGroup>
  <Import Project="$(MSBuildExtensionsPath)\Microsoft\XNA Game Studio\$(XnaFrameworkVersion)\Microsoft.Xna.GameStudio.ContentPipeline.targets" />
  <!-- To modify your build process, add your task inside one of the targets below and uncomment it.
       Other similar extension points exist, see Microsoft.Common.targets.
  <Target Name="BeforeBuild">
  </Target>
  <Target Name="AfterBuild">
  </Target>
  -->
</Project>
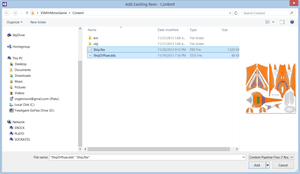
Now the solution is set up to load content into the game, so it's time to add the Ship 3D model to the Content project from the Content folder in the code download (see Figure 5).
 [Click on image for larger view.]
Figure 5. Adding the ship 3D model and texture.
[Click on image for larger view.]
Figure 5. Adding the ship 3D model and texture.
Now the game content is set up and ready to be loaded for later use. The next step is to create the VrDevice class, which encapsulates all the needed RiftDotNet Oculus Rift SDK logic for the game. Add a new VrDevice class file and add a using state for the RiftDotNet namespace:
using RiftDotNet;
Next I add private member variables for the IHMD and HDManager from RiftDotNet used to manage an Oculus Rift headset:
private IHMD _hmd;
private HMDManager _hmdManager;
Then I add read-only properties to get the horizontal and vertical resolutions of the Rift's display:
public uint HorizontalResolution { get; private set; }
public uint VerticalResolution { get; private set; }
Next, I add read-only properties for the vertical screen size, eye to screen distance, horizontal screen size, lens separation distance and interpupilary distance:
public float VScreenSize { get; private set; }
public float EyeToScreenDistance { get; private set; }
public float HScreenSize { get; private set; }
public float LensSeparationDistance { get; private set; }
public float InterpupillaryDistance { get; private set; }
Then I add the DistortionK read-only property used to get the distortion coefficients that will be used in the next article to apply a barrel distortion to the display:
public float[] DistortionK { get; private set; }
Next, I add the Initialize method that gets the attached Oculus Rift headset and loads all the properties. I get the attached headset from the headset manager in the Initialize method:
_hmdManager = new HMDManager();
_hmd = _hmdManager.AttachedDevice ?? _hmdManager.WaitForAttachedDevice(null);
Then I set the HorizontalResolution, VerticalResolution, VScreenSize and EyeToScreenDistance properties from the headset's information class:
HorizontalResolution = _hmd.Info.HResolution;
VerticalResolution = _hmd.Info.VResolution;
VScreenSize = _hmd.Info.VScreenSize;
EyeToScreenDistance = _hmd.Info.EyeToScreenDistance;
Next I set the HScreenSize, LensSeperationDistance, InterpupuliaryDistance, and DistortionK properties from the headser's information class:
HScreenSize = _hmd.Info.HScreenSize;
LensSeparationDistance = _hmd.Info.LensSeparationDistance
InterpupillaryDistance = _hmd.Info.InterpupillaryDistance
DistortionK = _hmd.Info.DistortionK;
Finally, I reset the headset:
_hmd.Reset();
See Listing 2 for the completed VrDevice class implementation.
Listing 2: VrDevice.cs, the VrDevice class.
using System;
using RiftDotNet;

namespace VSMVrMonoGame
{
    public class VrDevice
    {
        private IHMD _hmd;
        private HMDManager _hmdManager;
        public uint HorizontalResolution { get; private set; }
        public uint VerticalResolution { get; private set; }
        public float VScreenSize { get; private set; }
        public float EyeToScreenDistance { get; private set; }
        public float HScreenSize { get; private set; }
        public float LensSeparationDistance { get; private set; }
        public float InterpupillaryDistance { get; private set; }
        public float[] DistortionK { get; private set; }

        public void Initialize()
        {
            _hmdManager = new HMDManager();
            _hmd = _hmdManager.AttachedDevice;
            if (_hmd == null)
            {
                Console.WriteLine("Please attach your VR device.");
                _hmd = _hmdManager.WaitForAttachedDevice(null);
            }

            HorizontalResolution = _hmd.Info.HResolution;
            VerticalResolution = _hmd.Info.VResolution;
            VScreenSize = _hmd.Info.VScreenSize;
            EyeToScreenDistance = _hmd.Info.EyeToScreenDistance;
            HScreenSize = _hmd.Info.HScreenSize;
            LensSeparationDistance = _hmd.Info.LensSeparationDistance;
            InterpupillaryDistance = _hmd.Info.InterpupillaryDistance;
            DistortionK = _hmd.Info.DistortionK;

            _hmd.Reset();
        }
    }
}
Now it's time to implement the game logic. Open up the Game1 class file and grab a frosty beverage of your choice. First, I add the private member variables to load the ship Model and the VrDevice:
private Model model;
private VrDevice vrDevice
Then I add class members to store the left and right eye view ports:
private Viewport leftVp;
private Viewport rightVp;
Next I add class members to store the left and right eye view and project matrices:
private Matrix projLeft;
private Matrix projRight;
private Matrix viewLeft;
private Matrix viewRight;
In the Game1 class constructor, I set the full-screen mode to false and set the window to be the size of the Rift's display, which is currently 1280x800 for the first development kit:
public Game1()
    : base()
{
    graphics = new GraphicsDeviceManager(this)
        {
            IsFullScreen = false,
            PreferredBackBufferHeight = 800,
            PreferredBackBufferWidth = 1280
        };
    Content.RootDirectory = "Content";
}
In the Initialize method, I instantiate and initialize the vrDevice:
vrDevice = new VrDevice();
vrDevice.Initialize();
Next I initialize the left and right eye view ports:
leftVp = new Viewport(0, 0, graphics.PreferredBackBufferWidth/2,
                                         graphics.PreferredBackBufferHeight);
rightVp = new Viewport(graphics.PreferredBackBufferWidth / 2, 0,
                                         graphics.PreferredBackBufferWidth,
                                         graphics.PreferredBackBufferHeight);
Then I compute the aspect ratio for the Rift, which is half the width for each eye:
float aspectRatio = vrDevice.HorizontalResolution / (2 * (float)vrDevice.VerticalResolution);
Next I calculate the view center, which is a quarter of the width of Rift's screen:
float viewCenter = vrDevice.HScreenSize * 0.25f;
The eye projection shift is the half the lens separation distance from the view center:
float eyeProjectionShift = viewCenter - vrDevice.LensSeparationDistance * 0.5f;
The projection center offset is four times the eye projection shift, divided by the horizontal screen size:
float projectionCenterOffset = 4.0f * eyeProjectionShift / vrDevice.HScreenSize;
The center projection matrix is a field of view perspective matrix created from the prior calculated field of view and aspect ratio with a near z distance of 0.3 and a far z distance of 1,000:
var projCenter = Matrix.CreatePerspectiveFieldOfView(yfov, aspectRatio, 0.3f, 1000.0f);
The left and right eye projection matrices are created by offsetting the center projection matrix by the positive and negative projection center offset x values:
projLeft = Matrix.CreateTranslation(projectionCenterOffset, 0, 0) * projCenter;
projRight = Matrix.CreateTranslation(-projectionCenterOffset, 0, 0) * projCenter;
Then I create the left and right eye view projections by offsetting the center view projection by half of the interpupilary distance; positive offset for the left eye and negative for the right eye:
float halfIPD = vrDevice.InterpupillaryDistance * 0.5f;
viewLeft = Matrix.CreateTranslation(halfIPD, 0, 0) * viewCenter;
viewRight = Matrix.CreateTranslation(-halfIPD, 0, 0) * viewCenter;
Here's the completed Initialize method implementation:
protected override void Initialize()
{
            vrDevice = new VrDevice();
            vrDevice.Initialize();
            leftVp = new Viewport(0, 0, graphics.PreferredBackBufferWidth/2,
                                                    graphics.PreferredBackBufferHeight);
            rightVp = new Viewport(graphics.PreferredBackBufferWidth / 2, 0,
                                                    graphics.PreferredBackBufferWidth,
                                                    graphics.PreferredBackBufferHeight);

            float aspectRatio = vrDevice.HorizontalResolution / (2 * (float)vrDevice.VerticalResolution);
            float halfScreenDistance = (vrDevice.VScreenSize / 2);
            float yfov = (float)2.0f * (float)Math.Atan(halfScreenDistance / vrDevice.EyeToScreenDistance);
            float viewCenter = vrDevice.HScreenSize * 0.25f;
            float eyeProjectionShift = viewCenter - vrDevice.LensSeparationDistance * 0.5f;
            float projectionCenterOffset = 4.0f * eyeProjectionShift / vrDevice.HScreenSize;
            var projCenter = Matrix.CreatePerspectiveFieldOfView(yfov, aspectRatio, 0.3f, 1000.0f);
            projLeft = Matrix.CreateTranslation(projectionCenterOffset, 0, 0) * projCenter;
            projRight = Matrix.CreateTranslation(-projectionCenterOffset, 0, 0) * projCenter;
            float halfIPD = vrDevice.InterpupillaryDistance * 0.5f;
            viewLeft = Matrix.CreateTranslation(halfIPD, 0, 0) * viewCenter;
            viewRight = Matrix.CreateTranslation(-halfIPD, 0, 0) * viewCenter;

            base.Initialize();
 }
In the LoadContent method, I load the Ship 3D model though Mono Game's content pipeline:
protected override void LoadContent()
{
    spriteBatch = new SpriteBatch(GraphicsDevice);
    model = Content.Load<Model>("Ship");
}
The next and final step is to render the 3D scene. First I get the elapsed time since the last frame in seconds:
var time = (float)gameTime.TotalGameTime.TotalSeconds;
Then I store the original view port from the graphics device:
Viewport original = graphics.GraphicsDevice.Viewport;
Then clear the screen to cornflower blue:
GraphicsDevice.Clear(Color.CornflowerBlue);
Then I create the world matrix for the ship model, which is scaled by 0.003, rotated on the y-axis by the frame time delta and then translated to (0, -1.5f, -6f) in the game world:
var world = Matrix.CreateScale(0.003f) *
          Matrix.CreateRotationY(time) *
          Matrix.CreateTranslation(0, -1.5f, -6.0f);
Then I render the left eye's version of the 3D model to the left view port using the DrawModel method to render the 3D ship:
graphics.GraphicsDevice.Viewport = leftVp;
DrawModel(model, world, viewLeft, projLeft);
Next, I repeat the process for the right eye using the right eye view port:
graphics.GraphicsDevice.Viewport = rightVp;

DrawModel(model, world, viewRight, projRight);
Then I reset the graphics device view port back to the original view port:
graphics.GraphicsDevice.Viewport = original;
The completed Draw method:
protected override void Draw(GameTime gameTime)
{
    var time = (float)gameTime.TotalGameTime.TotalSeconds;
    Viewport original = graphics.GraphicsDevice.Viewport;

    GraphicsDevice.Clear(Color.CornflowerBlue);

    var world = Matrix.CreateScale(0.003f) *
              Matrix.CreateRotationY(time) *
              Matrix.CreateTranslation(0, -1.5f, -6.0f);

    graphics.GraphicsDevice.Viewport = leftVp;
    DrawModel(model, world, viewLeft, projLeft);

    graphics.GraphicsDevice.Viewport = rightVp;

    DrawModel(model, world, viewRight, projRight);

    graphics.GraphicsDevice.Viewport = original;

    base.Draw(gameTime);
}
Last, I add the DrawModel method, which renders the 3D ship model using the given world, view and projection matrices using the basic lighting pixel shader included in Mono Game:
private void DrawModel(Model model, Matrix world, Matrix view, Matrix projection)
 {
     foreach (ModelMesh mesh in model.Meshes)
     {
         foreach (BasicEffect effect in mesh.Effects)
         {
             effect.EnableDefaultLighting();

             effect.World = world;
             effect.View = view;
             effect.Projection = projection;
         }

         mesh.Draw();
     }
 }
Your completed Game class implementation should look like Listing 3.
Listing 3: Game1.cs, the complete Game class implementation.
#region Using Statements
using System;
using Microsoft.Xna.Framework;
using Microsoft.Xna.Framework.Graphics;
using Microsoft.Xna.Framework.Input;

#endregion

namespace VSMVrMonoGame
{
    /// <summary>
    /// This is the main type for your game
    /// </summary>
    public class Game1 : Game
    {
        private GraphicsDeviceManager graphics;
        private SpriteBatch spriteBatch;
        private Model model;
        private VrDevice vrDevice;
        private Viewport leftVp;
        private Viewport rightVp;
        private Matrix projLeft;
        private Matrix projRight;
        private Matrix viewLeft;
        private Matrix viewRight;

        public Game1()
            : base()
        {
            graphics = new GraphicsDeviceManager(this)
                {
                    IsFullScreen = true,
                    PreferredBackBufferHeight = (int)vrDevice.VerticalResolution,
                    PreferredBackBufferWidth = (int)vrDevice.HorizontalResolution
                };
            Content.RootDirectory = "Content";
        }

        /// <summary>
        /// Allows the game to perform any initialization it needs to before starting to run.
        /// This is where it can query for any required services and load any non-graphic
        /// related content.  Calling base.Initialize will enumerate through any components
        /// and initialize them as well.
        /// </summary>
        protected override void Initialize()
        {
            vrDevice = new VrDevice();
            vrDevice.Initialize();
            leftVp = new Viewport(0, 0, graphics.PreferredBackBufferWidth/2,
                                                    graphics.PreferredBackBufferHeight);
            rightVp = new Viewport(graphics.PreferredBackBufferWidth / 2, 0,
                                                    graphics.PreferredBackBufferWidth,
                                                    graphics.PreferredBackBufferHeight);

            float aspectRatio = vrDevice.HorizontalResolution / (2 * (float)vrDevice.VerticalResolution);
            float halfScreenDistance = (vrDevice.VScreenSize / 2);
            float yfov = (float)2.0f * (float)Math.Atan(halfScreenDistance / vrDevice.EyeToScreenDistance);
            float viewCenter = vrDevice.HScreenSize * 0.25f;
            float eyeProjectionShift = viewCenter - vrDevice.LensSeparationDistance * 0.5f;
            float projectionCenterOffset = 4.0f * eyeProjectionShift / vrDevice.HScreenSize;
            var projCenter = Matrix.CreatePerspectiveFieldOfView(yfov, aspectRatio, 0.3f, 1000.0f);
            projLeft = Matrix.CreateTranslation(projectionCenterOffset, 0, 0) * projCenter;
            projRight = Matrix.CreateTranslation(-projectionCenterOffset, 0, 0) * projCenter;
            float halfIPD = vrDevice.InterpupillaryDistance * 0.5f;
            viewLeft = Matrix.CreateTranslation(halfIPD, 0, 0) * viewCenter;
            viewRight = Matrix.CreateTranslation(-halfIPD, 0, 0) * viewCenter;

            base.Initialize();
        }

        /// <summary>
        /// LoadContent will be called once per game and is the place to load
        /// all of your content.
        /// </summary>
        protected override void LoadContent()
        {
            spriteBatch = new SpriteBatch(GraphicsDevice);
            model = Content.Load<Model>("Ship");
        }

        /// <summary>
        /// UnloadContent will be called once per game and is the place to unload
        /// all content.
        /// </summary>
        protected override void UnloadContent()
        {
            // TODO: Unload any non ContentManager content here
        }

        /// <summary>
        /// Allows the game to run logic such as updating the world,
        /// checking for collisions, gathering input, and playing audio.
        /// </summary>
        /// <param name="gameTime">Provides a snapshot of timing values.</param>
        protected override void Update(GameTime gameTime)
        {
            if (GamePad.GetState(PlayerIndex.One).Buttons.Back == ButtonState.Pressed || Keyboard.GetState().IsKeyDown(Keys.Escape))
                Exit();

            base.Update(gameTime);
        }

        /// <summary>
        /// This is called when the game should draw itself.
        /// </summary>
        /// <param name="gameTime">Provides a snapshot of timing values.</param>
        protected override void Draw(GameTime gameTime)
        {
            var time = (float)gameTime.TotalGameTime.TotalSeconds;
            Viewport original = graphics.GraphicsDevice.Viewport;

            GraphicsDevice.Clear(Color.CornflowerBlue);

            var world = Matrix.CreateScale(0.003f) *
                      Matrix.CreateRotationY(time) *
                      Matrix.CreateTranslation(0, -1.5f, -6.0f);

            graphics.GraphicsDevice.Viewport = leftVp;
            DrawModel(model, world, viewLeft, projLeft);

            graphics.GraphicsDevice.Viewport = rightVp;

            DrawModel(model, world, viewRight, projRight);

            graphics.GraphicsDevice.Viewport = original;

            base.Draw(gameTime);
        }

        private void DrawModel(Model model, Matrix world, Matrix view, Matrix projection)
        {
            foreach (ModelMesh mesh in model.Meshes)
            {
                foreach (BasicEffect effect in mesh.Effects)
                {
                    effect.EnableDefaultLighting();

                    effect.World = world;
                    effect.View = view;
                    effect.Projection = projection;
                }

                mesh.Draw();
            }
        }
    }
}
You should now be able to run the game and see a converging 3D ship spinning before your eyes!
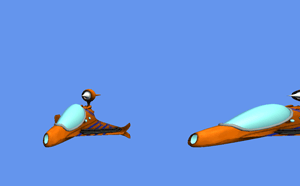 [Click on image for larger view.]
Figure 6.The finished game.
[Click on image for larger view.]
Figure 6.The finished game.
Today I've covered how to render a very basic 3D scene to the Oculus Rift. Stay tuned for the next iteration of the series, where I'll cover how to implement the barrel distortion post processing pixel shader that corrects for the blurriness you may notice at the outer edges of the scene. I'll also cover how to add motion tracking of the player's head so you can truly feel like you're in the game world.