C# Corner
How to Automate IIS 7 Configuration with .NET
Are you tired of manually configuring IIS sites (adding Web sites, application pools, virtual directories and so on)? Use C# and the Microsoft.Web.Administration Namespace to simplify your life (or at least IIS configuration).
I maintain a number of Web sites outside my day job. Nothing major -- a church Web site, a small PHP Web site for the salon my wife works at and a hot-lunch-ordering Web site for my kid's school. These sites are all hosted by Web hosting companies, but I have a copy of all of them set up on my development machine for maintenance and testing.
From time to time, I have to do a clean install of my machine. It's either a new version of Windows or, most recently, a solid-state drive (SSD) that died on me. Either way, when it comes to setting up IIS on my new environment, I grew tired of the myriad of settings and options that had to be configured for all these sites. I decided to put my programming skills to work and automate this task.
Admins Only!
An important point I'd like to begin with: Access to IIS Manager is restricted to Administrators. Therefore, any utilities you write using the techniques covered in this article must be executed by an administrator. Likewise, if you're going to do debugging of your utilities from inside Visual Studio, you'll need to be running Visual Studio with Administrator access.
The sample code included in this article contains a complete example of programmatically creating an IIS site, complete with virtual directories, application pools and security settings.
IIS 7 Information
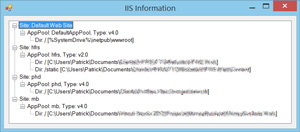
To show you what's possible, I created a new Windows Forms application and used NuGet to install the Microsoft.Web.Administration package. Then I dropped a few lines of code into the Form_Load event. It displays basic information for the local IIS server in a tree view, as you can see in Listing 1.
Listing 1: Form_Load Event Showing Information for Local IIS Server in a Tree View
using (var serverManager = new ServerManager())
{
  foreach (var site in serverManager.Sites)
  {
    var siteNode = tvwIIS.Nodes.Add(string.Format("Site: {0}", site.Name));
    foreach (var appl in site.Applications)
    {
      var appPoolNode =
        siteNode.Nodes.Add(string.Format("AppPool: {0}, Type: {1}", appl.ApplicationPoolName,
          GetApplType(serverManager, appl)));
      foreach (var virtDir in appl.VirtualDirectories)
      {
        appPoolNode.Nodes.Add(String.Format("Dir: {0} [{1}]", virtDir.Path,
          virtDir.PhysicalPath));
      }
    }
  }
}
The utility function GetApplType is used to obtain the .NET runtime version based on the Application Pool the Application's using:
private string GetApplType(ServerManager sm, Application appl)
{
  var appPool = sm.ApplicationPools[appl.ApplicationPoolName];
  return appPool.ManagedRuntimeVersion;
}
The result of running this on my machine is shown in Figure 1. It isn't going to win any UI design awards, but I hope you'll see how easy it is to query basic information about IIS and its inner configuration. Now I'm going to do some real work!
 [Click on image for larger view.]
Figure 1. The Basic Display of IIS Configuration
[Click on image for larger view.]
Figure 1. The Basic Display of IIS Configuration
Creating a New Site
Now I want to automate the setup and configuration of my Web sites in IIS. The first thing to do is create the actual site. When I run locally, each site is mapped to its own port on my local machine. I don't need to remember the port numbers because I have bookmarks for each one. However, when it comes to setting these up (manually), I had to remember the port numbers. The process of automating this has the added benefit of not having to change my bookmarks if I accidentally set up a site on the wrong port.
Site creation is easy, as shown in Listing 2.
Listing 2: Site Creation in IIS
private static void AddSite(string siteName, string physicalPath, int portNumber)
{
  using (var sm = new ServerManager())
  {
    var invalidChars = SiteCollection.InvalidSiteNameCharacters();
    if (siteName.IndexOfAny(invalidChars) > -1)
    {
      throw new Exception(String.Format("Invalid Site Name: {0}", siteName));
    }

    var site = sm.Sites.Add(siteName, physicalPath, portNumber);
    site.ServerAutoStart = true;

    sm.CommitChanges();
  }
}
Note the SiteCollection object exposes a static char[] that contains a list of invalid site name characters. All of my sites have simple names that I know contain valid characters. But as you can see, I've created a generic AddSite method that can be used in many situations. This extra check makes sure I don't accidentally use any invalid characters.
You should also see that the last line inside the using block is a call to the CommitChanges method on the ServerManager. All the work done before this call is just done in-memory. If I forget to call CommitChanges, nothing is changed in IIS. The CommitChanges call pushes the changes from memory into IIS and makes them live.
At this point, my site is created and browsing to http://localhost:9898 works fine. However, I'm not done yet. I like each of my sites to have their own application pool. This is mostly for isolation, but if you noticed in Figure 1, I still have one of these old sites running under the Microsoft .NET Framework 2.0. If I don't provide the name of the application pool when I'm setting up my site, it uses the DefaultAppPool -- which, on my current machine, is running the .NET Framework 4. So I'm going to expand my AddSite method to support Application Pool creation.
Creating an AppPool
When creating the application pool, I need to set three things:
- The application pool name. For this, I'm going to default to the site name with "_AppPool" appended to it.
- The .NET runtime version. All of my sites, except for one, are running the .NET Framework 4, so I guess I could make this the default if it isn't provided by the caller.
- The Managed Pipeline Mode. Again, this would normally default to "Integrated," but the old .NET 2.0 site needs "Classic." Like the runtime version, I'll create some overloads that default to Integrated.
When setting the .NET runtime version, the ApplicationPool class takes in a string of either v2.0 or v4.0 as the runtime version. Microsoft probably used a string instead of an enum to allow you to plug in future versions of the runtime without having to update an enum. The Managed Pipline mode, however, is exposed as an enum.
Here's my updated AddSite signature:
void AddSite(string siteName, string physicalPath, int portNumber, string runtimeVersion,
  ManagedPipelineMode pipelineMode)
After making sure the siteName passed to AddSite is valid, I added some code to create the application pool:
...
var poolName = siteName + "_AppPool";
AddAppPool(sm, poolName, runtimeVersion, pipelineMode);
...
The assignment of the application pool to my site is done through an Application. A site can have many Applications, but will always have at least one -- and that one is automatically associated with the root directory of the site. Application pool assignment is done by using the app pool name, not a reference to an ApplicationPool object:
site.Applications.First().ApplicationPoolName = poolName;
The AddAppPool code is trivial:
private static void AddAppPool(ServerManager sm, string poolName, string runtimeVersion,
  ManagedPipelineMode piplineMode)
{
  var appPool = sm.ApplicationPools.Add(poolName);
  appPool.ManagedRuntimeVersion = runtimeVersion;
  appPool.ManagedPipelineMode = piplineMode;
}
Basic setup for this site is now complete. With minimal effort, I've got code to quickly set up my sites with specific configuration settings. This gets me 90 percent of the way there. One site has a virtual directory to be created, and a couple have some customizations to be made to the application pool. The current AddSite method already has five arguments, and I'd hate to add more. Instead, I'm going to refactor things a bit.
Customized Configurations
Instead of sending a bunch of parameters as settings for the various properties of my IIS objects, I'll expose a lambda that receives the IIS objects and allows the caller to set whatever it wants. Here's what my new AddSite signature looks like:
void AddSite(string siteName, Action<ServerManager, Site> siteConfigurator, Action<ServerManager,
  ApplicationPool> appPoolConfigurator)
This gives callers of this method full control to configure each item (site and app pool) the way they like, but doesn't burden them with the repetitive code of creating the sites, app pools and committing changes.
My new code to set up the "vsm" site is now:
AddSite("vsm", (mgr, site) =>
{
  site.SetPhysicalPath(@"C:\temp\vsm");
  site.BindToPort(9898);
  site.ServerAutoStart = true;
}, (mgr, appPool) =>
{
  appPool.ManagedRuntimeVersion = "V2.0";
  appPool.ManagedPipelineMode = ManagedPipelineMode.Classic;
});
And AddSite has been updated to execute the callbacks during the site creation process, shown in Listing 3.
Listing 3: Updating AddSite to Execute Callbacks During Site Creation Process
private static void AddSite(string siteName, Action<ServerManager, Site> siteConfigurator,
  Action<ServerManager, ApplicationPool> appPoolConfigurator)
{
  using (var sm = new ServerManager())
  {
    var invalidChars = SiteCollection.InvalidSiteNameCharacters();
    if (siteName.IndexOfAny(invalidChars) > -1)
    {
      throw new Exception(String.Format("Invalid Site Name: {0}", siteName));
    }

    var poolName = siteName + "_AppPool";
    var appPool = sm.ApplicationPools.Add(poolName);
    appPoolConfigurator(sm, appPool);

    var site = sm.Sites.Add(siteName, "", 0);
    site.Applications.First().ApplicationPoolName = poolName;
    siteConfigurator(sm, site);

    sm.CommitChanges();
  }
}
Notice that I no longer pass in the physical path and port number to the AddSite method. I wanted to keep the parameters passed to AddSite to a minimum. But this did create a problem -- the SiteCollection.Add method requires the physical path and port number. I changed the SiteCollection.Add call to pass in an empty string for physical path and zero for port number. Instead, the physical path and port are set during my site configuration callback:
(mgr, site) =>
  {
    site.SetPhysicalPath(@"C:\temp\vsm");
    site.BindToPort(9898);
    site.ServerAutoStart = true;
  }
The Site object doesn't have a method called SetPhysicalPath, nor a method called BindToPort. Those are extension methods I created to make the assignment of those two items easier to perform.
As pointed out earlier, when a site's created, it automatically gets an Application created for it. That's where I assigned the app pool name. In addition to an Application being created, that Application has a virtual directory automatically created (to map the root directory), and an HTTP binding is created in the site's Bindings collection.
Knowing that, my extension methods simply grab those default objects and set their properties individually:
static class Extensions
{
  public static void SetPhysicalPath(this Site site, string path)
  {
    site.Applications.First().VirtualDirectories.First().PhysicalPath = path;
  }

  public static void BindToPort(this Site site, int port)
  {
    site.Bindings.First().BindingInformation = String.Format("*:{0}:", port);
  }
}
Virtual Directories
I already touched on virtual directories a bit -- there's a default one created for each site's root directory. One of my sites needs an additional virtual directory created that points to a folder outside the site's physical path.
To add a new one, I just had to grab the list of virtual directories from the site's Application and add a new entry with a specific path and physical location:
AddSite("vsm", (mgr, site) =>
{
  ...
  site.Applications.First().VirtualDirectories.Add("/static", @"C:\Temp\static");
  ...
}
The last part of my IIS site creation automation was some more changes for the application pools.
Further AppPool Configuration
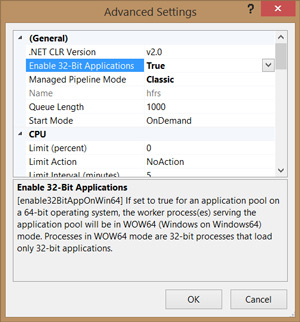
The site I maintain that still uses the .NET Framework 2.0 also has a DLL that must be run in 32-bit mode. Normally, from the IIS Manager GUI, I'd go in to the Advanced Settings for my app pool and set the option to Enable 32-bit Applications (see Figure 2).
 [Click on image for larger view.]
Figure 2. Configuring App Pools via the GUI
[Click on image for larger view.]
Figure 2. Configuring App Pools via the GUI
I want this automated as well. Luckily, this is easy, as this functionality is exposed via a Boolean property. Here's my updated app pool configuration handler with the new code in the second-to-last line:
(mgr, appPool) =>
  {
    appPool.ManagedRuntimeVersion = "V2.0";
    appPool.ManagedPipelineMode = ManagedPipelineMode.Classic;
    appPool.Enable32BitAppOnWin64 = true;
  }
Another thing that needs changing is the identity under which some of the app pools and virtual directories run. You may have noticed in Figure 1 that all of these sites are under My Documents on my machine. Normally, the default identity of the ASP.NET worker process doesn't have high-enough permissions to access my directory, so I need to change the identity under which the app pool and virtual directories run.
For the virtual directories, there's a username and password field I can set during the site creation. For app pools, there's a ProcessModel property that exposes the identity information. While my setup currently has the same identity for all of these, I can't assume it will be that way forever. Therefore, I made a utility method to handle getting authentication information from the console, as shown in Listing 4.
Listing 4: Utility Method
private static void GetAuthInfo(string item, Action<string, string> authHandler)
{
  Console.WriteLine("Please enter authentication information for: {0}", item);
  if( allowBlank)
    Console.WriteLine("(Leave blank to use same credentials as last time)");

  while (true)
  {
    Console.Write("Username: ");
    var inputUser = Console.ReadLine();
    if (allowBlank && String.IsNullOrEmpty(inputUser))
    {
      authHandler(userName, password);
      return;
    }

    Console.Write("Password: ");
    var inputPassword = GetPassword();
    if (!String.IsNullOrEmpty(inputPassword))
    {
      userName = inputUser;
      password = inputPassword;

      authHandler(userName, password);
      allowBlank = true;
      return;
    }
  }
}
I had to craft a quick console-based password input method because the .NET Framework doesn't have one built-in. As you can see in Listing 5, it simply displays an asterisk as each character is typed.
Listing 5: Console-Based Password Input Method
private static string GetPassword()
{
  var passwd = String.Empty;
  while (true)
  {
    var ki = Console.ReadKey(true);
    if (ki.Key == ConsoleKey.Enter)
    {
      break;
    }

    if (ki.Key == ConsoleKey.Backspace)
    {
      if (passwd.Length > 0)
      {
        passwd = passwd.Substring(0, passwd.Length - 1);
        Console.Write("\b \b");
      }
    }
    else
    {
      passwd += (ki.KeyChar);
      Console.Write("*");
    }
  }
  return passwd;
}
The GetAuthInfo method gets a username and password from the console and hangs on to them for future use. Once it has a non-blank username and password, it calls the authHandler delegate to let it do its work.
For virtual directories, I just needed to set the UserName and Password properties:
var rootDir = site.Applications.First().VirtualDirectories.First();
GetAuthInfo("Site " + site.Name, (u, p) =>
{
  rootDir.UserName = u;
  rootDir.Password = p;
});
For the app pool, I need to set the IdentityType property as well as UserName and Password on the ProcessModel associated with the app pool:
appPool.ProcessModel.IdentityType = ProcessModelIdentityType.SpecificUser;
GetAuthInfo("AppPool " + appPool.Name, (u, p) =>
{
  appPool.ProcessModel.UserName = u;
  appPool.ProcessModel.Password = p;
});
Now my IIS setup is totally automated. I can reuse this code again and again to quickly get a site up and running with all the specific settings needed. I could also repurpose most of this code for a simple setup application if I even needed to install this on a different machine.
More Than Just Web Sites
The Microsoft.Web.Administration namespace can be used for a number of things. In this article, I reviewed how it can be used to automate the setup and configuration of Web sites. It can also be used to query IIS -- how many app pools are running the .NET Framework 2.0? How many aren't using the default AppPool Identity? I can also write code to start and stop a site or even an application pool. It's a handy little library that might not get used much, but when it is used, it can save a lot of time.