Neural Network Lab
Creating Neural Networks Using Azure Machine Learning Studio
Dr. McCaffrey walks you through how to use the Microsoft Azure Machine Learning Studio, a new front-end for Microsoft Azure Machine Learning, to get a neural prediction system up and running.
The new Microsoft Azure Machine Learning Studio (ML Studio), released in July 2014, gives you a fascinating way to create neural network prediction systems. In this article, I'll walk you through a complete example that will get you up and running with creating neural networks using ML Studio.
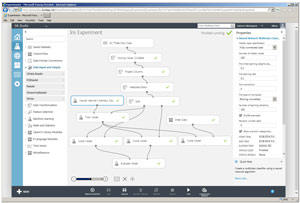
The best way to see where this article is headed is to examine Figure 1. The image shows a completed ML Studio experiment. The goal of the experiment is to predict the species (Iris setosa, Iris versicolor or Iris virginica) of an iris flower, based on the flower's sepal (a green leaf-like structure) length and width, and petal (the flower part) length and width.
 [Click on image for larger view.]
Figure 1. A Complete Machine Learning Studio Neural Network Experiment
[Click on image for larger view.]
Figure 1. A Complete Machine Learning Studio Neural Network Experiment
At the top of the image, notice that ML Studio is running in Internet Explorer, so it's a Web-based application. More specifically, ML Studio is the front-end for the Microsoft Azure Machine Learning service. From here on, for simplicity, I'll use the term ML Studio to refer to both the client front-end and the Azure back-end.
In the address bar, you can see that I'm using an internal URL, passau.cloupapp.net. During development, the ML Studio project was code-named "Passau" and you may come across that term in the documentation. The public URL for ML Studio will be available at http://azure.microsoft.com under the Portal tab.
If you're a developer, you can initially somewhat think of ML Studio (to create ML systems) as roughly analogous to the Visual Studio tool (to create executable programs), but don't carry the analogy too far. To use Visual Studio, you'd have to either buy the tool or use a free trial version. The same is true for ML Studio; there will be a charge for using the service, but there will be ways for you to try the system out for free. The exact details are certain to change frequently -- constant change is one of the headaches, in my opinion, of working with cloud-based systems.
ML Studio has three primary working areas. In Figure 1, on the left you can see items with names like Saved Datasets, Data Input and Output, and Machine Learning. These are categories, and if you expand any you see specific items that can be dragged onto the center design surface. This is somewhat similar to the Visual Studio Toolbox where you can drag UI controls onto a design surface. However, ML Studio modules represent what you can think of as methods; that is, prewritten code that performs some sort of ML task.
The center area of ML Studio is called the experiment. This is analogous to the Visual Studio editor -- the place where you do most of your work. At the top, the experiment is titled "Iris Experiment." An experiment title is roughly analogous to a Visual Studio Solution name. The rectangular boxes are modules that I dragged onto the design surface. For example, the module labeled "Iris Three Class Data" is the raw data source, and the module labeled "Neural Network Multiclass Classification Model" (the name is partially cut off) is the core neural network code.
The curved lines establish input-output flows between modules. In general I'm not a fan of visual-style programming and curvy lines, but ML Studio is an exception -- I really like the tool a lot.
The right-hand side of ML Studio shows details about whatever is currently selected in the main work area. In Figure 1, because the neural network classifier module is selected (you can see its border is bolded), the information in the right-hand area, such as "Number of hidden nodes" with value 100, refers specifically to that module. You can think of the information in the right-hand area as the parameter values (or equivalently, argument values, depending on your point of view) of the selected module/method.
After an experiment has been created, it can be run by clicking on the Run icon located at the bottom of the tool. This is somewhat equivalent to hitting the VS F5 key to execute a program in the debugger. As each module finishes, ML Studio displays a green checkmark inside the module. You can also see a Save icon but by default ML Studio also automatically saves your experiment every few seconds so you won't lose much if you drop a network connection.
In the sections that follow, I'll walk you through the creation of the neural network experiment in Figure 1 so that you'll be able to replicate it. Doing so will give you a solid basis for investigating ML Studio on your own, or for exploring the early release documentation. This article assumes you have a basic understanding of neural networks, and at least beginning-level programming skills (in order to understand ML Studio and Visual Studio analogies and terminology), but doesn't assume you know anything about ML Studio.
Viewing Results
ML Studio doesn't display results after running an experiment; you have to explicitly ask to see them. The final results are shown in the image in Figure 2. In order to see these results, I right-clicked on the right-most Score Model experiment module and selected the Visualize option from the context menu. This opened a separate window with the results as shown.
 [Click on image for larger view.]
Figure 2. Experiment Results
[Click on image for larger view.]
Figure 2. Experiment Results
There's a lot of information in the results but the key information is at the bottom of the image in Figure 2:
5.1  3.5  1.4  0.2  unknown  . .  Iris-setosa
6.0  2.0  0.1  0.1  unknown  . .  Iris-versicolor
This output indicates that after the prediction model was created, it was presented with two new data items. The first, with an unknown species, is data for a hypothetical iris with sepal length 5.1 (the columns have labels if you look closely), sepal width 3.5, and so on. The model created by ML Studio predicts that the hypothetical flower is Iris setosa. The second data item is for a different hypothetical iris and it is predicted to be species Iris versicolor.
Creating the Dataset
All ML Studio experiments start with some data. Here, the demo data is a well-known ML benchmark data set often called the Fisher's Iris Data or the UCI Iris Set, because the data is on a server maintained by the University of California, Irvine. The raw data can be found by doing an Internet search, and is a simple text file named iris.data.
The first two and last two lines of the raw data are:
5.1,3.5,1.4,0.2,Iris-setosa
4.9,3.0,1.4,0.2,Iris-setosa
...
6.2,3.4,5.4,2.3,Iris-virginica
5.9,3.0,5.1,1.8,Iris-virginica
There are a total of 150 comma-delimited lines of data. The first 50 lines are all setosa, the next 50 lines are all versicolor, and the last 50 lines are all virginica.
ML Studio can read data directly off the Web, or from Azure storage, but I prefer to create my own data store. To do so, first, I copied the text file into Notepad on my local machine, and then added column headers, like so:
sepal-length,sepalwidth,petal-length,petal-width,species
5.1,3.5,1.4,0.2,Iris-setosa
...
5.9,3.0,5.1,1.8,Iris-virginica
When writing ML code from scratch, working with column headers can be annoying, and so headers are often left off data files. But with ML studio, using column headers is actually easier than omitting them, as well as making the data easier to understand. I renamed the local file RawIrisData.txt and saved it on my machine.
After navigating to the ML Studio homepage, I clicked on the Datasets category in the left-hand pane. In the main working area, ML Studio displayed a list of built-in data sets, for example, Iris Two Class Data (the same data used here, but with only the setosa and virginica species) and Telescope Data. In the lower left-hand corner of ML Studio, I located the New icon and clicked on it.
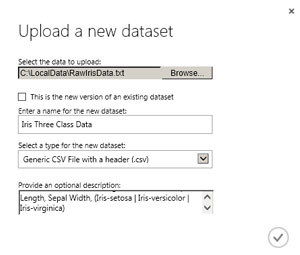
From there I had the option of new Dataset or new Experiment, so I clicked on Dataset, and then clicked on the From Local File option/icon. This brought up a dialog box as shown in Figure 3. I used the Browse button to target the local file, named the data set "Iris Three Class Data," selected type GenericCSV file with a header (.csv), and typed in a brief description of the data set.
 [Click on image for larger view.]
Figure 3. Creating a New Dataset
[Click on image for larger view.]
Figure 3. Creating a New Dataset
I clicked on the OK checkmark and ML Studio uploaded the local file into Azure storage and saved it. Back in the Datasets view in ML Studio, I did a page refresh and the iris data was now visible along with the demo data sets. Note: in the pre-release version of ML Studio I used, it wasn't possible to delete a Dataset. So, when investigating, I suggest that you create a single data set with a generic name like Dummy Data. Then when you need a different data set, use the "This is a new version of an existing dataset" option so that your ML Studio workspace doesn't become overrun with orphaned data sets that can't be deleted.
Creating the Experiment
To create the neural network experiment. I clicked on the New icon in the lower left-hand corner of ML Studio, and then clicked on the Experiment option. Next, in the left-hand pane, I clicked on the Saved Datasets category, and then scrolled to the Iris Three Class Data item I just created and dragged it onto the design pane. At the top of the design surface, I entered Iris Experiment as the title. At this point, you could right-click on the bottom, output node on the Iris Data module, and select the Visualize option to verify your data set is correct.
It's easy to underestimate how much effort is involved in manipulating source data before applying ML algorithms. Typical tasks include rearranging data columns, deleting unwanted columns, dealing with missing values, encoding non-numeric data, and splitting data into training and test sets. From a developer's point of view, for the iris data experiment these tasks might take the form of code that resembles:
string[][] rawData = LoadData("RawIrisData.txt");
rawData = RemoveMissing(rawData, '?');
rawData = SwapColumns(rawData, 0, 4);
double[][] data = ConvertToNumeric(rawData);
data = Normalize(data);
double[][] trainData;
double[][] testData;
MakeTrainTest(data, 0.80, out trainData, out testData);
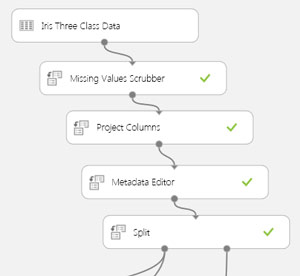
The image in Figure 4 shows a close-up of the first four ML Studio modules that perform these tasks. In many ML scenarios, the raw data has missing values and the most common approach to deal with them is to simply delete all data item rows that contain one or more missing values, and ML Studio gives you that option as Remove entire row. However, with the iris data there are no missing values, so the Missing Values Scrubber module will have no effect and is included just to show you how to use it when needed.
 [Click on image for larger view.]
Figure 4. Initial Data Processing
[Click on image for larger view.]
Figure 4. Initial Data Processing
The Project Columns module allows you to specify any columns you want to omit. In this case, I selected the "Select all columns" option. ML Studio examines your data and makes intelligent guesses whether column values are string categorical data or numeric data. The Metadata Editor module allows you to override the ML assumptions and also allows you to specify which column is the Label column; that is, the variable to predict. I selected the species column (here's where having column headers is a big help) and specified it was the Label column. I left the other four columns as Feature (predictors) columns.
The Split module does just that -- it divides data into a training set, used to create an ML model, and a test set, used to estimate the accuracy of the model. Here, I specified 0.8 in the module's parameter pane so the training data would be 80 percent of the 150 items (120 items) and the test set would be the remaining 20 percent (30 items). The Split module also has a Boolean parameter named Stratified split. When working with ML Studio, you will certainly come across parameters whose meaning you don't understand. The question-mark icon in the lower right will give you access to the ML Studio Help.
To summarize, when working with neural networks, pre-processing your data is often extremely time-consuming and just not very much fun. ML Studio makes working with data much, much quicker and easier. The only downside is that you have to get used to working with cloud-based data storage.
Training the Neural Network
Training a neural network is the process of finding values for its weights and bias terms, which are used in conjunction with input values to generate outputs and predictions. Put another way, training a model is the process of finding a set of weight values so that when presented with input data from the training set (in this case, four numeric values, for sepal length and width, and petal length and width), the computed outputs (either setosa, versicolor or virginica) closely match the known outputs in the training data. Once the weights and bias values have been determined, the resulting model can be presented with the test data. The accuracy of the model on the test data (the percentage of correct predictions) gives you a rough estimate of how well the model will do when presented with new data where the true output isn't known.
For the iris demo, a code-based approach to training might resemble:
int numInput = 4;
int numHidden = 7;
int numOutput = 3;
NeuralNetwork nn =
  new NeuralNetwork (numInput, numHidden, numOutput);
int maxEpochs = 1000;
double learnRate = 0.10;
nn.Train(trainData, maxEpochs, learnRate);
The image in Figure 5 shows a close-up of the equivalent ML Studio training-related modules. In the demo, the Train Model module accepts as input the Neural Network Classification module. Unlike the other connections, this isn't really a data flow. Instead it specifies exactly what kind of ML model is to be used. Alternatives to Neural Network Multiclass include modules Neural Network Binary (when the variable to predict can take only one of two possible values, such as "male" or "female"), Averaged Perceptron Binary, Boosted Decision Tree Binary and others.
 [Click on image for larger view.]
Figure 5. Training the Model
[Click on image for larger view.]
Figure 5. Training the Model
ML Studio isn't magic, and it's up to you to know which model to use. A developer analogy with Visual Studio is that the Microsoft .NET Framework has hundreds of data structures, such as generic Dictionary, HashSet and generic Queue, but it's up to you to know exactly what each data structure does. In the same way, it's up to you to learn a bit about ML classifiers.
The Neural Network module has some important parameters, such as the learning rate, and the momentum, that can greatly affect how well the resulting model predicts. Again, it's up to you to understand what these parameters are and how they work. Fortunately, ML Studio has well-chosen default values for most module parameters.
Evaluating the Model
After the demo model has been trained, the next step is to feed the training data and the test data to the model, calculate the computed outputs, and calculate the accuracy of the computed outputs (against the known outputs). In code this might look like:
nn.ComputeOutputs(trainData); // Score
double trainAccuracy = nn.Accuracy(trainData); // Evaluate
nn.ComputOutputs(testData); // Score
double testAccuracy = nnAccuracy(testData); // Evaluate
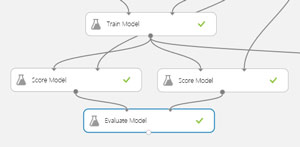
The image in Figure 6 shows a close-up of the relevant scoring and evaluating modules. Each of the two Score Model modules accepts two input flows. The first input is the trained model (the information needed to compute outputs), and the second input is either a training set or test set (the data inputs needed). The results of these two scoring modules are sent to the Evaluate Model module, which computes accuracy.
 [Click on image for larger view.]
Figure 6. Scoring and Evaluating the Model
[Click on image for larger view.]
Figure 6. Scoring and Evaluating the Model
The image in Figure 7 shows the results in the Evaluate Model module for the test data. The chart is called a confusion matrix in ML terminology. There's a similar chart of results for the training data, which I cropped out. The model correctly predicted all instances of species setosa and virginica (the 100 percent values). For the versicolor species in the training data, 87.5 percent were correctly predicted, but 12.5 percent were incorrectly classified as virginica, although none were incorrectly classified as setosa.
 [Click on image for larger view.]
Figure 7. Testing Data Accuracy
[Click on image for larger view.]
Figure 7. Testing Data Accuracy
The result information for an ML Studio Neural Network model is rather sparse compared to results from other models, such as Logistic Regression, and because ML Studio is a cloud service, by the time you read this article, the result information for neural network models might be enhanced and you might see additional information.
Making Predictions
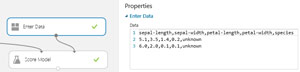
Once an ML Studio neural network model has been created and evaluated it can be used to make predictions on data with unknown outputs. I wanted to predict the species of two hypothetical iris flowers. One approach would be to create and upload a new ML Studio Dataset and then score it in the same way as the training and test data sets. But for a limited amount of data, a more interactive approach is to use the Enter Data module as shown in Figure 8.
 [Click on image for larger view.]
Figure 8. Entering New Data to Predict
[Click on image for larger view.]
Figure 8. Entering New Data to Predict
The Enter Data module allows you to create a Dataset module on the fly. The format of the data in the module must exactly match the format of the data used to train the model, which means the column headers are required. The output from the Enter Data module is combined with the output from the Train Model module. After the experiment is run, you can see the results by clicking on the Visualize option of the Score Model module, as shown previously in Figure 2.
If you were making predictions using a procedural programming language, the code could resemble this:
double[] unknown = new double[] { 5.1, 3.5, 1.4, 0.2 };
double[] result = nn.ComputeOutputs(unknown);
int y = MaxIndex(result);
if (y == 0)
  Console.WriteLine("Predicted species is setosa");
else if (y == 1)
  Console.WriteLine("Predicted species is versicolor");
else if (y == 2)
  Console.WriteLine("Predicted species is virginica");
No Code?
This article has just scratched the surface of ML Studio, but gives you enough information to replicate the iris experiment and give the tool a try. You might have noticed this article doesn't include any coding. However, one of the coolest things about ML Studio is that you can write your own custom modules -- I'll cover this topic in future columns.
My hunch is that creating neural network models with ML Studio will nicely complement creating neural network models from scratch using C# or some other language. ML Studio allows you to create a basic model very quickly, as sort of a rapid prototype. Then you can create a custom neural network with advanced characteristics such as drop-out or particle swarm optimization.