Tips and Tricks
Create a SharePoint Hosted App with Visual Studio
The hooks in SharePoint Apps allow developers to streamline the process of creating them without SharePoint getting in the way.
- By Malin De Silva
- 04/30/2015
App is the keyword when someone starts speaking about what's new in SharePoint 2013. Apps for SharePoint (or, more simply, SharePoint Apps) provide some incredibly easy-to-build solutions for SharePoint-based environments, and they also offer wonderful opportunities for developers to market their apps in the Apps for SharePoint store.
First, a quick background: SharePoint 2010 introduced the sandboxed concept, the predecessor to SharePoint Apps, but it offered limited access for developers at the site-collection level. It had many issues and had to work under several code access security (CAS) policies. What grew out of that was the need for a new concept that would allow developers to become more productive, efficient and have more freedom and, thus, SharePoint Apps.
There are two development approaches to SharePoint Apps.
- SharePoint-hosted Apps -- Host the app within SharePoint and use the JavaScript Client-Side Object Model
- Provider-hosted Apps -- Host the app externally from SharePoint and use all the options available with the Client-Side Object Model
One of the important things to note is that a SharePoint App creates a sub-site of the site where the app is installed and supports creating lists, defining properties and so on.
Apps vs. SharePoint Solutions
SharePoint Apps have a number of advantages compared to the farm solutions when you consider the safety, scaling and integration of the deployment environment. Unless there's a need to access highly secured entities in SharePoint, it's preferred to use apps over farm solutions with SharePoint 2013.
Here are some important notes to be made on SharePoint Apps when compared with farm solutions:
- App code never runs within the SharePoint host environment.
- Apps have two scopes: They can work within the scope of a SharePoint site, as well as with a special SharePoint site called the App Catalog.
- No down time is required for the whole environment when an app is being upgraded.
Scenario
In this example, I'll create a Quick Notes app where the App users will be able to add notes with a title and a description and then view the notes. The information will be stored inside the app as a list. The QuickNotes list will contain a Description column with the data types in addition to the default columns including Title, which will be used as the note title.
Getting Started with Visual Studio
Visual Studio supports creating SharePoint Apps as it does for any SharePoint development. If you're creating an app for SharePoint Online then you can use "Napa" Office 365 Development Tools, as well. For this example, I'll use Visual Studio 2013. If you use Visual Studio 2012, make sure to enable Office Developer Tools for Visual Studio.
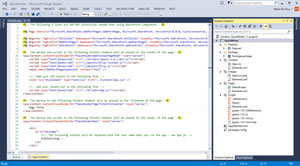
Go to New Project Wizard and select "App for SharePoint" from the Office/SharePoint section. Name the project QuickNotes. The New app for SharePoint window will appear. In the URL, give the deployment URL and select "SharePoint-hosted" as the hosting option and click Finish.
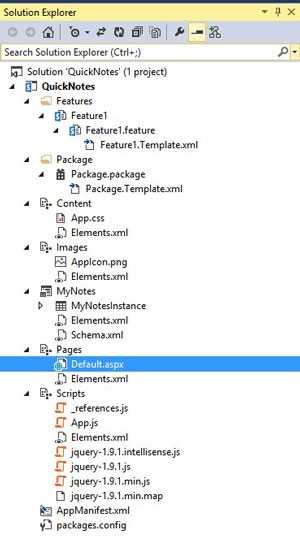
You can see Solution Explorer with several folders in it, as shown in Figure 1. There's a Feature and a folder for content such as style sheets, a folder for images, and a folder for pages and scripts.
 [Click on image for larger view.]
Figure 1: Using New Project Wizard To Create QuickNotes App
[Click on image for larger view.]
Figure 1: Using New Project Wizard To Create QuickNotes App
Right-click on the project in Solution Explorer and add a new List in the Office/SharePoint section of the Add New Item window. Name it MyNotes and select the Default (Custom List) template.
Then replace the content inside the Default.aspx file within the <asp:Content> element with the ContentPlaceHolderID property value set to PlaceHolderMain with following HTML:
<div>
  <table>
    <tr>
      <td>Note: </td>
      <td><input type="text" id="QuickNoteName" /></td>
      <td><input id="AddNoteButton" type="button" value="Add" /></td>
    </tr>
  </table>
  <br />
  <ul id="QuickNotes"></ul>
</div>
This includes an HTML table with a label, textbox and a button for adding notes. Then an unordered list will display notes as they're added.
Now, replace the content inside the App.js file with the JavaScript in Listing 1.
Listing 1: JavaScript to Replace Content Inside App.js File
'use strict';

var context = SP.ClientContext.get_current();
var collListItem = '';

$(document).ready(function () {
  loadNotes();
  $("#AddNoteButton").click(function () {
    var quickNoteName = $("#QuickNoteName").val();
    if (quickNoteName != null) {
      var oList = context.get_web().get_lists().getByTitle('MyNotes');
      var itemCreateInfo = new SP.ListItemCreationInformation();
      var oListItem = oList.addItem(itemCreateInfo);
      oListItem.set_item('Title', quickNoteName);
      oListItem.update();
      context.load(oListItem);
      context.executeQueryAsync(noteAddingSuccess, noteAddingFail);
    }
    else {
      alert("Title cannot be empty.");
    }
  });
});

function noteAddingSuccess() {
  $("#QuickNoteName").text('');
  loadNotes();
}

function noteAddingFail(sender, args) {
  alert("Failed adding note" + args.get_message());
}

function loadNotes() {
  var oList = context.get_web().get_lists().getByTitle('MyNotes');
  var camlQuery = new SP.CamlQuery();
  camlQuery.set_viewXml('<View><RowLimit>100</RowLimit></View>');
  collListItem = oList.getItems(camlQuery);
  context.load(collListItem);
  context.executeQueryAsync(onNotesLoadSucceeded, onNotesLoadFailed);
}

function onNotesLoadSucceeded() {
  var listItemInfo = '';

  var listItemEnumerator = collListItem.getEnumerator();

  while (listItemEnumerator.moveNext()) {
    var oListItem = listItemEnumerator.get_current();
    listItemInfo = listItemInfo + '<li>' + oListItem.get_item('Title') + '</li>';
  }

  $('#QuickNotes').html(listItemInfo);
}

function onNotesLoadFailed(sender, args) {
  alert("Failed loading notes" + args.get_message());
}
I used the JavaScript Object Model for querying the list data and for adding list items. The same can be done using a SharePoint REST API reference.
Let's walk through the process. First, it asks to load the current notes. Then the button with an attached click event and AddNoteButton ID. reads the value inside the textbox with the QuickNoteName ID. This creates a list item with the value assigned as the list item title. The executeQueryAsync function has three overloads. I've used the one with two parameters, which can define a function each for success and failure. The other two overloads include one without any parameters and another with only the success parameter.
When function execution fails, an error message is received by the server. On success it asks to load the items, which includes the newly added item to the unordered list.
The loadNotes function reads items available within the MyNotes list and displays them inside an unordered HTML list. This also has an executeQueryAsync function call that will, upon success of the list, load items to the client context in an unordered list.
Exploring the Visual Studio Solution
If you're familiar with SharePoint farm solution creation, packaging a SharePoint app is quite similar to that.
If you explore Figure 2, you will see four modules named by default, as follows:
- Content -- Includes content files such as CSS
- Images -- Images relevant to the app
- Pages -- .aspx and .html pages related to the app
- Scripts -- JavaScript references related to the app
These modules are also included in the feature named Feature1, along with the list definition and list instance. The QuickNotes package includes the Feature1.
 [Click on image for larger view.]
Figure 2: Four Modules Created for QuickNotes App
[Click on image for larger view.]
Figure 2: Four Modules Created for QuickNotes App
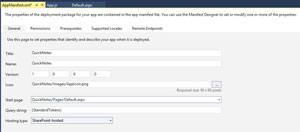 [Click on image for larger view.]
Figure 3: General Tab Setting Can Be Customized
[Click on image for larger view.]
Figure 3: General Tab Setting Can Be Customized
The Visual Studio solution provides an easy way to interact with the properties of the app deployment through a simple designer window. Click on the AppManifest.xml to change the deployment package properties. It has five tabs:
1. General
This tab includes the app title, name, version, app icon, start page, query string and hosting type, as shown in Figure 3. These are general settings, but you can change them to customize the app's appearance and naming.
2. Permissions
A SharePoint-hosted app functions as a sub-Web inside a host Web so it needs to provide storage, security and everything else to facilitate a full-fledged system by a developer. But it may not be just about information installed within an app Web. Sometimes an app may require data from a host Web or another site in a site collection. Also, it might require access to service applications, like Business Connectivity Services.
When an app requires another level of data and service access, it's important to inform the user who installs the app. The developer can define those permissions in the this tab, as shown in Figure 4.
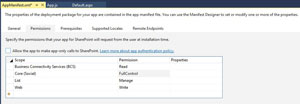 [Click on image for larger view.]
Figure 4: Customizing Permissions
[Click on image for larger view.]
Figure 4: Customizing Permissions
When the user installs the app, he will be notified that these permissions are being used from the app and will ask the user to accept it as a trusted app.
3. Prerequisites
Some service applications are required to to be installed in order to make the app functional. Such capabilities are defined as prerequisites, and you can define them in the Prerequisites tab shown in Figure 5.
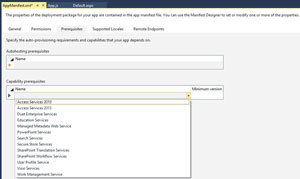 [Click on image for larger view.]
Figure 5: Defining Service Prerequisites
[Click on image for larger view.]
Figure 5: Defining Service Prerequisites
4. Supported Locales
In scenarios where the app needs to support multiple locales, they can be defined under this tab by specifying the resource files for each locale.
5. Remote Endpoints
Under this tab is where you include domain names that point to remote services, so they'll be validated by the proxies as valid requests.
Testing the Solution
You can test a SharePoint app by deploying it to a SharePoint Developer site. To deploy the solution to the developer site through Visual Studio, right- click on the solution in the Solution Explorer and select Deploy Solution. The location to which the app was deployed will be displayed in the output window, as shown in Figure 6.
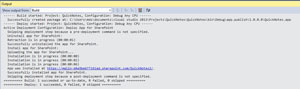 [Click on image for larger view.]
Figure 6: Location of App Displays in Output Window
[Click on image for larger view.]
Figure 6: Location of App Displays in Output Window
Once the apps is browsed through the published URL, you can access the app and add notes, as shown in Figure 7.
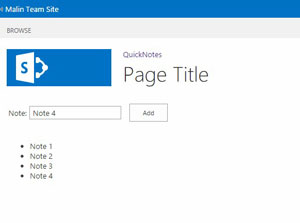 [Click on image for larger view.]
Figure 7: Browse the App to Access It
[Click on image for larger view.]
Figure 7: Browse the App to Access It
If you need to browse through the list where the information is stored, replace the URL in the "/Pages/.." section with "/Lists/MyNotes/" and browse through the URL. What you should now see is a simple app that shows the list capabilities inside the SharePoint-hosted app. From there, you can add more functionality and expand its scope.
Publishing Apps for SharePoint
Apps for SharePoint can be published to two places:
- The public Office store
- Organization app catalog
The public Office store is somewhat similar to the common smartphone app marketplace, where you can publish apps for users to download either for free or a fee. To publish apps to it, you need to have a Microsoft Seller Dashboard account. When submitting an app, Microsoft performs a set of necessary security checks to verify the app is secure. You can then specify whether to enable a per-user or per-site subscription license for the app.
An organizational app catalog is a dedicated site collection hosted in a SharePoint Web application. Typically, a Web application administrator or tenant administrator specifies who can publish to a specific catalog, so you would have to work with that administrator to determine the process for inclusion.
The success of the smartphone apps and the app model for distributing apps already make it attractive for developers, let alone SharePoint app developers. Apps for SharePoint open up those possibilities even more.
About the Author
Malin De Silva is a SharePoint Specialist at Exilesoft and has been involved in many custom development projects, intranets, search, and other projects using SharePoint, .NET, Java and PHP. Malin is a frequent contributor to many forums, including Sri Lanka .NET Forum and SharePoint Sri Lanka. Connect with him on LinkedIn or Facebook.