C# Corner
ASP.NET MVC 6 and Tag Helpers, Part 2
Now that you know how to create tag helpers, let's create a custom one that loads a bootstrap-select dropdown via a remote URI.
Last time, we looked at the basics of tag helpers in ASP.NET MVC 6 and I showed how to create one. Let's dig a bit deeper this time, and now I'll show how to create a custom tag helper that loads a bootstrap-select dropdown through a remote URI.
As you have seen in the first part of this series, tag helpers are used to clean up Razor views. Custom tag helpers are like custom HTML helpers except they are exposed to the developer as HTML rather than a function call.
To get started install dnvm if you don't already have it installed (I show you how in Part 1).
Then upgrade dnvm by running "dnvm upgrade –u". The current latest version of dnvm is 1.0.0-rc1-15838. Next pull down the code for Part 1. Then open up the HelloMvc solution in Visual Studio 2015. Next open up the project.json file and update it to match Listing 1.
Listing 1: Updated Project.json for MVC 6 RC1
{
  "version": "1.0.0-*",
  "webroot": "wwwroot",
  "exclude": [
    "wwwroot"
  ],
  "packExclude": [
    "**.kproj",
    "**.user",
    "**.vspscc"
  ],
  "dependencies": {
    "Microsoft.AspNet.Server.Kestrel": "1.0.0-*",
    "Microsoft.AspNet.Diagnostics": "1.0.0-*",
    "Microsoft.AspNet.Mvc": "6.0.0-*",
    "Microsoft.AspNet.Server.IIS": "1.0.0-*",
    "Microsoft.AspNet.Server.WebListener": "1.0.0-*",
    "Microsoft.Framework.Logging": "1.0.0-*",
    "Microsoft.Framework.Logging.Console": "1.0.0-*",
    "Microsoft.AspNet.Mvc.TagHelpers": "6.0.0-rc1-16028",
    "Microsoft.AspNet.StaticFiles": "1.0.0-*",
    "Microsoft.Extensions.DependencyInjection": "1.0.0-*"
  },
  "commands": {
    "web": "Microsoft.AspNet.Hosting --server Microsoft.AspNet.Server.WebListener --server.urls http://localhost:5001",
    "kestrel": "Microsoft.AspNet.Hosting --server Microsoft.AspNet.Server.Kestrel --server.urls http://localhost:5004"
  },
  "frameworks": {
    "dnx451": { },
    "dnxcore50": { }
  }
}
Next run "dnu restore" either from a command prompt or through the Package Manager Console that is in Visual Studio from Tools | NuGet Package Manager | Package Manager Console. This will update the references for the solution. Next open up the Startup.cs file and add the following using statements:
using Microsoft.AspNet.Builder;
using Microsoft.Extensions.DependencyInjection;
using Microsoft.Framework.Logging;
Then update the ConfigureServices method and set up the ILoggerFactory dependency injection mapping:
public void ConfigureServices(IServiceCollection services)
{
    services.AddSingleton<ILoggerFactory, LoggerFactory>();
    services.AddMvc();
}
Next update the Configure method allow static files and to use the developer exception page:
public void Configure(IApplicationBuilder app, ILoggerFactory loggerFactory)
 {
     loggerFactory.AddConsole();
     app.UseStaticFiles();
     app.UseDeveloperExceptionPage();
     app.UseMvcWithDefaultRoute();
 }
See Listing 2 for the completed Startup.cs file.
Listing 2: Startup.cs Updated for MVC 6 RC1
using Microsoft.AspNet.Builder;
using Microsoft.Extensions.DependencyInjection;
using Microsoft.Framework.Logging;

namespace HelloMvc
{
    public class Startup
    {
        public void ConfigureServices(IServiceCollection services)
        {
            services.AddSingleton<ILoggerFactory, LoggerFactory>();
            services.AddMvc();
        }

        public void Configure(IApplicationBuilder app, ILoggerFactory loggerFactory)
        {
            loggerFactory.AddConsole();
            app.UseStaticFiles();
            app.UseDeveloperExceptionPage();
            app.UseMvcWithDefaultRoute();
        }
    }
}
Now that the solution is fully updated to work with MVC 6 RC1 let's add the custom tag helper. Create a new class named BootstapSelectTagHelper into a new directory named TagHelpers. Then add the using statement for TagHelpers to the class file:
using Microsoft.AspNet.Razor.Runtime.TagHelpers;
Next add the HtmlTargetElement attribute to the class declaration with a tag name of bs-select and with attributes select-url, search, and asp-for:
[HtmlTargetElement("bs-select", Attributes = "select-url, search,  asp-for")]
public class bootstrapSelectTagHelper : TagHelper
Then add properties to map to the data-url, search, and asp-for custom attributes:
public string DataUrl { get; set; }
public bool Search { get; set; }
public string AspFor { get; set; }
Next, override the Process method that sets the outputted tag name and html attributes for the custom Tag Helper:
public override void Process(TagHelperContext context, TagHelperOutput output)
 {
First set the output tag name to select:
output.TagName = "select";
Then add the output class attribute to include the selectpicker and form-control classes:
output.Attributes.Add("class", "selectpicker form-control");
Next add the data-url output attribute and set it to the DataUrl property value:
output.Attributes.Add("data-url", DataUrl);
Then add the data-live-search output attribute and set it to the Boolean Search property value:
output.Attributes.Add("data-live-search", Search);
Lastly set the output name and id attributes to the AspFor property value:
     output.Attributes.Add("name", AspFor);
     output.Attributes.Add("id", AspFor);
 }
Listing 3 shows the completed bootstrapSelectTagHelper class.
Listing 3: Custom bootstrap-Select Tag Helper
using Microsoft.AspNet.Razor.Runtime.TagHelpers;

namespace HelloMvc.TagHelpers
{
    [HtmlTargetElement("bs-select", Attributes = "data-url, search,  asp-for")]
    public class bootstrapSelectTagHelper : TagHelper
    {
        public string DataUrl { get; set; }
        public bool Search { get; set; }
        public string AspFor { get; set; }

        public override void Process(TagHelperContext context, TagHelperOutput output)
        {
            output.TagName = "select";
            output.Attributes.Add("class", "selectpicker form-control");
            output.Attributes.Add("data-url", DataUrl);
            output.Attributes.Add("data-live-search", Search);
            output.Attributes.Add("name", AspFor);
            output.Attributes.Add("id", AspFor);
        }
    }
}
Now that the server-side portion of the custom tag helper is completed it's time to implement the client-side.
Download the bootstrap-select JavaScript library from https://silviomoreto.github.io/bootstrap-select/. Place the contents of the dist folder into the wwwroot folder in the Visual Studio solution. Now create a new JavaScript file named ajax-bootstrap-select into the wwwroot/js directory that will load elements into the bootstrap-select custom tag helper via jQuery. Open up the ajax-bootstrap-select.js file and update its content to Listing 4.
Listing 4: Ajax-bootstap-select.js File
$(function () {
    $('.selectpicker').selectpicker();
    $(".selectpicker").each(function (index, item) {
        var url = $(item).attr("data-url");
        $.get(url).done(function (result) {
            $(result).each(function (i, val) {
                $(item)
                 .append($("<option></option>")
                 .attr("value", val)
                 .text(val));
            });
            $(item).selectpicker('refresh');
        });
    });
});
The ajax-bootstrap-select JavaScript initializes the select tag with the selectpicker CSS class that is created from the custom bootstrap-select tag helper. Then it iterates over each bootstrap-select element gets its data-url attribute and performs an HTTP GET AJAX call on the URI. Next it iterates over the JSON collection returned from the URI and adds option elements for each item to select tag. Lastly it calls the bootstrap-select refresh method to re-render the bootstrap-select control.
Now it's time to update the _Layout partial view to reference the bootstrap-select CSS and JavaScript files. Open up the _Layout.cshtml Razor view file. Then add the following CSS references into the <head> content:
<link rel="stylesheet" href="//maxcdn.bootstrapcdn.com/bootstrap/3.3.4/css/bootstrap.min.css" />
<link href="~/css/bootstrap-select.css" rel="stylesheet" />
Next add the following JavaScript references to the bottom of the <body> content:
<script src="https://code.jquery.com/jquery-2.1.4.min.js"></script>
<script src="//maxcdn.bootstrapcdn.com/bootstrap/3.3.4/js/bootstrap.min.js"></script>
<script src="~/js/bootstrap-select.js"></script>
<script src="~/js/ajax-bootstrap-select.js"></script>
See Listing 5 for the completed _Layout.cshtml view.
Listing 5: Updated _Layout.cshtml Razor View
<!DOCTYPE html>
<html>
<head>
    <meta charset="utf-8" />
    <meta name="viewport" content="width=device-width, initial-scale=1.0">
    <title>@ViewBag.Title - My ASP.NET Application</title>
    <link rel="stylesheet" href="//maxcdn.bootstrapcdn.com/bootstrap/3.3.4/css/bootstrap.min.css" />
    <link href="~/css/bootstrap-select.css" rel="stylesheet" />
</head>
<body>
    <div class="navbar navbar-inverse navbar-fixed-top">
        <div class="container">
            <div class="navbar-header">
                <button type="button" class="navbar-toggle" data-toggle="collapse" data-target=".navbar-collapse">
                    <span class="icon-bar"></span>
                    <span class="icon-bar"></span>
                    <span class="icon-bar"></span>
                </button>
            </div>
            <div class="navbar-collapse collapse">
                <ul class="nav navbar-nav">
                    <li><a href="/">Home</a></li>
                </ul>
            </div>
        </div>
    </div>
    <div class="container body-content">
        @RenderBody()
        <hr />
        <address>
            @if (@Model != null)
            {
                @Model.Address
            }
        </address>
        <footer>
            <p>© @DateTime.Now.Year - My ASP.NET Application</p>
        </footer>
    </div>
    <script src="https://code.jquery.com/jquery-2.1.4.min.js"></script>
    <script src="//maxcdn.bootstrapcdn.com/bootstrap/3.3.4/js/bootstrap.min.js"></script>
    <script src="~/js/bootstrap-select.js"></script>
    <script src="~/js/ajax-bootstrap-select.js"></script>
</body>
</html>
The next step is to update the Home Controller's Index Razor partial view to use the custom tag helper. After the form-group div for the Age User property, add the following markup:
<div class="form-group">
     <label asp-for="UserType" class="col-md-2 control-label"></label>
     <div class="col-md-10">
         <bs-select asp-for="UserType" select-url="/Home/UserType" search="true" />
         <span asp-validation-for="UserType" class="text-danger"></span>
     </div>
 </div>
Your completed Index.cshtml Razor view should now look like Listing 6.
Listing 6: Updated Index.cshml Razor View
@using MvcSample.Web.Models
@model User
@{
    Layout = "/Views/Shared/_Layout.cshtml";
    ViewBag.Title = "Home Page";
    string helloClass = null;
}

<div class="row">
    @if (!String.IsNullOrWhiteSpace(ViewBag.Success))
    {
        <div class="alert alert-success" role="alert">@ViewBag.Success</div>
    }

    <form asp-controller="Home" asp-anti-forgery="false" asp-action="CreateUser" method="post" class="form-horizontal" role="form">
        <div asp-validation-summary="ValidationSummary.All" class="text-danger"></div>
        <div class="form-group">
            <label asp-for="Name" class="col-md-2 control-label"></label>
            <div class="col-md-10">
                <input asp-for="Name" class="form-control" />
                <span asp-validation-for="Name" class="text-danger"></span>
            </div>
        </div>
        <div class="form-group">
            <label asp-for="Address" class="col-md-2 control-label"></label>
            <div class="col-md-10">
                <input asp-for="Address" class="form-control" />
                <span asp-validation-for="Address" class="text-danger"></span>
            </div>
        </div>
        <div class="form-group">
            <label asp-for="Age" class="col-md-2 control-label"></label>
            <div class="col-md-10">
                <input asp-for="Age" class="form-control" />
                <span asp-validation-for="Age" class="text-danger"></span>
            </div>
        </div>
        <div class="form-group">
            <label asp-for="UserType" class="col-md-2 control-label"></label>
            <div class="col-md-10">
                <bs-select asp-for="UserType" select-url="/Home/UserType" search="true" />
                <span asp-validation-for="UserType" class="text-danger"></span>
            </div>
        </div>
        <div class="form-group" style="margin-top: 1ex">
            <div class="col-md-offset-2 col-md-10">
                <input type="submit" value="Save" class="btn btn-default" />
            </div>
        </div>
    </form>
</div>
The next step is to update the User View Model class to include a string property for the user's type drop-down control:
[Display(Name="Type")]
public string UserType { get; set; }
Your completed User class should now look like Listing 7.
Listing 7: User.cs Updated To Include UserType Property
using System.ComponentModel.DataAnnotations;

namespace MvcSample.Web.Models
{
    public class User
    {
        [Required]
        [MinLength(4)]
        public string Name { get; set; }
        public string Address { get; set; }
        public int Age { get; set; }

        [Display(Name="Type")]
        public string UserType { get; set; }
    }
}
Lastly I update the Home Controller class to return a list of user types in a action method named UserType:
public IActionResult UserType()
{
    var list = new List<string> { "Employee", "Employer", "Customer"  };
    return Json(list);
}
See Listing 8 for the updated Home Controller class.
Listing 8: HomeController.cs Updated To Include UserType Action Method
using Microsoft.AspNet.Mvc;
using MvcSample.Web.Models;
using System.Collections.Generic;

namespace MvcSample.Web
{
    public class HomeController : Controller
    {
        public IActionResult Index()
        {
            return View(CreateUser());
        }

        public User CreateUser()
        {
            User user = new User()
            {
                Name = "My name",
                Address = "My address"
            };

            return user;
        }

        public IActionResult UserType()
        {
            var list = new List<string> { "Employee", "Employer", "Customer"  };
            return Json(list);
        }
    }
}
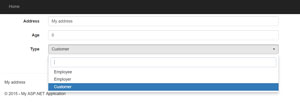
You should now be able to run the application via the "dnx web" command and see the custom bootstrap-select Tag Helper in action as seen in Figure 1.
 [Click on image for larger view.]
Figure 1: Finished Application
[Click on image for larger view.]
Figure 1: Finished Application
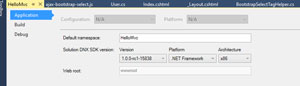
You can also run the application directly in Visual Studio by updating the project settings. First update the Application Solution DNX SDK Version to be 1.0.0-rc1-15838 as seen in Figure 2.
 [Click on image for larger view.]
Figure 2: Application Solution DNX SDK Version Update to RC1
[Click on image for larger view.]
Figure 2: Application Solution DNX SDK Version Update to RC1
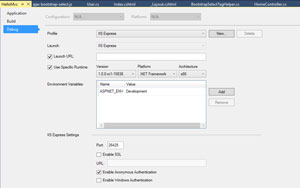
Next update the Debug Use Specific Runtime value to as be 1.0.0-rc1-15838 as seen in Figure 3.
 [Click on image for larger view.]
Figure 3: Debug Use Specific Runtime Version Update to RC1
[Click on image for larger view.]
Figure 3: Debug Use Specific Runtime Version Update to RC1
Creating a custom tag helper in ASP.NET MVC 6 in fairly easy to do. I recommend creating a custom tag helper in situations where you would have created a custom HTML helper in prior versions of ASP.NET MVC, as they are more easily readable by both designers and developers.
Next time, I'll show how to implement a custom view component, which allows for the separation of the markup and code for a reusable partial view.