Cross Platform C#
Visual Studio Mobile Center: A Better Way To Build Mobile Apps
Learn how Mobile Center helps you easily develop, build, test, distribute, and monitor your mobile apps.
- By Greg Shackles
- 05/09/2017
If you're building a mobile app, there's a lot of things you need to set up. How do you build and distribute your app? How do you authenticate your users? Do you have some sort of backend set up to store your data? How are you monitoring errors and usage? The list goes on and on.
Microsoft has a lot of different offerings targeting these very needs. There's Xamarin Insights for crash reporting and monitoring, Test Cloud for device testing, HockeyApp for distribution, Azure Mobile Services for storage and authentication, and Visual Studio Team Services for builds. These are great options, but it's still a lot to piece together for every app you need to manage. Microsoft recently introduced a new product to help consolidate the story: Visual Studio Mobile Center.
Mobile Center takes all of these separate services and unifies them into a single cohesive experience, allowing you to manage your builds, tests, monitoring, and back-end services in the same place. In fact, Mobile Center is effectively the next version of HockeyApp and Test Cloud, which are being completely migrated into Mobile Center over time. It's also up to you which pieces of Mobile Center to use, so you still have the flexibility to use any other tools or products you wish. Along the same lines, you're also not obligated to write your apps with Xamarin either; Mobile Center supports Xamarin, React Native, Objective-C and Swift for iOS, and Java for Android.
In this article I'll walk through some of the features Mobile Center has to offer, and how easy it is to start leveraging them with a Xamarin application.
Build
First I'll go ahead and set up some continuous integration builds for my app, which will just be a simple Xamarin.Forms app. Mobile Center can connect to your GitHub account, allowing you to easy pick the repository and project you'd like to build and get started. In the future they will be adding support for more source control systems as well. Once you do this, Mobile Center will automatically set up a build for your master branch and queue it up.
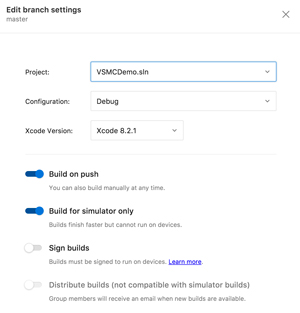
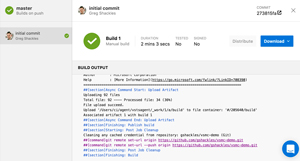
You can also customize the build settings for a given branch (see Figure 1) to specify things like the target solution file, compiling in Debug or Release mode, whether builds should kick off automatically when that branch is committed to, and more. For each build you'll be able to see the logs, build errors, and download the compiled app if it was successful (see Figure 2).
 [Click on image for larger view.]
Figure 1: Setting up builds for the master branch
 [Click on image for larger view.]
Figure 2: Successful first build of the project
That's all it takes to get started building your app in Mobile Center! It just takes a few clicks to get continuous integration for every commit you make in your repository.
Test
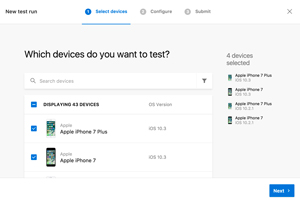
If you've used Test Cloud before, you'll feel right at home in the Test area of Mobile Center because it's built on Test Cloud. As shown in Figure 3, you can select the set of devices you'd like to run your tests on and specify if your tests are written in Xamarin.UITest, Calabash, or Appium. Mobile Center will provide you with a command you can run locally to submit your tests to Mobile Center. In the future this will be more integrated, eliminating the need for running the separate command, but in the meantime you can still take advantage of the power of testing on thousands of real devices and have those results show up in Mobile Center alongside everything else.
 [Click on image for larger view.]
Figure 3: Choosing devices for testing in Test Cloud
Distribute
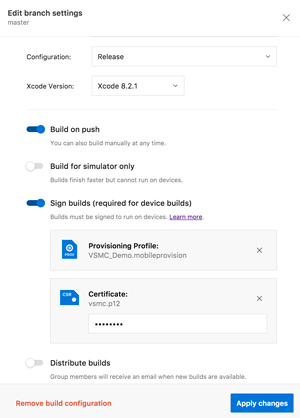
Now that the app is being built automatically, the next step is to start distributing it to testers. In order to do this, first I'll need to change my branch's build settings to compile in Release mode, and since I'm doing this for an iOS app I also need to upload a provisioning profile and signing certificate (see Figure 4). You can also optionally specify that Mobile Center should automatically distribute builds for this branch to your testers, but I'll leave that off for now.
 [Click on image for larger view.]
Figure 4: Updating the build settings to prepare for distribution
Updating those settings will trigger a new build of the app that will be built for distribution. Once it completes, you can click the Distribute button on the build status page to start the distribution process. You can set up different distribution groups to control who you send each build to, and also specify release notes that will be shown to your testers. Mobile Center will send out an email to everyone in that distribution group to let them know a new release is available, and allow them to download it and get started.
With just a few more clicks I've got beta distribution happening in Mobile Center, and can even set that up to happen automatically to enable continuous delivery to my users.
Tables
Now that I've got builds and distribution going, I can now add a quick backend for my app. Mobile Center's Tables feature provides an easy way to create table storage for an app, handling the creation of all the required Azure resources behind the scenes for you.
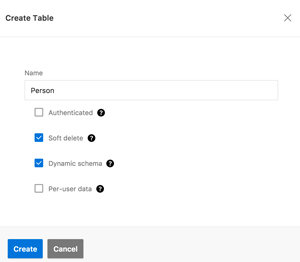
There are a few options for a new table, such as specifying whether a user must be authenticated to use it, soft versus hard deletes, and more. For this demo I'll create a simple unauthenticated table named Person (see Figure 5). You can edit the schema for the table right in Mobile Center, or you can have it update dynamically based on the data being inserted into it.
 [Click on image for larger view.]
Figure 5: Creating a table for storing the app's data
First, go ahead and install the Microsoft.Azure.Mobile.Client NuGet package to bring in the required libraries. Once that's installed, open the AppDelegate class and add this line to its FinishedLaunching method:
Microsoft.WindowsAzure.MobileServices.CurrentPlatform.Init();
Next, in Listing 1 we'll start updating the app to display the contents of this table.
Listing 1. Displaying Content of the Table.
<?xml version="1.0" encoding="utf-8"?>
<ContentPage xmlns="http://xamarin.com/schemas/2014/forms" xmlns:x="http://schemas.microsoft.com/winfx/2009/xaml" xmlns:local="clr-namespace:VSMCDemo" x:Class="VSMCDemo.VSMCDemoPage">
  <ListView x:Name="People" Margin="20">
    <ListView.ItemTemplate>
      <DataTemplate>
        <TextCell Text="{Binding Name}" />
      </DataTemplate>
    </ListView.ItemTemplate>
  </ListView>
</ContentPage>
With that defined we can add some logic to query the table, as well as insert new data into it. To keep this demo as simple as possible, the app will insert a new person into the table each time the app loads, and then query the full list of people from the table to display, as shown in Listing 2.
Listing 2: Adding Logic to Query the Table
private static MobileServiceClient MobileService = new MobileServiceClient("https://your-service-url.azurewebsites.net");

protected override void OnAppearing()
{
    base.OnAppearing();

    UpdateList();
}

private async Task UpdateList()
{
    var table = MobileService.GetTable<Person>();

    await table.InsertAsync(new Person
    {
        Name = $"Greg {Guid.NewGuid()}"
    });

    var people = await table.ToListAsync();

    People.ItemsSource = people;
}
You can get your mobile service URL from the root Table page in Mobile Center. If you run the app a few times you should see new entries being added to the table, as seen in Figure 6. You can also view this data directly in Mobile Center as well. This only scratches the surface of what you can do with Mobile Center's table storage, but with just a few lines of code we've got a persistent backend for the app. There is even support for offline storage and syncing, which can be very important for mobile applications.
 [Click on image for larger view.]
Figure 6: The iOS app displaying the contents of the Person table
Identity
Authentication can be a painful thing to implement in your app, especially if you want to provide a variety of login providers for your users. Mobile Center handles a lot of that pain for you, allowing you to add authentication with Google, Facebook, Twitter, Microsoft, and Azure Active Directory. Once you set up these providers in the Mobile Center dashboard, all it takes is a few more lines of code to add authentication into your app.
Crashes
It's very important to monitor and report crashes for all of your apps to make sure your users aren't running into issues, so let's go ahead and add that to this app. First we'll need to add a couple new NuGet packages:
Microsoft.Azure.Mobile.Analytics and Microsoft.Azure.Mobile.Crashes.
Next, open App.xaml.cs and update the OnStart method:
protected override void OnStart()
{
    MobileCenter.Start(
        "ios=your-ios-secret;android=your-android-secret",
        typeof(Analytics), typeof(Crashes));
}
That's actually all that's needed to start collecting crash data from the app! To test this, let's update that OnAppearing method from earlier to throw an exception:
protected override void OnAppearing()
{
    base.OnAppearing();

    throw new ApplicationException("Boom goes the dynamite");
}
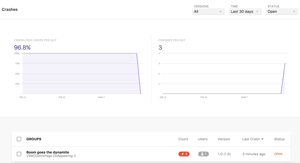
After running that a couple times, we can remove the exception to restore normal behavior. Now if you go look in the Crashes area of Mobile Center you'll see the crashes that just happened. Mobile Center will show you an overview of all the reported crashes, including metrics on what percentage of your users were impacted by crashes (see Figure 7). You can also dig into specific errors to see the full stacktrace as well as which devices reported the crash.
 [Click on image for larger view.]
Figure 7: Mobile Center displaying the crash reports it received
Crash reporting is essential for any application, and here we added that to the app with effectively a single line of code.
Analytics
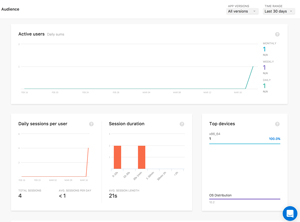
If you were paying close attention, you may have noticed that in the last section we also added and enabled the Mobile Center Analytics package. If you navigate to the Analytics section of Mobile Center you should already see some data flowing in here from the previous sessions (see Figure 8)! You can see how many users the app is seeing on a daily or monthly basis, how long they spend in the app, which device and OS version they use, and more. We got all of this for free without adding any extra code to the app, other than that MobileCenter.Start call earlier.
 [Click on image for larger view.]
Figure 8: Mobile Center displaying audience analytics
There is also support for adding custom events into your app in order to help collect information relevant to your app. For example, let's add an event to track each time we add a new person that gets called right after the insert:
Analytics.TrackEvent("PersonAdded");
Running the app a few times now will create some events, which will then show up in the Events section of Mobile Center Analytics (see Figure 9). You can dig into each event to see a more detailed breakdown for it. You can also optionally include extra information with your events as well.
 [Click on image for larger view.]
Figure 9: Mobile Center displaying custom event data it received
Events are a great and easy way to get better visibility into how users are actually using your app. Combining events and analytics with crash reporting also enables a much more powerful unified view into your user's experiences, and can make it much easier to track down issues by having a holistic view of how they got to the issue.
Summary
If you're building a mobile app, Mobile Center can help get you up and running with all of the various lifecycle and monitoring pieces you need quickly. In just a few clicks and not very much code we were able to build a new app that gets built on every commit, distributed to beta testers, has a database backend, reports crashes, and records metrics and analytics. You can pick and choose which pieces work for you, and you can even interact with it through their API so in the end you can leverage Mobile Center any way you want.