C# Corner
ASP.NET Core: Learning the Ropes, Part 3
Welcome to Part 3 of ASP.NET Core Learning the Ropes, wherein I show how to create the Contact Controller and Razor views for creating, updating, viewing and deleting contact records from a SQL Server database using ASP.NET Core MVC with Entity Framework Core.
To get started, download and open the code from Part 2. Next open up the Contact Controller class. Then add a using statement for the Models namespace:
using VSMASPCoreApp.Models;
Next add the Create GET controller action:
public IActionResult Create()
{
  return View();
}
Then I add the Create POST controller action that inserts a new Contact record into the database and returns the user back to the contacts list page:
[HttpPost]
 [ValidateAntiForgeryToken]
 public IActionResult Create([Bind("ContactId,FirstName,LastName,EmailAddress")] Contact contact)
 {
   if (ModelState.IsValid)
   {
     _contactRepository.AddContact(contact);
     return RedirectToAction(nameof(Index));
   }
   return View(contact);
 }
Next, I add the Details GET controller action that displays an existing contact record. If the contact record doesn't exist, we return a not found status code:
public IActionResult Details(int id)
 {
   var contact = _contactRepository.GetContactById(id);

   if (contact == null)
   {
     return NotFound();
   }

   return View(contact);
 }
Then I add the Edit GET controller action that displays an existing contact record or returns a not found status code if the record can't be found:
public IActionResult Edit(int id)
{
  var contact = _contactRepository.GetContactById(id);
  if (contact == null)
  {
    return NotFound();
  }
  return View(contact);
}
Next, I add the Edit POST controller action that updates an existing contact record. If the record doesn't exist a not found status code is returned:
[HttpPost]
[ValidateAntiForgeryToken]
public IActionResult Edit(int id, [Bind("ContactId,FirstName,LastName,EmailAddress")] Contact contact)
{
  if (id != contact.ContactId)
  {
    return NotFound();
  }

  if (ModelState.IsValid)
  {
    _contactRepository.UpdateContact(contact);
    return RedirectToAction(nameof(Index));
  }
  return View(contact);
}
Then I add the Delete GET controller action that displays an existing contact record:
public IActionResult Delete(int id)
{
  var contact = _contactRepository.GetContactById(id);
  if (contact == null)
  {
    return NotFound();
  }

  return View(contact);
}
Lastly, I add the Delete POST controller action that deletes an existing contact record:
  [HttpPost, ActionName("Delete")]
  [ValidateAntiForgeryToken]
  public IActionResult DeleteConfirmed(int id)
  {
    _contactRepository.DeleteContact(id);
    return RedirectToAction(nameof(Index));
  }
Your contact controller should now look like Listing 1.
Listing 1: Finished Contact Controller
using Microsoft.AspNetCore.Mvc;
using VSMASPCoreApp.Repositories;
using VSMASPCoreApp.Models;

namespace VSMASPCoreApp.Controllers
{
  public class ContactController : Controller
  {
    private readonly IContactRepository _contactRepository;

    public ContactController(IContactRepository contactRepository)
    {
      _contactRepository = contactRepository;
    }

    public IActionResult Index()
    {
      var contacts = _contactRepository.GetContacts();
      return View(contacts);
    }

    public IActionResult Create()
    {
      return View();
    }

    [HttpPost]
    [ValidateAntiForgeryToken]
    public IActionResult Create([Bind("ContactId,FirstName,LastName,EmailAddress")] Contact contact)
    {
      if (ModelState.IsValid)
      {
        _contactRepository.AddContact(contact);
        return RedirectToAction(nameof(Index));
      }
      return View(contact);
    }

    public IActionResult Details(int id)
    {
      var contact = _contactRepository.GetContactById(id);

      if (contact == null)
      {
        return NotFound();
      }

      return View(contact);
    }

    public IActionResult Edit(int id)
    {
      var contact = _contactRepository.GetContactById(id);
      if (contact == null)
      {
        return NotFound();
      }
      return View(contact);
    }

    [HttpPost]
    [ValidateAntiForgeryToken]
    public IActionResult Edit(int id, [Bind("ContactId,FirstName,LastName,EmailAddress")] Contact contact)
    {
      if (id != contact.ContactId)
      {
        return NotFound();
      }

      if (ModelState.IsValid)
      {
        _contactRepository.UpdateContact(contact);
        return RedirectToAction(nameof(Index));
      }
      return View(contact);
    }
    public IActionResult Delete(int id)
    {
      var contact = _contactRepository.GetContactById(id);
      if (contact == null)
      {
        return NotFound();
      }

      return View(contact);
    }

    [HttpPost, ActionName("Delete")]
    [ValidateAntiForgeryToken]
    public IActionResult DeleteConfirmed(int id)
    {
      _contactRepository.DeleteContact(id);
      return RedirectToAction(nameof(Index));
    }
  }
}
The next step is to update the Contact model class to have more friendly display names for the action views we'll create next. Open up the Contact model class and add a using statement for the data annotations namespace:
using System.ComponentModel.DataAnnotations;
Then use the Display data annotation to create the display names for the Contact model properties:
[Display(Name = "Id")]
public int ContactId { get; set; }
[Display(Name ="First Name")]
public string FirstName { get; set; }
[Display(Name ="Last Name")]
public string LastName { get; set; }
[Display(Name ="Email Address")]
public string EmailAddress { get; set; }
Your finished Contact model class should look like Listing 2.
Listing 2: Updated Contact Model Class
using System.ComponentModel.DataAnnotations;

namespace VSMASPCoreApp.Models
{
  public class Contact
  {
    [Display(Name = "Id")]
    public int ContactId { get; set; }
    [Display(Name ="First Name")]
    public string FirstName { get; set; }
    [Display(Name ="Last Name")]
    public string LastName { get; set; }
    [Display(Name ="Email Address")]
    public string EmailAddress { get; set; }
  }
}
Now that the model class is updated it's time to put it to use in the views. First, I update the index list view. Open up the Contact/Index.cshtml file and upate it to match Listing 3.
Listing 3: Contact/Index.cshtml
@model IEnumerable<Contact>

  <p>
     <a asp-action="Create">Create New</a>
  </p>
  @if (Model.Any())
  {
    <table class="table-striped table-responsive table-bordered">
      <thead>
        <tr>
          <th>First</th>
          <th>Last</th>
          <th>Email</th>
      <th></th>
        </tr>
      </thead>
      <tbody>
        @foreach (var contact in Model)
        {
          <tr>
            <td>@contact.FirstName</td>
            <td>@contact.LastName</td>
            <td>@contact.EmailAddress</td>
            <td>
              <a asp-action="Edit" asp-route-id="@contact.ContactId">Edit</a> |
              <a asp-action="Details" asp-route-id="@contact.ContactId">Details</a> |
              <a asp-action="Delete" asp-route-id="@contact.ContactId">Delete</a>
            </td>
          </tr>
        }
      </tbody>
    </table>
  }
  else
  {
    <div class="alert alert-info" role="alert">
      No contacts found, add a contact first.
    </div>
    }
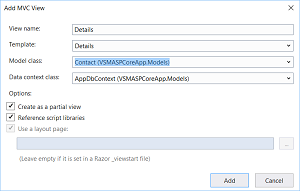
Now I create the Create partial view. Right click on the Views/Contact folder and select Add -> View and select the Create template, Contact model, and AppDbContext class as seen in Figure 1.
 [Click on image for larger view.]
Figure 1. Adding Create Partial View
[Click on image for larger view.]
Figure 1. Adding Create Partial View
Next, I create the Details partial view through the same way except I select the Details template option as seen in Figure 2.
 [Click on image for larger view.]
Figure 2. Adding Details Partial View
[Click on image for larger view.]
Figure 2. Adding Details Partial View
Then I add the Delete partial view in the same except I select the Delete template as shown in Figure 3.
 [Click on image for larger view.]
Figure 3. Adding Delete Partial View
[Click on image for larger view.]
Figure 3. Adding Delete Partial View
Lastly, I Add the Edit partial view in the same except I select the Edit template as seen in Figure 4.
 [Click on image for larger view.]
Figure 4. Adding Edit Partial View
[Click on image for larger view.]
Figure 4. Adding Edit Partial View
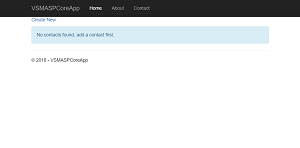
Now you can run the application and see the updated contact list view as seen in Figure 5.
 [Click on image for larger view.]
Figure 5. Updated Contacts List View
[Click on image for larger view.]
Figure 5. Updated Contacts List View
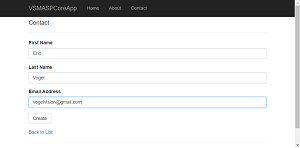
You can then click on the Create New button to create a new contact record as seen in Figure 6.
 [Click on image for larger view.]
Figure 6. Creating New Contact
[Click on image for larger view.]
Figure 6. Creating New Contact
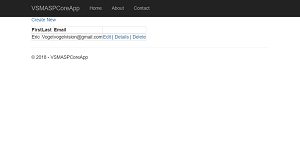
After you created a new contact record you can edit, view details and delete a record by clicking on the correct link in the contacts grid as seen in Figure 7.
 [Click on image for larger view.]
Figure 7. List with Created Contact
[Click on image for larger view.]
Figure 7. List with Created Contact
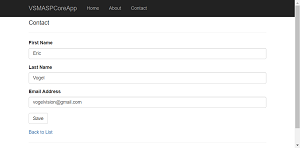
You can edit a record by clicking on the Edit link in the grid for a contact and you should see the form in Figure 8.
 [Click on image for larger view.]
Figure 8. Details View
[Click on image for larger view.]
Figure 8. Details View
You can edit an existing record by clicking on the Edit link in the grid for a contact as seen in Figure 9.
 [Click on image for larger view.]
Figure 9. Editing a Contact
[Click on image for larger view.]
Figure 9. Editing a Contact
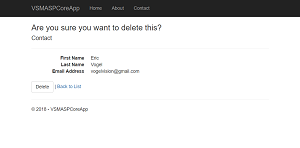
Lastly you can delete a contact record by clicking on the Delete link in the grid as seen in Figure 10.
 [Click on image for larger view.]
Figure 10. Deleting a Contact
[Click on image for larger view.]
Figure 10. Deleting a Contact
I've covered how to implement a controller and its views to create, read, update and delete a contact record using ASP.NET Core MVC. As you've seen, Visual Studio has some useful scaffolding code for creating CRUD views, and ASP.NET Core MVC is useful for creating cross-platform CRUD Web applications.
About the Author
Eric Vogel is a Senior Software Developer for Red Cedar Solutions Group in Okemos, Michigan. He is the president of the Greater Lansing User Group for .NET. Eric enjoys learning about software architecture and craftsmanship, and is always looking for ways to create more robust and testable applications. Contact him at [email protected].