The Data Science Lab
Sentiment Analysis Using a PyTorch EmbeddingBag Layer
Dr. James McCaffrey of Microsoft Research uses a full movie review example to explain the natural language processing (NLP) problem of sentiment analysis, used to predict whether some text is positive (class 1) or negative (class 0).
Natural language processing (NLP) problems are very challenging. A common type of NLP problem is sentiment analysis. The goal of sentiment analysis is to predict whether some text is positive (class 1) or negative (class 0). For example, a movie review of, "This was the worst film I've seen in years" would certainly be classified as negative.
In situations where the text to analyze is long -- say several sentences with a total of 40 words or more -- two popular approaches for sentiment analysis are to use an LSTM (long, short-term memory) network or a Transformer Architecture network. These two approaches are difficult to implement. For situations where the text to analyze is short, the PyTorch code library has a relatively simple EmbeddingBag class that can be used to create an effective NLP prediction model.
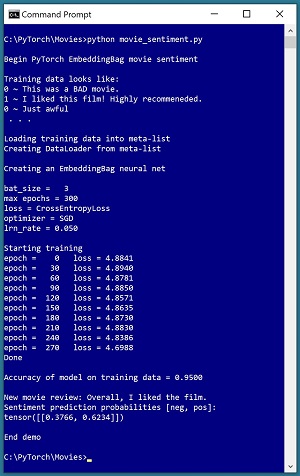
A good way to see where this article is headed is to take a look at the screenshot of a demo program in Figure 1. The goal of the demo is to predict the sentiment of a movie review. The demo training data consists of a text file of 20 very short movie reviews. The data looks like:
0 ~ This was a BAD movie.
1 ~ I liked this film! Highly recommeneded
0 ~ Just awful
 . . .
Notice that the word "recommeneded" is misspelled. Dealing with misspellings is one of dozens of issues that make NLP problems difficult. The demo program loads the training data into a meta-list using a specific format that is required by the EmbeddingBag class. The meta-list of training data is passed to a PyTorch DataLoader object which serves up training data in batches. Behind the scenes, the DataLoader uses a program-defined collate_data() function, which is a key component of the system.
 [Click on image for larger view.] Figure 1: Movie Review Sentiment Analysis Using an EmbeddingBag
The demo program uses a neural network architecture that has an EmbeddingBag layer, which is explained shortly. The neural network model is trained using batches of three reviews at a time. After training, the model is evaluated and has 0.95 accuracy on the training data (19 of 20 reviews correctly predicted). In a non-demo scenario, you would also evaluate the model accuracy on a set of held-out test data to see how well the model performs on previously unseen reviews.
The demo program concludes by predicting the sentiment for a new review of, "Overall, I liked the film." The prediction is in the form of two pseudo-probabilities with values [0.3766, 0.6234]. The first value at index [0] is the pseudo-probability of class negative, and the second value at [1] is the pseudo-probability of class positive. Therefore, the prediction is that the review is positive.
This article assumes you have an intermediate or better familiarity with a C-family programming language, preferably Python, and a basic familiarity with the PyTorch code library. The complete source code for the demo program is presented in this article and is also available in the accompanying file download. The training data is embedded as comments at the bottom of the program source file. All normal error checking has been removed to keep the main ideas as clear as possible.
To run the demo program, you must have Python, PyTorch and TorchText installed on your machine. The demo programs were developed on Windows 10 using the Anaconda 2020.02 64-bit distribution (which contains Python 3.7.6) and PyTorch version 1.8.0 for CPU installed via pip. Installation is not trivial. You can find detailed step-by-step installation instructions for installing Python and PyTorch in my blog post.
The TorchText library contains hundreds of useful classes and functions for dealing with natural language problems. The demo program uses TorchText version 0.9 which has many major changes from versions 0.8 and earlier. After installing Python and PyTorch you can install TorchText 0.9 by going to the web site and then downloading the appropriate whl file for your system, for example, torchtext-0.9.0-cp37-cp37m-win_amd64.whl for Python 3.7 running on Windows. After you download the whl file, you can install TorchText by opening a shell, navigating to the directory containing the whl file, and issuing the command "pip install (whl file)."
Note that this article is significantly longer than any other article in the Visual Studio Magazine Data Science Lab series. I originally split this article into three smaller articles but because NLP problems are very complex and their components (tokenizers, vocabulary objects, collating functions and so on) are tightly coupled, a series of articles made the topic more difficult, rather than easier, to understand. The moral of the story is that if you are not familiar with NLP, be aware that NLP systems are usually much more complicated than tabular data or image processing problems.
The Movie Review Data
The movie review data used by the demo program is artificial. There are just 20 items. In a non-demo scenario, you want at least several hundred training items and preferably many thousand. The 20-item training data is:
0 ~ This was a BAD movie.
1 ~ I liked this film! Highly recommeneded.
0 ~ Just awful
1 ~ Good film, acting
0 ~ Don't waste your time - A real dud
0 ~ Terrible
1 ~ Great movie.
0 ~ This was a waste of talent.
1 ~ I liked this movie a lot. See it.
1 ~ Best film I've seen in years.
0 ~ Bad acting and a weak script.
1 ~ I recommend this film to everyone
1 ~ Entertaining and fun.
0 ~ I didn't like this movie at all.
1 ~ A good old fashioned story
0 ~ The story made no sense to me.
0 ~ Amateurish from start to finish.
1 ~ I really liked this move. Lot of fun.
0 ~ I disliked this movie and walked out.
1 ~ A thrilling adventure for all ages.
The data separates the item 0-1 label from the item text using a "~" character because a "~" is less likely to occur in a movie review than other separators such as a comma or a tab.
In order to create an NLP sentiment analysis prediction model using a neural network with an EmbeddingBag layer, you must understand:
- How to create and use a tokenizer object
- How to create and use a Vocab object
- How to create an EmbeddingBag layer and integrate it into a neural network
- How to design a custom collating function for use by a PyTorch DataLoader object
- How to design a neural network that uses all these components
- How to train the network
- How to evaluate the prediction accuracy of the trained model
- How to use the trained model to make a prediction for a new, previously unseen movie review
- How to integrate all the pieces into a complete working program
All of this sounds a bit more intimidating than it really is. The entire demo program is just over 200 lines of code. If you methodically examine each of the nine steps as presented in this article, you will have all the knowledge you need to create a custom sentiment analysis system for short-input text.
The complete source code is presented in Listing 8 at the end of this article. If you learn like I do, a good strategy for understanding this article is to begin by getting the complete demo program up and running.
1. Understanding Tokenizers
Loosely speaking, a tokenizer is a function that breaks a sentence down to a list of words. In addition, tokenizers usually normalize words by converting them to lower case. Put another way, a tokenizer is a function that normalizes a sequence of tokens, replaces or modifies specified tokens, splits the tokens, and stores them in a list.
Suppose you have a movie review like:
This movie was BAD with a capital B! <br /> Don't waste your time.
The "basic_english" tokenizer which is used in the demo program would return a list with 16 tokens:
[this movie was bad with a capital b ! don ' t waste your time .]
Words have been converted to lower case, consecutive whitespace characters such as spaces have been reduced to a single space, and the HTML <br /> tag has been removed (actually converted to a single blank space character). Notice that the exclamation point, single-quote and period characters are considered individual tokens.
When working with NLP, you can either use a library tokenizer or implement a custom tokenizer from scratch. The demo program uses a tokenizer from the TorchText library. The statements that instantiate a tokenizer object are:
import torchtext as tt
g_toker = tt.data.utils.get_tokenizer("basic_english")
The leading "g_" indicates that the tokenizer object has global scope. The reason why a global tokenizer is needed is explained later in this article. The tokenizer could be used like this:
review = "This movie was great!!"
tok_lst = g_toker.tokenize(review)  # list of words/tokens
The TorchText basic_english tokenizer works reasonably well for most simple NLP scenarios. Other common Python language tokenizers are in the spaCy library and the NLTK (natural language toolkit) library.
The basic_english tokenizer performs these five operations:
- convert input to all lower case
- add space before and after single-quote, period, comma, left paren, right paren, exclamation point, question mark
- replace colon, semicolon, <br /> with a space
- remove double-quote
- split on whitespace
In some problem scenarios you may want to create a custom tokenizer from scratch. For example, in several of my NLP projects I wanted to retain the word "don't" rather than split it into three separate tokens. One approach to create a custom tokenizer is to refactor the TorchText basic_english tokenizer source code. An example is presented in Listing 1. The MyTokenizer class constructs a regular expression and the tokenize() method applies the regular expression to its input text.
Listing 1: A Tokenizer Class Based on TorchText basic_english Tokenizer
class MyTokenizer():
  import re  # regular expression module
  def __init__(self):
    self.patts = \
      [r'\'', r'\"', r'\.', r'<br \/>', r',',
       r'\(', r'\)', r'\!', r'\?', r'\;',
       r'\:', r'\s+']
    self.replaces = \
      [' \'  ', '', ' . ', ' ', ' , ',
       ' ( ', ' ) ', ' ! ', ' ? ', ' ',
       ' ', ' ']
    self.engine = \
      list((self.re.compile(p), r) for p, r in \
        zip(self.patts, self.replaces))

  def tokenize(self, line):
    line = line.lower()
    for pattern_re, replaced_str in self.engine:
      line = pattern_re.sub(replaced_str, line)
    return line.split()
Another approach for creating a custom tokenizer is to use simple string operations instead of a regular expression. For example, you could write a standalone function like:
def tokenize(line):
  line = line.lower()
  line = line.replace(".", " . ")
  line = line.replace("<br />", " ")
  line = line.replace('\"', "")
  # etc.
  return line.split()
The key takeaway is that tokenizers are not trivial, but they're not rocket surgery either. You can implement a custom tokenizer if necessary for your problem scenario, or if you want to avoid an external dependency.
2. Understanding Vocabulary Objects
An NLP vocabulary object accepts a token/word and returns a unique ID integer value. An example of creating and using a global-scope PyTorch Vocab object is:
g_vocab = make_vocab(".\\Data\\reviews20.txt")  # uses g_toker
id = g_vocab["movie"]
print(id)  # result is 6
token = g_vocab.itos[9]
print(token)  # result is "and"
To create a PyTorch Vocab object you must write a program-defined function such as make_vocab() that analyzes source text (sometimes called a corpus). The program-defined function uses a tokenizer to break the source text into tokens and then constructs a Vocab object. The Vocab object has a member List object, itos[] ("integer to string") and a member Dictionary object stoi[] ("string to integer").
Weirdly, when you want to convert a string to an ID during model training, you do not call the stoi[] Dictionary directly, such as id = g_vocab.stoi["movie"]. Instead you call it implicitly, like id = g_vocab["movie"]. Behind the scenes, the implicit call to the Vocab object is transferred to a class __getitem__() method which in turn calls a default get() method on the stoi[] Dictionary which in turn has a default return value of 0 for words like "floogebargen" that aren't in the Dictionary and would otherwise throw a dictionary key-not-found Exception error. If you're new to Python programming, magic function calls like this can take a while to get used to.
When you want to convert an integer ID to a string, typically during debugging or system diagnostics, you must explicitly call the itos[] List, such as str = g_vocab.itos[27].
The demo program defines a make_vocab() function as shown in Listing 2.
Listing 2: The Demo Program make_vocab() Function
import torchtext as tt
import collections

def make_vocab(fn):
  # create Vocab object to convert words/tokens to IDs
  # assumes an instantiated global tokenizer exists
  counter_obj = collections.Counter()
  f = open(fn, "r")
  for line in f:
    line = line.strip()
    txt = line.split("~")[1]
    split_and_lowered = g_toker(txt)  # global
    counter_obj.update(split_and_lowered)
  f.close()
  result = tt.vocab.Vocab(counter_obj, min_freq=1,
    specials=('<unk>', '<pad>'))
  return result  # a Vocab object
You must customize the program-defined function that creates a Vocab object to match the structure of the source data. Recall that the demo training data has a 0 or 1 label, followed by a "~" character, followed by the text of a movie review. Therefore the make_vocab() function splits a source line on "~" and fetches the review text as item [1].
The current movie review text is passed to the global basic_english g_toker tokenizer which converts the review to all lower case, does some replacements, and returns a list of tokens/words. That list is passed to a Counter object. The idea here is that you want to assign integer IDs to words based on their frequency. Common words such as "the" and "and" will have low IDs like 9 and 11, and uncommon words will be assigned high IDs. The Counter object tracks the frequency of each unique token. A Counter object is essentially a Dictionary where the key is a word/token such as "movie" and the value is the number of times the key appears in the source.
By default, ID 0 is reserved for "<unk>" and ID 1 is reserved for "<pad>". The "<unk>" is a placeholder for unknown words that do not appear in the source text used to create the Vocab object. This can occur when you feed a new, previously unseen movie review to the trained model. The purpose of "<pad>" is that in most NLP prediction systems, you must pad input sequences so that they all have the same length. As you'll see shortly, a big advantage of using a neural network with an EmbeddingBag layer is that you don't need to pad input (at the expense of having to implement a collate function). Therefore, the "<pad>" token isn't used in the demo and could have been omitted.
There are multiple ways to instantiate a Vocab object. The demo program passes in a Counter object. The min_freq parameter specifies the minimum count that a word/token must have in order to be included in the Vocab object. The default value is 1 which means all words will appear. The "specials" parameter specifies a tuple of special tokens. The default is ('<unk>', '<pad>') so the demo code could have omitted both the min_freq and specials arguments, but I prefer to make the parameter default values explicit as a form of documentation.
It's possible to design and implement a custom vocabulary class that has stoi() and itos() functionality. However, based on my experience, a custom vocabulary object is rarely necessary. You can find an example of a custom vocabulary class in my blog post.
To recap, you must create a tokenizer object to split sentences into words. You can use a built-in tokenizer, such as the basic_english tokenizer in the TorchText library, or implement a custom tokenizer to handle specific scenarios, using a regular expression or basic string operations. You must create a vocabulary object. To do so you must have a tokenizer and write wrapper code over your source text that uses a Counter object to instantiate a Vocab object. It's usually not necessary to implement a custom vocabulary object.
3. Understanding the EmbeddingBag Layer
The demo program EmbeddingBag layer is one part of a standard neural network. The demo EmbeddingBag layer accepts a batch of three movie reviews that have been stored into a single list and converts each movie review into a numeric vector with 50 values. This is somewhat similar to a regular Embedding layer which would convert each word/token in a movie review to a numeric vector.
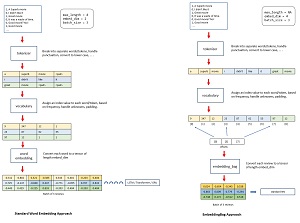
The diagram in Figure 2 illustrates the similarities and differences between a regular Embedding layer and an EmbeddingBag layer. The diagram is a loose conceptual representation rather than a highly accurate representation of algorithm steps.
An NLP movie review sentiment analysis system that uses a regular Embedding layer starts with the source movie reviews. A tokenizer processes the words/tokens and stores them in a list. The list of words/tokens is used to create a vocabulary object that assigns a unique ID to each word/token, based on the token's frequency. An ID of 0 is used for unknown words and an ID of 1 is used for padding.
Each movie review is padded so that all reviews have the same length of max_length = 4. Padding is added at the end of each short review, and long reviews are truncated to max_length. With all reviews now the same length, they can be batched together in groups of three reviews. Batching is not technically necessary but often dramatically improves model training.
A regular word Embedding layer then converts each word/token in a movie review into a numeric vector of length embed_dim = 2. In a realistic NLP system, the embed_dim is usually set to at least 100. A batch of movie reviews now consists of a two-dimensional array of 8 values, where each review has exactly 4 words/tokens, and each word is represented by 2 numeric values. A batch of reviews is fed to the next() function part of an LSTM or Transformer. The converted words/tokens in each review are sent sequentially so that information about the order of the words/tokens is used.
 [Click on image for larger view.] Figure 2: Comparison of an Embedding Layer and an EmbeddingBag Layer
A movie review sentiment analysis system that uses an EmbeddingBag layer starts with the source movie reviews. A tokenizer processes the words/tokens and stores them in a list. The list of words/tokens is used to create a vocabulary object that assigns a unique ID to each word/token, based on the token's frequency. An ID of 0 is used for unknown words and an ID of 1 is used for padding. In short, a system that uses an EmbeddingBag layer has standard NLP tokenizer and vocabulary functions.
A batch of three movie reviews is created by concatenating the reviews into a single list. The reviews are not padded, so the batch-list will have a variable length for each batch. You must create an integer list of offsets that indicates where each movie review begins. In Figure 2 the offsets list is [0, 3, 7] which means that the first review begins at index [0], the second review starts at [3] and the third review starts at [7].
The batch-list of reviews and the associated offsets list are passed to the EmbeddingBag layer which converts each movie review to a numeric vector. The key point is that an entire review is converted to a vector, rather than each word being converted to a vector. The batch of converted movie reviews is fed to a standard neural network. Each review is sent as an unordered set of words.
To recap, a standard Embedding layer approach retains information about the order of each word in the input, but requires you to pad all input sequences to the same length. Each word/token is converted to a vector. An EmbeddingBag layer approach does not require padding, but does not retain information about the order of each word in the input. A standard Embedding layer is appropriate for relatively long input sequences because it retains word order information. An EmbeddingBag layer is acceptable for relatively short input sequences because it does not retain word order information.
4. Understanding Collating Functions
When implementing an NLP system that uses an EmbeddingBag layer, a common approach for serving up data in batches is to write a collating function and pass it as an argument to a PyTorch DataLoader object. The collating function accepts a batch of raw movie reviews and produces three lists: a list of words tokenized as integer IDs, a list of associated labels to predict, and a list of offsets indicating where each movie review begins.
Using a regular DataLoader for a tabular data neural network looks like this:
train_file = ".\\Data\\iris_train.txt"
train_ds = IrisDataset(train_file)  # create one big Dataset

bat_size = 4
train_ldr = T.utils.data.DataLoader(train_ds, \
  batch_size=bat_size, shuffle=True)  # create loader

for b_ix, (inpts, lbls) in enumerate(train_ldr):
  # feed inputs to neural net, get outputs
  # compare outputs to labels, get error/loss
  # use loss to update weights
Using a DataLoader for an EmbeddingBag layer looks like:
train_file = ".\\Data\\reviews20.txt"
data_lst = make_data_list(train_file)  # create one big List

bat_size = 3
train_ldr = T.utils.data.DataLoader(data_lst, \
  batch_size=bat_size, shuffle=True, \
  collate_fn=collate_data)

for b_ix, (labels, reviews, offsets) in enumerate(train_ldr):
  # feed reviews and offsets to net, get outputs
  # compare outputs to labels, get error/loss
  # use loss to update weights
When using an EmbeddingBag layer, you write a program-defined function make_data_list() that reads all training data into one big list (rather than into a Dataset object). You also write a program-defined collate_data() function that breaks the big list into batches of three lists (labels, inputs, offsets). The make_data_list() and collate_data() functions essentially do the work of a Dataset object used in a standard neural network.
The make_data_list() function used in the demo program is presented in Listing 3 and the collate_data() function is presented in Listing 4.
Listing 3: The Demo Program make_data_list() Function
def make_data_list(fn):
  # get all data into one big list of (label, review) tuples
  # result will be passed to DataLoader, used by collate_fn
  result = []
  f = open(fn, "r")
  for line in f:
    line = line.strip()
    parts = line.split("~")
    tpl = (parts[0], parts[1])  # label, review
    result.append(tpl)
  f.close()
  return result
The function reads through the source movie reviews, splits each line of text based on the "~" delimiter, constructs a tuple of a label and review text, and appends the tuple to a result list.
Listing 4: The Demo Program collate_data() Function
def collate_data(batch):
  # rearrange a batch and compute offsets too
  # needs a global vocab and tokenizer
  label_lst, review_lst, offset_lst = [], [], [0]
  for (_lbl, _rvw) in batch:
    label_lst.append(int(_lbl))  # string to int

    rvw_idxs = [g_vocab.stoi[tok] for tok in g_toker(_rvw)]  # idxs
    rvw_idxs = [g_vocab[tok] for tok in g_toker(_rvw)]  # stoi opt.
    rvw_idxs = T.tensor(rvw_idxs, dtype=T.int64)  # to tensor
    review_lst.append(rvw_idxs)
    offset_lst.append(len(rvw_idxs))

  label_lst = T.tensor(label_lst, dtype=T.int64).to(device)
  offset_lst = T.tensor(offset_lst[:-1]).cumsum(dim=0).to(device)
  review_lst = T.cat(review_lst).to(device)  # 2 tensors to 1

  return (label_lst, review_lst, offset_lst)
The collate_data() function is passed as an argument to a DataLoader object, but you cannot pass any arguments to the collate_data() function. The collate_data() function needs a tokenizer so the tokenizer must have global scope.
The offsets are computed using the PyTorch cumsum() "cumulative sum" function. When I was first learning how to create NLP systems using an EmbeddingBag layer, for me understanding the statement that computes the offsets list was the most difficult part of the process, even though the idea is conceptually simple and the code is just a single statement. Fortunately, you can use the collate_data() function code presented here as a template for most NLP problems that use an EmbeddingBag layer.
5. Designing the Network
The neural network definition for the demo movie review sentiment analysis system is presented in Listing 5. The embed_dim class member is set to 50 so an entire movie review will be represented as a number vector with 50 values. The neural network is set up for either binary classification or multi-class classification. By setting num_class to 2 the system will do binary sentiment analysis. You can change the system from a positive-negative classifier to a positive-neutral-negative classifier by setting num_class to 3.
Listing 5: Demo Program Neural Network Definition
class NeuralNet(T.nn.Module):

  def __init__(self):
    super(NeuralNet, self).__init__()
    self.vocab_size = len(g_vocab)
    self.embed_dim = 50
    self.num_class = 2

    self.embed = T.nn.EmbeddingBag(self.vocab_size,
      self.embed_dim)
    self.fc1 = T.nn.Linear(self.embed_dim, 20)
    self.fc2 = T.nn.Linear(20, self.num_class)

    lim = 0.05
    self.embed.weight.data.uniform_(-lim, lim)
    self.fc1.weight.data.uniform_(-lim, lim)
    self.fc1.bias.data.zero_()
    self.fc2.weight.data.uniform_(-lim, lim)
    self.fc2.bias.data.zero_()

  def forward(self, reviews, offsets):
    z = self.embed(reviews, offsets)
    z = T.tanh(self.fc1(z))  # tanh activation
    z = self.fc2(z)  # no activation: CrossEntropyLoss
    return z
The EmbeddingBag layer has two required parameters: the size of the global vocabulary object and the embedding dimension. There are seven optional parameters: max_norm, norm_type, scale_grad_by_freq, mode, sparse, include_last_offset and padding_idx. In general, the default values for the seven optional parameters work well.
The demo neural network has one hidden Linear layer (fc1) with 20 nodes and tanh activation. The output layer (fc2) generates an output in the form of two pseudo-probabilities. There is no activation function on the output Linear layer because the training code uses CrossEntropyLoss which automatically deals with an internal softmax mechanism. An alternative network design for a strictly binary classification system is to use BCELoss() (binary cross entropy) during training and apply sigmoid() activation on the output layer.
6. Training the Network
The demo program implements a program-defined train() function. The code is presented in Listing 6. Training a neural network that has an EmbeddingBag layer is mostly the same as training a regular neural network. The key difference is that the DataLoader returns class labels, inputs and an offsets list.
Listing 6: The Demo Program train() Function
def train(net, ldr, bs, me, le, lr):
  # network, loader, bat_size, max_epochs, log_every, lrn_rate
  net.train()
  opt = T.optim.SGD(net.parameters(), lr=lr)
  loss_func = T.nn.CrossEntropyLoss()  # will apply softmax
  print("\nStarting training")
  for epoch in range(0, me):
    epoch_loss = 0.0
    for bix, (labels, reviews, offsets) in enumerate(ldr):
      opt.zero_grad()
      oupt = net(reviews, offsets)  # get predictions
      loss_val = loss_func(oupt, labels)  # compute loss
      loss_val.backward()  # compute gradients
      epoch_loss += loss_val.item()  # accum loss for display
      opt.step()  # update net weights
    if epoch % le == 0:
      print("epoch = %4d   loss = %0.4f" % (epoch, epoch_loss))
  print("Done ")
The training code uses simple stochastic gradient descent optimization with a fixed learning rate, which often works well for simple network architectures. For more complex architectures, you should consider using Adam optimization, or using a learning rate scheduler.
The train() function is prepared and called like so:
bat_size = 3
data_lst = make_data_list(".\\Data\\reviews20.txt")
train_ldr = T.utils.data.DataLoader(data_lst, \
  batch_size=bat_size, shuffle=True, \
  collate_fn=collate_data)
net = NeuralNet().to(device)
max_epochs = 300
log_interval = 30
lrn_rate = 0.05
train(net, train_ldr, bat_size, max_epochs, \
    log_interval, lrn_rate)
The demo program train() function accepts a DataLoader object as an argument. An alternative design is to use a locally defined DataLoader; however, you would have to also pass the meta-list of training data and collating function in as arguments.
7. Computing Model Prediction Accuracy
During training you want to monitor the loss/error value to determine if training is working or not. You can use the built-in loss function for this. But after training you are interested in the prediction accuracy of the trained model. To compute accuracy you must implement a program-defined function. The implementation of an accuracy() function is presented in Listing 7.
Listing 7: The Demo Program accuracy() Function
def accuracy(net, meta_lst):
  net.eval()
  ldr = T.utils.data.DataLoader(meta_lst, \
    batch_size=1, shuffle=False, collate_fn=collate_data)
  num_correct = 0; num_wrong = 0
  for bix, (labels, reviews, offsets) in enumerate(ldr):
    with T.no_grad():
      oupt = net(reviews, offsets)  # get prediction values
    pp = T.softmax(oupt, dim=1)  # pseudo-probability
    predicted = T.argmax(pp, dim=1)  # 0 or 1 as tensor
    if labels.item() == predicted.item():
      num_correct += 1
    else:
      num_wrong += 1

  return (num_correct * 1.0) / (num_correct + num_wrong)
The accuracy() function uses a new locally defined DataLoader rather than using the existing training DataLoader. Although you could use the existing DataLoader, by creating a new local DataLoader you can set the shuffle parameter to False which allows you to examine each data item in order. This is useful during debugging and diagnostics to see which items were predicted incorrectly.
The accuracy() function is called like so:
acc_train = accuracy(net, data_lst)
print("\nAccuracy of model on training data = \
  %0.4f " % acc_train)
Recall that the output of the neural network is a pair of values, but the values don't necessarily sum to 1 because no explicit softmax activation is applied in the network's forward() method. The accuracy() function applies softmax() so that the two output values sum to 1, which makes interpreting the output easier.
The accuracy() function determines if an output is correct by fetching the index of the largest output component, using the argmax() function. For example, if the softmax outputs are [0.35, 0.65], the largest value is at index [1] and so the predicted class is 1. Using argmax() effectively sets the decision boundary value at 0.5 -- output values less than 0.5 indicate class 0 and values greater than 0.5 indicate class 1. An alternative design is to examine the output pseudo-probabilities directly to determine the predicted class. This approach allows you to set a custom decision boundary value.
8. Using the Trained Model
The demo program uses the trained movie review sentiment analysis model to make a prediction for a new previously unseen movie review, using these statements:
print("New movie review: Overall, I liked the film.")
review_lst = [("-1", "Overall, I liked the film.")]
ldr = T.utils.data.DataLoader(review_lst, \
  batch_size=1, shuffle=True, collate_fn=collate_data)
net.eval()
(_, review, offset) = iter(ldr).next()
with T.no_grad():
  oupt = net(review, offset)  # get raw prediction values
pp = T.softmax(oupt, dim=1)   # as pseudo-probabilities
print("Sentiment prediction probabilities [neg, pos]: ")
print(pp)
Recall that the DataLoader needs input in the form of a list of tuples, where each tuple is a class label and review text. Therefore, the demo sets up a list with a single tuple that has a dummy -1 class label and text of "Overall, I liked this film." A DataLoader is created using the list and the existing collate_data() function.
During training, you iterate through a DataLoader using the enumerate() function, but in this case there is just a single movie review so the demo converts the DataLoader to an iterable object using the iter() function, and then calls the next() method to get the dummy class label and the movie review text.
9. Putting It All Together
The complete source code for the demo program, with a few minor edits to save space, is presented in Listing 8. The dummy 20-item movie review training data is embedded as comments at the end of the listing.
Listing 8: Demo Program Complete Source Code
# movie_sentiment.py

# simple sentiment analysis using PyTorch EmbeddingBag
# Anaconda3-2020.02 (Python 3.7.6)
# PyTorch 1.8.0-CPU TorchText 0.9
# Windows 10

import numpy as np
import torch as T
import torchtext as tt
import collections

device = T.device("cpu")

# -----------------------------------------------------------

# data file looks like:
# 0 ~ This was a BAD movie.
# 1 ~ I liked this film! Highly recommeneded.
# 0 ~ Just awful
# . . .

def make_vocab(fn):
  # create Vocab object to convert words/tokens to IDs
  # assumes an instantiated global tokenizer
  # toker = tt.data.utils.get_tokenizer("basic_english")
  counter_obj = collections.Counter()
  f = open(fn, "r")
  for line in f:
    line = line.strip()
    txt = line.split("~")[1]
    # print(txt); input()
    split_and_lowered = g_toker(txt)  # global
    counter_obj.update(split_and_lowered)
  f.close()
  result = tt.vocab.Vocab(counter_obj, min_freq=1,
    specials=('<unk>', '<pad>'))
  return result  # a Vocab object

# globals are needed for the collate_fn() function
g_toker = tt.data.utils.get_tokenizer("basic_english")
g_vocab = make_vocab(".\\Data\\reviews20.txt")

def make_data_list(fn):
  # get all data into one big list of (label, review) tuples
  # result will be passed to DataLoader, used by collate_fn
  result = []
  f = open(fn, "r")
  for line in f:
    line = line.strip()
    parts = line.split("~")
    tpl = (parts[0], parts[1])  # label, review
    result.append(tpl)
  f.close()
  return result

# -----------------------------------------------------------

def collate_data(batch):
  # rearrange a batch and compute offsets too
  # needs a global vocab and tokenizer
  label_lst, review_lst, offset_lst = [], [], [0]
  for (_lbl, _rvw) in batch:
    label_lst.append(int(_lbl))  # string to int

    rvw_idxs = [g_vocab.stoi[tok] for tok in g_toker(_rvw)]  # idxs
    rvw_idxs = [g_vocab[tok] for tok in g_toker(_rvw)]  # stoi opt.
    rvw_idxs = T.tensor(rvw_idxs, dtype=T.int64)  # to tensor
    review_lst.append(rvw_idxs)
    offset_lst.append(len(rvw_idxs))

  label_lst = T.tensor(label_lst, dtype=T.int64).to(device)
  # print(offset_lst); input()
  offset_lst = T.tensor(offset_lst[:-1]).cumsum(dim=0).to(device)
  # print(offset_lst); input()
  review_lst = T.cat(review_lst).to(device)  # 2 tensors to 1

  return (label_lst, review_lst, offset_lst)

# -----------------------------------------------------------

class NeuralNet(T.nn.Module):

  def __init__(self):
    super(NeuralNet, self).__init__()
    self.vocab_size = len(g_vocab)
    self.embed_dim = 50
    self.num_class = 2

    self.embed = T.nn.EmbeddingBag(self.vocab_size,
      self.embed_dim)
    self.fc1 = T.nn.Linear(self.embed_dim, 20)
    self.fc2 = T.nn.Linear(20, self.num_class)

    lim = 0.05
    self.embed.weight.data.uniform_(-lim, lim)
    self.fc1.weight.data.uniform_(-lim, lim)
    self.fc1.bias.data.zero_()
    self.fc2.weight.data.uniform_(-lim, lim)
    self.fc2.bias.data.zero_()

  def forward(self, reviews, offsets):
    z = self.embed(reviews, offsets)
    z = T.tanh(self.fc1(z))  # tanh activation
    z = self.fc2(z)  # no activation: CrossEntropyLoss
    return z

# -----------------------------------------------------------

def train(net, ldr, bs, me, le, lr):
  # network, loader, bat_size, max_epochs, log_every, lrn_rate
  net.train()
  opt = T.optim.SGD(net.parameters(), lr=lr)
  loss_func = T.nn.CrossEntropyLoss()  # will apply softmax
  print("\nStarting training")
  for epoch in range(0, me):
    epoch_loss = 0.0
    for bix, (labels, reviews, offsets) in enumerate(ldr):
      opt.zero_grad()
      oupt = net(reviews, offsets)  # get predictions
      loss_val = loss_func(oupt, labels)  # compute loss
      loss_val.backward()  # compute gradients
      epoch_loss += loss_val.item()  # accum loss for display
      opt.step()  # update net weights
    if epoch % le == 0:
      print("epoch = %4d   loss = %0.4f" % (epoch, epoch_loss))
  print("Done ")

# -----------------------------------------------------------

def accuracy(net, meta_lst):
  net.eval()
  ldr = T.utils.data.DataLoader(meta_lst, \
    batch_size=1, shuffle=False, collate_fn=collate_data)
  num_correct = 0; num_wrong = 0
  for bix, (labels, reviews, offsets) in enumerate(ldr):
    with T.no_grad():
      oupt = net(reviews, offsets)  # get prediction values
    pp = T.softmax(oupt, dim=1)  # pseudo-probability
    predicted = T.argmax(pp, dim=1)  # 0 or 1 as tensor
    if labels.item() == predicted.item():
      num_correct += 1
    else:
      num_wrong += 1

  return (num_correct * 1.0) / (num_correct + num_wrong)

# -----------------------------------------------------------

def main():
  # 0. get started
  print("\nBegin PyTorch EmbeddingBag movie sentiment ")
  T.manual_seed(2)
  np.random.seed(2)

  # 1. create training DataLoader object
  print("\nTraining data looks like: ")
  print("0 ~ This was a BAD movie.")
  print("1 ~ I liked this film! Highly recommeneded.")
  print("0 ~ Just awful")
  print(" . . . ")

  bat_size = 3
  print("\nLoading training data into meta-list ")
  data_lst = make_data_list(".\\Data\\reviews20.txt")
  print("Creating DataLoader from meta-list ")
  train_ldr = T.utils.data.DataLoader(data_lst, \
    batch_size=bat_size, shuffle=True, \
    collate_fn=collate_data)

  # 2. create neural net
  print("\nCreating an EmbeddingBag neural net ")
  net = NeuralNet().to(device)

  # 3. train movie sentiment model
  max_epochs = 300
  log_interval = 30
  lrn_rate = 0.05

  print("\nbat_size = %3d " % bat_size)
  print("max epochs = " + str(max_epochs))
  print("loss = CrossEntropyLoss")
  print("optimizer = SGD")
  print("lrn_rate = %0.3f " % lrn_rate)
  train(net, train_ldr, bat_size, max_epochs, \
    log_interval, lrn_rate)

  # 4. compute model classification accuracy
  acc_train = accuracy(net, data_lst)
  print("\nAccuracy of model on training data = \
%0.4f " % acc_train)

  # 5. TODOs: test data accuracy, save model

  # 6. make a prediction on a new review
  print("\nNew movie review: Overall, I liked the film.")
  review_lst = [("-1", "Overall, I liked the film.")]
  ldr = T.utils.data.DataLoader(review_lst, \
    batch_size=1, shuffle=True, collate_fn=collate_data)
  net.eval()
  (_, review, offset) = iter(ldr).next()
  with T.no_grad():
    oupt = net(review, offset)  # get raw prediction values
  pp = T.softmax(oupt, dim=1)   # as pseudo-probabilities
  print("Sentiment prediction probabilities [neg, pos]: ")
  print(pp)

  print("\nEnd demo ")

if __name__ == "__main__":
  main()

# -----------------------------------------------------------

# copy,paste, remove comment chars, save as reviews20.txt
# 0 ~ This was a BAD movie.
# 1 ~ I liked this film! Highly recommeneded.
# 0 ~ Just awful
# 1 ~ Good film, acting
# 0 ~ Don't waste your time - A real dud
# 0 ~ Terrible
# 1 ~ Great movie.
# 0 ~ This was a waste of talent.
# 1 ~ I liked this movie a lot. See it.
# 1 ~ Best film I've seen in years.
# 0 ~ Bad acting and a weak script.
# 1 ~ I recommend this film to everyone
# 1 ~ Entertaining and fun.
# 0 ~ I didn't like this movie at all.
# 1 ~ A good old fashioned story
# 0 ~ The story made no sense to me.
# 0 ~ Amateurish from start to finish.
# 1 ~ I really liked this move. Lot of fun.
# 0 ~ I disliked this movie and walked out.
# 1 ~ A thrilling adventure for all ages.
In addition to short-text sentiment analysis, you can use the demo program as a template for any NLP classification problem with short text. For example, you could create a system that classifies news articles (0 = business, 1 = sports, 2 = politics, 3 = technology, etc.) based on their title ("Angels Edge Mariners 5-4 in 10 Innings").