Inside VSTS
Unit Testing with VSTS2008 (Part 3)
The last in a series of articles on working with VSTS2008 shows how to make existing unit tests data driven.
In Part 1 and Part 2 of this series, we learned about the basics of unit testing with Visual Studio Team System 2008. In this article, we will build off the unit test in Part 1 and Part 2 to make the unit test data driven.
Let’s go back and look at the AddTest() unit method. The method at this point tests our Add() method using only one set of numbers. What if we wanted to test 5 different sets of numbers, including negative numbers? One option would be to create a new unit test for each set of numbers we want to add together. While this is a valid strategy, it can be rather time-consuming and would produce redundant code. All we really want to do is replace the values for p1, p2 and expected in our unit test. Team System allows us to do this by turning a regular unit test into a data-driven unit test.
A data-driven unit test allows data to be taken from a data source and pushed into the unit test. In Visual Studio Team System 2008, you have three different options for data sources:
- ODBC connection to a database table or spreadsheet
- Comma-delimited file
- XML file
Once the data source is connected to the unit test, the unit test can be modified to use data from the data source.
Setting Up a Data Driven Unit Test
For this example, a comma-delimited text file will be used. You can use Microsoft Notepad or Microsoft Excel to create a comma delimited file. We'll create a file named CalcData.csv, which is saved to c:\.
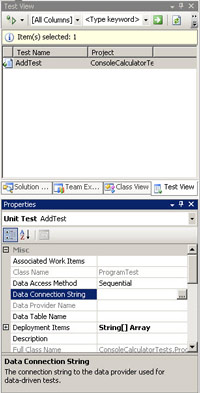
To get started, open the ConsoleCalculator solution in Visual Studio Team System 2008. From the main menu, select Test -> Windows -> Test View to open the Test View window. The Test View window will list all the tests available in the solution. Select the AddTest method in the Test View window to view the properties of the test, shown in Figure 1.

[Click on image for larger view.] |
| Figure 1. |
To add a data source to this unit test, click the button next to the Data Connection String property. This will start the New Test Data Source Wizard. On the first screen of the wizard, select the data source type to use. The three options are Database, CSV File (comma delimited file) and XML File.
Select the CSV File data source and click Next. On the next screen select the CalcData.csv file that was created earlier. The Preview Data screen shows how the data will be interpreted by the unit test framework. Click the Finish button to close the wizard. If the file being accessed is not a member of the current test project, you will be prompted to add the file to the test project. For this example, click the Yes button to add the file as a deployment item to the test project.
Now that a data source has been added to the AddTest() method, the method needs to be modified to use data from the data source. To access data from the data source, use the TestContext object. To access the p1 column, use the following code:
TestContext.DataRow["p1"]
The above line of code essentially translates into: using the TestContext object, access a row of data, and in that row access the p1 column. Figure 2 shows the AddTest() method with all the necessary changes.

[Click on image for larger view.] |
| Figure 2. |
Notice that in this case, the value from the TestContext object has to be converted from a string to an integer before it can be used by the test method.
Running a Data Driven Unit Test
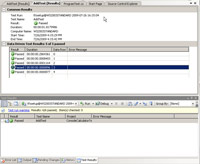
The AddTest() method has been modified to use data from the comma-delimited file. Now it is time to run the test. Right-click on the AddTest() method, and from the context menu select Run Tests. This will run the AddTest() test method. The test method will run once for each row of data in the test file. Double-click the test in the Test Results window to view the details of the data driven test. As Figure 3 shows, you can see the results for each row of test data.

[Click on image for larger view.] |
| Figure 3. |
Making this test method data driven was definitely easier than creating five new test methods by hand. By using a comma-delimited data file and modifying three lines of code in the test method, the test method was made much more effective and useful. Remember, when creating test methods in the future, always look for ways that existing methods can be reused by making them data-driven.
About the Author
Mickey Gousset spends his days as a principal consultant for Infront Consulting Group. Gousset is lead author of "Professional Application Lifecycle Management with Visual Studio 2012" (Wrox, 2012) and frequents the speaker circuit singing the praises of ALM and DevOps. He also blogs at ALM Rocks!. Gousset is one of the original Team System/ALM MVPs and has held the award since 2005.