In-Depth
Web Performance Testing with Visual Studio 2010
- By Benjamin Day
- 06/17/2010
Performance testing and debugging is a major focus of Visual Studio 2010 Ultimate. Web testing and load testing have been supported in Visual Studio Team System since the 2005 release, but Visual Studio 2010 offers major improvements.
In the Web performance tests, the addition of Loops and Conditions enables developers to write more complex and intelligent tests against their applications. For load tests, the addition of 64-bit agents and controllers allows you to more effectively use the available hardware resources to generate load. Additionally, changes to the licensing of the load test agents and controllers gives you greater flexibility, making it easier -- and potentially cheaper -- to configure your load test rigs.
Web tests allow you to simulate a user performing a set of operations – typically a defined use case – on your ASP.NET Web application, and validate the responses to see if the application is working as expected. Once you have your Web tests defined, you can knit them together to create a load test to see how well your application performs under stress.
It's always better to test your Web applications early to detect performance problems. In this article, I'll focus on authoring and debugging Web performance tests. In part 2, I'll explain how to set up and configure a Load Test Rig and use Web tests as the basic building blocks of your load tests.
Create Some Web Tests
Web tests are typically created using the Internet Explorer Web Testing toolbar, which records a human user clicking through a Web application. In the sample code for this article, our Visual Studio Test Project is called Com.Benday.WebTesting.WebTests. You can create a new Web test by right-clicking the project and choosing new Web Test (in Visual Studio 2010, Web Performance Test) from the Add menu.
When you add a new Web Test to your project, Visual Studio will open up Internet Explorer and you should see the Web Test Recorder panel in the browser. You can now go to a Web site and start using it just like you normally would and, as you go, you'll see your actions being recorded by the Web Test Recorder (Figure 1).
[Click on image for larger view.] |
| Figure 1. The Web Test Recorder toolbar in Internet Explorer |
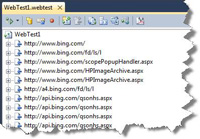
When you've finished performing the actions that you wanted to record, click the Stop on the Web Test Recorder toolbar and you'll be taken back to Visual Studio and you'll see your actions in a *.webtest file (Figure 2).
[Click on image for larger view.] |
| Figure 2. A new Web Test in Visual Studio |
A More Complex Web Test
Newly recorded Web tests don't have a lot of smarts and are not doing much work of any value. A Web test simply plays back the Web requests that you originally performed. It doesn't check the return values and it doesn't know anything about how your application works but it is the starting point for creating a more complicated and comprehensive test.
You make your tests smarter by using Validation Rules, Extraction Rules, and Test Context from within your Web test requests. Validation Rules look at the HTML returned from the server and verify that the application has done what you expect. Extraction Rules look at the HTML, pull out values, and store them in memory in a dictionary structure known as Test Context. These test context values can be used in subsequent Web test requests to create dynamic behaviors and dynamic validations.
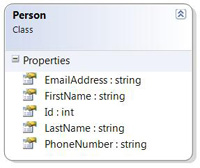
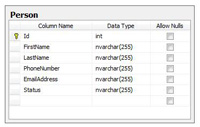
In the sample code for this article, I provide you with a Web application that manages person information. Each person record has first name, last name, phone number, email address, plus a primary key/identity value named Id (Figure 3, Figure 4). We'll use this Id value inside of our Web application to determine which Person record to show and edit.
[Click on image for larger view.] |
| Figure 3. Person class diagram |
[Click on image for larger view.] |
| Figure 4. Person database table |
This application isn't all that complex but let's say you want to simulate a bunch of users creating Person records in the database through your Web application.
Here's the script for the test:
1. Bring up the application in a browser
2. Click on Create New User
a. Verify that the Create New User screen came up
b. Verify that the text fields on the screen are blank and that the Id field is ‘-1' indicating that you're creating a new user
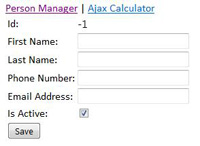
[Click on image for larger view.] |
| Figure 5. The blank Create New User screen |
3. Populate the screen with data
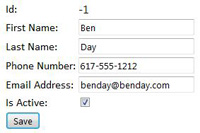
[Click on image for larger view.] |
Figure 6. Create New User screen with unsaved Person info
|
4. Click Save
a. Verify that Id field is no longer ‘-1' indicating that the Person record has been saved
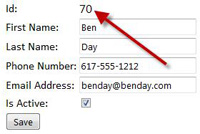
[Click on image for larger view.] |
Figure 7. The Person has been saved and the Id field is updated
|
5. Go back to the person list screen
a. Verify that the new person exists in the database
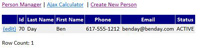
[Click on image for larger view.] |
Figure 8. The new record on the person list screen
|
6. Open the new person record
a. Verify that it matches what you originally typed
If you use the Web Test Recorder, it's very easy to create the fundamentals of this test and add basic validations but it all comes down to that Id value: Is the Id value is going to change every time you run the test and add a new row? This is where you'll use validation and extraction rules to build a more comprehensive test.
Let's start with one of the easier validations and add a validation rule for step 2 to check that the Person Id label value is ‘-1'. To do this, you'll need to know two things: 1) Which Web request brings up the ‘Create New Person' page, and 2) the name of the ASP.NET Label control that displays the Person Id value.
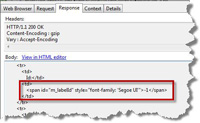
A good way to figure these two things out is to run the Web test and examine the results. The results record exactly what was sent to and from your Web application and that allows you to view the HTML for each request (Figure 9). By looking at the HTML, you can determine what's happening on each request, what the various Web controls are and what those controls are named.
[Click on image for larger view.] |
| Figure 9. Click the Response tab to view the HTML and find the Person ID label control |
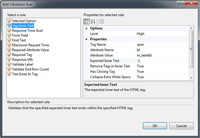
Once you know the name of the control to validate – in this case, ‘m_labelId' – and have figured out which Web request you need, you can right-click the request and choose Add Validation Rule to bring up the Add Validation Rule dialog (Figure 10).
[Click on image for larger view.] |
| Figure 10. Add a Validation Rule to the request |
If you're using Visual Studio 2010, you can access the value of the m_labelId control by using the Tag Inner Text validation rule. If you're using Visual Studio 2008, you'll need to write a custom validation rule to access this or any other control that renders as a tag. For more information about how to create custom validation and extraction rules, visit http://bit.ly/8a780S.
Next let's add a rule to make sure that the person Id label isn't ‘-1' after the save happens. For this one, you can use the Find Text rule with the Pass If Text Found attribute set to false (Figure 11). If you find the text of the label control and the value is ‘-1', the rule will fail indicating that the person wasn't saved or the field wasn't correctly populated after the save.

[Click on image for larger view.] |
| Figure 11. Add the Find Text Validation Rule to validate the save |
You'll also want to add an extraction rule to this request to pull the m_labelId value out for use later in the test when you reload the person to verify the record. For this you can use the Tag Inner Text Extraction Rule to extract the m_labelId value and put it into a context parameter named PersonId (Figure 12).

[Click on image for larger view.] |
| Figure 12. The Tag Inner Text Extraction Rule to validate the Person Id value |
Web Test Parameterization
Once you have extracted the values you want and stored them in test context, you can take advantage of Web Test Parameterization. Parameterization allows you to plug values from the test context in to just about anywhere in the Web Test Request. The EditPerson.aspx page in the sample Web application uses a query string parameter named Id to load person records. Let's adjust the Web test to drop the PersonId data context value in to the Id query string value.
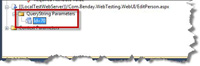
When you record the Web test, it keeps the exact values that you used when you recorded the test. So, if you go to the request that reloads the person and look at the Query String Parameters values you'll see a hard-coded value (Figure 13).
[Click on image for larger view.] |
| Figure 13. The hard-coded Id value for the query string parameter |
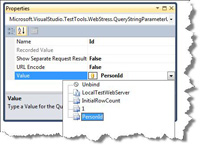
If you click on the Id parameter, you should see the Properties dialog for that parameter. On the Value property, you can click the drop down and see all the data context values that exist at that point in the test. All you have to do is choose the PersonId context value and now that Id query string parameter is automatically populated with the dynamic value at runtime (Figure 14).
[Click on image for larger view.] |
| Figure 14. Bind the Id query string parameter to the PersonId context value |
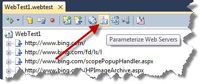
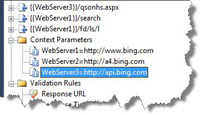
There is also a ‘best practice' parameterization that you should use on all your Web tests especially if you intend to eventually use them in a load test – parameterizing your Web server addresses. Thankfully, there's a button on the Web test editor that allows you to do this quickly (Figure 15). After that's done, all the Web test requests are converted to use the parameterized Web server values; you'll see a Context Parameters section at the bottom of your Web test with the values for any server you referenced during the test (Figure 16). This helps immensely because the environment you run your Web tests against may be different from the environment you execute your load tests against. Or maybe you're hooking your Web and load tests in to your nightly builds and the servers change depending on the build type that you're executing. Even if you don't need it now, you'll definitely want that flexibility once you start spending lots of time and effort on your tests.
[Click on image for larger view.] |
| Figure 15. The Parameterize Web Servers button |
[Click on image for larger view.] |
| Figure 16. Parameterized Web servers in the test context |
Data Sources and Data Binding
Parameterization with data context values is just the beginning of building a complex Web and load test. You can also attach a data source to the Web test that contains rows of test data. You can use the same parameterization concepts with a data source to execute the Web test once per row in the data source and plug values from the data source rows in to Web requests.
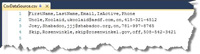
The simplest way to get going with a data source is to create a comma-separated value file and make it part of your Visual Studio Test Project (Figure 17).
[Click on image for larger view.] |
| Figure 17. A comma-separated data source file |
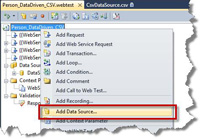
Once you have added the CSV file to the project, you can right-click on a Web test and choose Add Data Source from the context menu (Figure 18). This will bring up a wizard that will walk you through the process of attaching the data source to your Web test (Figure 19).
[Click on image for larger view.] |
| Figure 18. Add a data source to the Web test |
[Click on image for larger view.] |
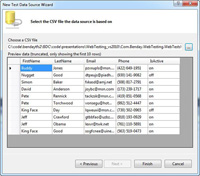
| Figure 19. The New Test Data Source Wizard dialog |
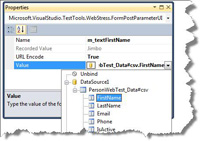
When you have configured the data source in your Web test, you can start using parameter binding to attach data row values to your Web test requests. For example, if you wanted to populate the Create New Person Web page with values from the data source, you could bind the form post parameter for each textbox control to fields in the data source (Figure 20, Figure 21).
[Click on image for larger view.] |
| Figure 20. Databind the m_textFirstName post parameter to the FirstName data source column |
[Click on image for larger view.] |
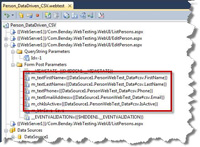
| Figure 21. The databound form post parameters |
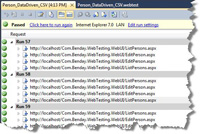
When you run the data-driven Web test, you'll see that the test executes one time for each row in the data source (Figure 22). This allows you to not only create a more dynamic test but it also enables you to run the test with a larger set of data which makes for a more comprehensive test.
[Click on image for larger view.] |
| Figure 22. Multiple iterations of the Web test using a data source |
Summary
Web performance tests can form the basis for load tests and are a great way to help test your Web applications to ensure quality and performance. Data-driven Web performance tests help to make load tests really worthwhile because the rows in the data source are used by the Load Test Agents to simulate virtual users executing similar use cases against the application but with different data. A load test that sends the same data to the server again and again probably isn't a great test.
The enhanced Web testing and load testing features in Visual Studio 2010 Ultimate offer a fantastic way to speed up your QA cycles and can help quickly determine whether your application is working or – more importantly – not working. If you execute the tests from your Team Foundation Server 2010 automated builds, you can get those quality checks each time that your build runs.