Inside TFS
Coded UI Tests (Part 4): Tips and Tricks
Mickey Gousset finishes out his series on coded UI testing with some useful tips and tricks.
So far in this series of columns on Coded UI Testing, we have covered the basics of how to
create a coded UI test, how to
run and edit the test, as well as how to
make the test data-driven. In this column, we are going to look at some tips and tricks to help make your coded UI tests better.
Things to Consider When Recording Your Test
Keep in mind that once you press the record button on the Coded UI Test Builder window, it is going to record every action you perform until you pause the recording. Which means if, while recording a test, you decide to open Microsoft Outlook and check your email, that will be recorded as well. As you can imagine, this will clutter your test with unnecessary actions, and cause unexpected results. Moral of the story: while recording a test, do not interact with anything that is not related to the test.
If you must interact with a non-test object, make sure to pause the recording by clicking the pause button on the Coded UI Test window. However, be very careful not to interact with the application you are testing while the recording is paused. If you pause a recording, interact with the application being tested, then continue recording the test, you have changed the state of the application, which could cause the test to fail on playback.
Adding New Assertions to an Existing Test
Next, let's see how we can add a new assertion to an existing coded UI test. For this scenario, we will take our sample application, and add an assertion to check the value of the First Word textbox. In Visual Studio 2010, in the CodedUITest1.cs file, in the CodedUITestMethod1() method, add a new line after this.UIMap.TypeValueAndClickCreate(). Right-click on this blank line, and select Generate Code for Coded UI Test | Used Coded UI Test Builder from the context menu. Then start the Hello World application.
From the Coded UI Test Builder window, drag and drop the crosshairs icon onto the First Word textbox. This will open the properties window for that textbox. Select the Text property and click Add Assertion from the toolbar. Take the defaults in the Add Assertion window (which are "AreEqual", with a comparison value of blank), and click OK. Finally, click the Generate Code button on the Coded UI Test Builder window to generate the assertion code. Give the generated method a name (such as "AssertFirstWord") and click the Add and Generate button to generate the code. Close the Coded UI Test Builder window to return to Visual Studio.
The code should now look similar to Figure 1.
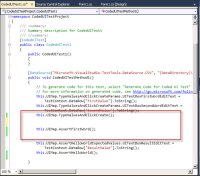
[Click on image for larger view.] |
| Figure 1. Code After Adding New Assertion. |
At this point, since this is a data-driven test, we need to connect the data file to this assertion, to feed the appropriate value into the assertion. Add the following line of code above the AssertFirstWord() method:
this.UIMap.AssertFirstWordExpectedValues.UITextBoxFirstWordEditText = TestContext.DataRow["FirstValue"].ToString();
Now when you run the test, it will use the appropriate value from the FirstValue column in the comma-delimited file.
How To Change Time Between Two Actions
Coded UI tests can execute very quickly. There may be times when you need to implement a pause or a delay between actions. This is accomplished by using the Playback object. For example, to create a five second pause after an action, add the following code just after the action method call:
Playback.PlaybackSettings.DelayBetweenActions = 5000;
You may also have an instance where you need to wait for a process to finish before continuing with the test. You can use the following line of code to wait until the UI thread is finished:
Playback.PlaybackSettings.WaitForReadLevel = WaitForReadyLevel.UIThreadyOnly;
Conclusion
As this series of columns has shown, the coded UI test is a great addition to the testing functionality of Visual Studio 2010. One thing we did not show in this series, but that you should be aware of, is that you can take the action recording from a manual test and turn it into a coded UI test. This allows you to initially run a test as a manual test, and then turn it into an automated process for regression testing.
About the Author
Mickey Gousset spends his days as a principal consultant for Infront Consulting Group. Gousset is lead author of "Professional Application Lifecycle Management with Visual Studio 2012" (Wrox, 2012) and frequents the speaker circuit singing the praises of ALM and DevOps. He also blogs at ALM Rocks!. Gousset is one of the original Team System/ALM MVPs and has held the award since 2005.