Ask Kathleen
How to Generate Code from a UML Model in Visual Studio 2010
The UML modeler is a powerful new tool, especially when it's backed with a code-generation system.
Unified Modeling Language (UML) represents a logical view of your application. This is distinct from the physical view represented by the Class Diagrams available in all SKUs of Visual Studio. Consider concepts in your application such as customers and invoices. These concepts are expressed in multiple places: business objects, UI elements, data objects and other classes. Class Diagrams include all of these classes. UML diagrams express each concept once, regardless of how many classes are involved in your architecture. The UML modeler also differentiates between models and diagrams. The model contains all the elements of your application. Each element can exist on multiple diagrams.
While I generally stick to Visual Studio Professional Edition features when writing this column, the full UML support is part of a compelling package in the new architect features of Visual Studio 2010 Ultimate. The UML modeler is built on top of the Domain-Specific Language (DSL) Toolkit, so you'll need to download and install the Visual Studio 2010 SDK and the Visual Studio 2010 Visualization and Modeling SDK.
Q: I heard you could generate code from UML diagrams. How does that work?
A: You can create a new modeling project in Visual Studio. If modeling projects aren't available, check that you have the Ultimate version. Create a new UML Class Diagram and drag classes, interfaces and enumerations from the toolbox, as shown in Figure 1. To include elements in multiple diagrams, drag them from the UML Model Explorer. Use UML packages to place elements in different namespaces. In this article, I'll stick to classes, enums and attributes, but you'll find a robust set of UML features.

[Click on image for larger view.] |
| Figure 1. As a logical view of your application, a UML diagram expresses each concept (customer and invoice) once, regardless of how many classes are involved in your architecture. |
You can generate code by adding T4 templates to the solution that contains the model. These templates run when the template is modified and saved. You can also click the Transform All Templates button in the Solution Explorer header. The templates won't automatically run when the model is changed.
I'll keep the template simple to focus on integrating templates into UML modeling and writing good templates:
<#@includefile="..\CommonDesignTimeSupport\SharedT4Code.t4"#>
<#@outputextension=".cs" #>
using System;

<#foreach (var ns inGetNamespacesForClasses()) { #>
namespace<#= ns.Name #>
{
<#foreach (var c inGetClassesForNamespace(ns))   { #>
publicpartialclass<#=c.Name#>
  {
<#	foreach (var p inGetAttributesForClass(c))  {  #>
	object<#=p.Name#> {get; set;}
<#} #>
  }
<# } #>
}
<# } #>
If you want coloration, it's available via the Tangible T4 Editor from Tools/Extension Manager/Online Gallery. For more information on details of T4 templates, see Oleg Sych's blog at OlegSych.com. The output is:
namespaceModelingProject1
{
  publicpartialclassCustomer
  {
    objectFirstName {get; set;}
    objectLastName {get; set;}
  }
  publicpartialclassInvoice
  {
    objectInvoiceDate {get; set;}
...
From a separation-of-concerns perspective, the entry template is responsible for defining output and uses only the IClass and IProperty interfaces. It doesn't load or perform navigation directly against the model, but delegates the shared template shown in Listing 1.
Note the usage of the $(SolutionDir) and the host ResolvePath method to locate relative files in Listing 1. The ModelHelper.cs class, which you can find in the download, is compiled into an assembly and is responsible for discovery, loading, caching and navigation. This provides compile-time checking and IntelliSense where you need it most. File resolution is relative to the entry template.
Visual Studio caches assemblies that are called by T4 templates, so you must close and reopen Visual Studio before you can recompile assemblies used by T4 templates.
Extending Metadata with Stereotypes
We have a fatal flaw in our output: All of the properties are using an object type. Attributes in the UML Class Diagram support string, integer and Boolean data types, but not other types such as GUIDs or DateTime. UML allows metadata extension via stereotypes. Stereotypes are sets of additional metadata you can supply to elements in your UML model. The stereotypes available define your model, so you must explicitly add them. You add a stereotype by adding a profile that contains it, and often other stereotypes. Visual Studio offers standard UML profiles and a C# profile. I'll copy and modify the C# profile to add metadata to the UML model.
Profiles are XML files with a .profile extension. You can find the C# profile at <program files>\Microsoft Visual Studio 10.0\Common7\IDE\Extensions\Microsoft\Architecture Tools\UmlProfiles. On my 64-bit machine, this was in the x86 program file tree. I replaced all occurrences of C# and CSharpwithDotNet. The profile contains parts for the definition, metaclasses (such as IProperty) and the internal types such as enumeration. I added an enumeration type for DotNetType. I then added a property for ClrType to the property within the profile definition:
<stereotypes>
<stereotypename="property" displayName="DotNet property">
<metaclasses>
<metaclassMoniker name=
"/DotNetProfile/Microsoft.VisualStudio.Uml.Classes.IProperty" />
</metaclasses>
...
<properties>
<propertyname="ClrType"displayName="Clr Type">
<propertyType>
<enumerationTypeMonikername="/DotNetProfile/DotNetType"/>
</propertyType>
</property>
...
<propertyTypes>
<enumerationTypename="DotNetType">
<enumerationLiterals>
<enumerationLiteralname="byte" displayName="byte" />
  ...
<enumerationLiteralname="DateTime" displayName="datetime" />
<enumerationLiteralname="Guid" displayName="guid" />
</enumerationLiterals>
</enumerationType>
...
</propertyTypes>
You can modify the type names for Visual Basic, or add a generation service that converts type names.
Simplifying Stereotype Use
The initial C# profile contains important information such as scope. Adding a specific stereotype throughout your model would be tedious. UML diagramming comes to the rescue with custom toolbox items. Create a model in a separate solution as a base for your new toolbox item. Add a class to the diagram and then set the stereotype and other characteristics, such as coloration. Then save the diagram and copy both of the diagram files to <documents>\Visual Studio 2010\Architecture Tools\Custom Toolbox Items. You'll probably need to create both in the directory. Close and reopen Visual Studio and you'll find your custom toolbox item. The name of your element will be used with a number suffix. The color, size, shape, stereotype and property values will be preserved. If you included several elements in your diagram, they'll all appear with their relative positions and relationship properties intact.
You can use a .tbxinfo file for a better look into your custom toolbox item file. Visual Studio Help has more information, or you can copy and modify the one in the download for this article.
Using Preprocessed Text Templates
Generating the Solution Explorer button is convenient, but you probably don't want the default of a single file hidden beneath the template. You may want a different file for each entity, and you'll often want templates in one common location outputting to several projects and directories. Also, any template-compile errors appear along with errors in the output and can be hard to find because generation reproduces compile errors. You can avoid these drawbacks by calling preprocessed templates from code you control. One way to call preprocessed templates is from a custom menu item on your UML diagram.
The goal of the preprocessed templates is identical to design-time text templates. Understanding the difference requires an understanding of how code generation works inside Visual Studio. The text-templating custom tool is transposed from your template into an interim .NET class that outputs your final code to a StringBuilder. This interim code is in C# or Visual Basic, depending on the language of your template. The code is compiled and run in a single step when you save the template; explicitly run the custom tool for the template or click the Transform All Template button.
Preprocessed text templates use a different custom tool, which creates and compiles the interim code to create an assembly capable of outputting your final code. But it doesn't perform the output. A segment of a preprocessed template shows how the interim file works:
publicvirtualstringTransformText()
{
  ...
  this.Write("\r\n");
  this.Write("\r\nusing System;\r\n\r\n");
Preprocessed templates let you check compilation early and let you call the template under your control by calling the template's TransformText method and explicitly outputting the resulting string. Figure 2 illustrates the two different approaches.
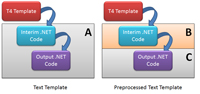
[Click on image for larger view.] |
| Figure 2. Text templates combine creation of interim .NET code and outputting the results of that code (step A). Preprocessed templates separate the operations, creating and compiling the interim code (step B) and outputting the results. Steps A and B are initiated by custom tools within Visual Studio. Step C is run under your control. |
Creating a Custom Menu Item
Creating custom menu items for your UML models is easy with the supplied Command Extension project template. Create a solution separate from your model to make testing easier. The Command Extension entry in the New Item dialog creates menu items.
The command extension class contains attributes indicating the designers where it works and exports and implements ICommand-Extension. An important aspect of the UML model is that it's a single model with many diagrams. Because generation is against the model, not diagrams, it's valid on any diagram type:
[ClassDesignerExtension]
[ActivityDesignerExtension]
[ComponentDesignerExtension]
[SequenceDesignerExtension]
[UseCaseDesignerExtension]
[Export(typeof(ICommandExtension))]
public class GenerateFromModel : ICommandExtension
{
The class is responsible for setting the menu item's visibility and enabled status. In addition, it returns the string that appears in the menu:
public void QueryStatus(IMenuCommand command)
{ command.Visible = command.Enabled = true; }

public string Text
{ get { return "Generate Code From Model"; } }
The Execute method performs work, generally after retrieving the model from the current diagram. The current diagram is exposed from the modeling infrastructure via the Managed Extensibility Framework (MEF):
  [Import]
public IDiagramContextDiagramContext { get; set; }

public void Execute(IMenuCommand command)
{
  IDiagram diagram = this.DiagramContext.CurrentDiagram;
  IModelStore modelStore = diagram.ModelStore;
  // Do work here
}
The Execute method for generation will need to find all appropriate templates, run the templates and output the resulting strings as files with the correct folders and names. There are several approaches to finding templates. I use a custom MEF export attribute that also indicates the UML type (class, enum and so on) the template works with. This takes some setup.
The first step is retrieving configuration information. You can see the method implementations in the download; it looks for a configuration file within the project structure and if it's not found, it uses intelligent defaults:
string configFileName = GetConfigFileName(diagram);
XDocument configDoc = GetConfigurationFile(configFileName);
IEnumerable<string>discoveryPaths = GetDiscoveryPaths(configFileName, configDoc);
string outputRoot = GetOutputSolutionRootPath(diagram, configDoc);
One subtle aspect of configuring code generation is that you have two independent sets of files: design-time templates with supporting assemblies and the output solution. Your output will probably be relative to your model, and you can manage template location through common dev machine structures, well-known server locations or environment variables.
I created an MEF container that's entirely independent of the Visual Studio MEF container. All exports in assemblies in the discoveryPaths will be available during generation. This includes support for services such as pluralization. Explicitly providing the model to the container makes it available to all templates and supporting code:
var container = Compose(discoveryPaths);
container.ComposeExportedValue(
  AttributedModelServices.GetContractName(
  typeof(IModelStore)), modelStore);
MEF retrieves the templates. The model supplies the model elements. Retrieving all elements avoids redundantly querying the model when many templates use the same elements: var templates = container.GetExports<IPreprocessedTemplate, IPreprocessedTemplateComposition>(); var elements = modelStore.AllInstances<IElement>();
My IPreprocessedTemplate interface provides the RelativeFileLocation for the output subdirectory in the solution, the FileName, an Initialize method and a Transform method, which calls TransformText implemented by the preprocessed template. These members are implemented in a class partial to the preprocessed template. This partial class also provides the custom MEF export attribute. Because a composition metadata interface is included as an argument to GetExports, MEF returns an IEnumerable<Lazy<IPreprocessedTemplate>>. Looping through this enumerable lets us access both the underlying template and the composition metadata, which includes the type of item the template wishes to work with:
foreach (varlazyTemplatein templates)
{
  var template = lazyTemplate.Value;
  var itemType = lazyTemplate.Metadata.itemType;
  var q = from x in elements
  where item Type.IsAssignableFrom(x.GetType())
  select x;
  foreach (var item in q)
  {
Initializing the template with the current item prepares it to return the output location, filename and output string containing the code to output. Once the work is done, outputting the code is easy:
template.Initialize(item);
var location = Path.Combine(outputRoot, template.RelativeFileLocation);
var fileName = Path.Combine(location, template.FileName);
var output = template.Transform();
if (!Directory.Exists(location))
{ Directory.CreateDirectory(location); }
File.WriteAllText(fileName, output);
  }
}
You can do a number of other things at the time of file output. You can protect against overwriting changed files, perform log-generation activity, report errors and prepare a list of files to include in your project. In this sample, the files are created but must be manually included in the project.
There are two issues with changes to generated files. The architecture can support derived or partial classes and local services for customization of output. But files can still be accidentally changed -- and the navigation options of Visual Studio nearly guarantee that programmers will miss warnings at the top of files. Losing accidental changes is bad for your team, especially during slow maintenance cycles. One way to protect files is including a hash of the contents into a file header you check before overwriting the file.
Running generation with your dedicated code and preprocessed templates has another benefit: simplifying templates. Compare the final template with the one at the start of this column:
using System;
namespace<#= _item.Namespace.Name #>
{
publicpartialclass<#= _item.Name#>
    {
<#	foreach (var p in _helper.GetAttributesForClass(_item))	{	#>
	<#= _helper.CSharpTypeName(p) #><#= p.Name #> {get; set;}
<#} #>
    }
}
The IPreprocessTemplate interface has a Transform, not TransformText, method. This forces the partial class to include a method to redirect the call. This approach allows the Transform method to perform complex logic and call numerous templates.
If you're designing generation systems using preprocessed T4 templates, you can leverage the inheritance hierarchy. By default, the base class is generated into the interim class's file and appears collapsed at the bottom. If you specify a base class with the inherits attribute of the template directive, T4 assumes you'll implement a proper base class. To do this easily, copy the base class created without the inherits attribute and interleave your desired base class:
- TemplateBase (Write, WriteLine, PushIndent and so on)
- CustomBase (default Transform, abstract TransformText)
- T4 template with inherits attribute set to CustomBase
This is an extremely powerful design. If the CustomBase is generic on the itemType, you can simplify your partial class to defining filename, location and supplying the Export attribute.
Debugging, Installing and Distributing
Before using your menu extension, you need to adjust the manifest. Double-clicking the .vsixmanifest opens a form-based editor. The ID must be unique, which is why the default includes a GUID suffix. You can change the author, description, icon and applicable versions of Visual Studio. You must also add the project as an MEF component by clicking Add Content. The ContentType is an MEF component and the source is the project.
With several moving parts inside Visual Studio and two MEF containers, you might be worried about debugging. You're in for a delightful surprise. With the menu item code in a separate solution than your main project, ensure the menu item project is the startup project and begin debugging with F5. A second instance of Visual Studio will open. The first time you'll have to select your developer type and wait for configuration, but remaining runs will retain this information along with a separate Most Recently Used list and so on. Open your modeling project in this instance of Visual Studio and you'll see your menu option, even though it's not yet installed. You can debug like other Microsoft .NET Framework code.
When you've finished testing, you can install your extension so it's available to all your .NET projects by double-clicking the .vsix file in File Explorer, installing and restarting any Visual Studio instances. The .vsix file normally appears in the bin\Debug or bin\Release directory of its project. You can uninstall your extension through Tools/Extension Manager, which you'll need to do before reinstalling if you make changes. To distribute your application, distribute your .vsix file, which is actually a .zip file containing the pieces needed by your extension.