Mobile Corner
A Walk Through the Windows Phone 7 Social Reader Template
Mobile Corner columnist Nick Randolph walks through a template that can get your first Windows Phone 7 application up and running fast.
- By Nick Randolph
- 04/19/2011
We're going to jump right in to building a simple Windows Phone 7 application, but rather than have to go through all the basic plumbing you're going to learn how to leverage a project template for building reading-style applications. The template allows you to specify RSS/Atom feeds, Facebook pages and Twitter accounts as data sources. You can then combine them into any number of filtered lists that can be displayed within your application.
Let's kick off by downloading the template from the Download link at the top of this page and installing it by placing the downloaded file into the folder "C:\Users\[username]\Documents\Visual Studio 2010\Templates\ProjectTemplates\Visual C#\Silverlight for Windows Phone." Right-click on the file and select Properties. In the Properties window click the Unblock button, followed by OK.
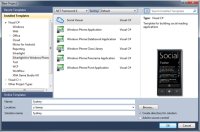
Open Visual Studio 2010 and select File -> New -> Project. Select Social Viewer, which is the template you just downloaded, from under the Silverlight for Windows Phone node. In this case we're going to build an application that will show what's going on in Sydney, so we'll aptly name it Sydney and click OK.

[Click on image for larger view.] |
| Figure 1. |
The first thing that you'll notices is that the solution structure is larger than a vanilla Windows Phone 7 project. This is because there are already a number of pages that are already wired up ready for you to use. The application starts with the MainPage, which contains one or more lists of summary items. Clicking on any of these items will launch the ReaderPage, which will give you the full details of the item. This page allows the reader to comment, share or tweet about the item, connecting through to Facebook or Twitter to do so. There is an About page, already wired up with the necessary information about your application, and lastly a Settings page, which is useful for exposing configurable settings to the user.
There are only a couple of things that you need to specify to get this application up and running. Open App.xaml and locate the ReaderConfiguration.Sources element. By default this element contains a single SocialSource element, which is there as a template for you to follow. In this case we're going to be pulling data from a news RSS feed, a twitter search for the keyword "Sydney" and a Facebook page for Sydney Australia.
Before we configure the application we need to locate a couple of pieces of information. The Twitter search is easy to configure, since we'll use the keyword "Sydney." For the RSS feed you need to locate the url of the feed, in this case it's http://feeds.smh.com.au/rssheadlines/top.xml. Lastly the Facebook page is located at http://www.facebook.com/seesydney, but you can't just enter that into the application. Instead, you need to locate the id of the page that you want to use as a source. To do this you need to open the page in your favorite browser, right-click on the Share link, which is in the lower left corner of the page, and select Copy shortcut.
If you open Notepad, or an equivalent text editor, and paste the clipboard contents, you should see that at the end of the url is a number prefixed by "p[]=". This is the page id that you'll need to use.
OK, so back to the application configuration. Copy the template SocialSource twice and enter the information about the Facebook, RSS and Twitter sources. Note that you can have as many or view items as you want so long as their Name properties are unique.
<sr:ReaderConfiguration.Sources>
    <sr:SocialSource Name="Sydney Australia"
                        Source="Facebook"
                        Id="10196659501" />
    <sr:SocialSource Name="Sydney News"
                        Source="RSS"
                        Id="http://feeds.smh.com.au/rssheadlines/top.xml" />
    <sr:SocialSource Name="Sydney Twitter"
                        Source="Twitter"
                        Id="Sydney" />
</sr:ReaderConfiguration.Sources>
Now that you've configured the sources, you need to allocate them to lists. You can combine one or more sources into any number of lists based on a number of different criteria. Right now we're just going to assign each SocialSource, specified by the SourceName attribute, to its own list.
<sr:ReaderConfiguration.Lists>
    <Sydney:ExtendedActivityFilter>
        <Sydney:ExtendedActivityFilter.Filters>
            <Lists:FilterBySourceName ListName="News" SourceName="Sydney News" />
            <Lists:FilterBySourceName ListName="Twitter"
                                        SourceName="Sydney Twitter" />
            <Lists:FilterBySourceName ListName="Action"
                                        SourceName="Sydney Australia" />
        </Sydney:ExtendedActivityFilter.Filters>
    </Sydney:ExtendedActivityFilter>
</sr:ReaderConfiguration.Lists>
Unlike the Sources, the order of the Lists is important as this will determine what order they appear within the application. This brings us to an interesting point: you can make a choice as to how you want the items to be displayed. You can either specify them to all be displayed in a single list (in which case the above lists will be ignored), or in a panorama display with each list you've defined in a separate panorama item. This is configured by specifying the DisplayMode attribute of the ReaderConfiguration; the options are Panorama or List.
<sr:ReaderConfiguration x:Key="Configuration"
                                DisplayMode="Panorama" ...
That's all there is to it. You can hit F5 to run your application.
There is much more that you can configure and extend in this sample so stay tuned for the next post.
About the Author
Nick Randolph runs Built to Roam, a consulting company that specializes in training, mentoring and assisting other companies build mobile applications. With a heritage in rich client applications for both the desktop and a variety of mobile platforms, Nick currently presents, writes and educates on the Windows Phone platform.