UI Code Expert
Visual Studio Solution Architecture for a WPF Application
Complex applications require careful architecting to reduce the amount of code movement between Visual Studio projects and the renaming of corresponding namespaces and folders.
All projects of any significant size are faced with the initial question of how to structure the Visual Studio solution. Small applications with a single form or dialog can be placed into a single Visual Studio solution with a single Visual Studio project. However, projects can quickly become bloated, and refactoring code so that it can be used across multiple tiers and multiple products (or company projects) can be challenging. Team leads who know their project is going to be non-trivial will want to develop an initial assembly architecture early to reduce the amount of code movement between Visual Studio projects and, frequently, the renaming of corresponding namespaces and folders that result.
In this article, I'll outline some basic assembly architecture within a solution and talk about various conventions that can be established within such architecture. Although there are similarities across all types of UIs, in this article I'll focus on a project that's targeted at creating a Windows Presentation Foundation (WPF) application.
Defining the Application Tiers
Architecture varies greatly based on requirements. To avoid confusion, I'm going to make several assumptions about the particular architecture I'm outlining so that we share a common perspective on where it applies. First, I'm assuming a multiuser application is being developed, and the users will each be connecting from different workstations. Furthermore, I'm assuming data is shared between users through a database.
Therefore, we have a minimum of a two-tier application; the tiers being the database and a WPF client. Of course, any self-respecting architect will strongly argue in favor of a minimum of three tiers for the application. (This is a requirement if the client is Silverlight, as the Silverlight sandbox won't allow direct connection to the database.)
At a minimum, accessing the database through an application tier prevents the execution of database queries directly -- thereby circumventing any business-tier security or even referential integrity logic.
Of course, tiers don't necessarily have to correspond to different physical servers separated either by a LAN or WAN connection. For development and unit-testing purposes, in fact, it's important that the entire architecture can be deployed to a single machine. However, when deploying into production, the architecture allows a complete separation of the tiers -- even allowing for Database and Server tiers to be deployed to the cloud if desired.
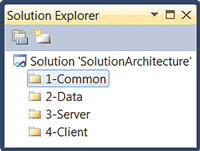
To map the application tiers into a Visual Studio solution we create solution folders -- a solution folder for each tier, as shown in Figure 1.
[Click on image for larger view.] |
| Figure 1. Solution folders map your application tiers into your Visual Studio solution. |
By prefixing the solution folders with a number, we can explicitly order the tiers within the solution. It's important to note that solution folders are logical groupings only; they don't require a corresponding directory structure behind them. A project added to the 2-Data solution does not necessarily have an underlying 2-Data directory parent, for example.
Placing the Projects into Solution Folders
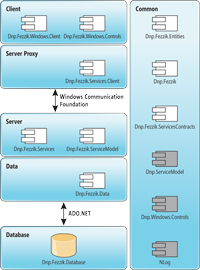
The next step in creating the solution is to add projects to each solution folder. To begin with, we map each project onto the architecture canvas, as shown in Figure 2.
[Click on image for larger view.] |
| Figure 2. The component layout maps each project into the tiered architecture. |
The term "component" is a general term. In the context of this article, a component is an assembly and, therefore, it maps to a Visual Studio project.
Several guidelines emerge from the component name and its location in the architecture canvas.
First, the name of the component maps exactly to the Visual Studio project name, as well as to the root namespace of all items in the project. Second, the root namespace for all code within the project is the company name (or designated alias) -- Dnp for this example -- followed by the product name (Fezzik).
Next, where reasonable, sub-namespaces (following the root namespace) follow the Microsoft .NET Framework naming convention, except that "System" and "Microsoft" are replaced with the root namespace. For example, if the code is an additional set of Windows controls specific to the Fezzik project, the project name would be Dnp.Fezzik.Windows.Controls. Similarly, code extending the functionality of Windows Communication Foundation (WCF) would be placed into the Dnp.Fezzik.ServiceModel project.
In some cases, there isn't a good mapping. Application entities that represent business objects within your application don't generally have an equivalent within the .NET Framework. Code such as this is placed into its own namespace: Dnp.Fezzik.Entities. One alternative for entities, specifically entities generated via the Entity Framework, would be to place them into a Dnp.Fezzik.Data.Objects or Dnp.Fezzik.Data.Entities namespace. The choice largely depends on whether the namespace is dependent on the corresponding .NET Framework component. If the entities project references System.Data.Objects.*, then using the Dnp.Fezzik.Data.Objects name makes sense. If, however, the entities are Plain Old CLR Objects (POCOs), then the Dnp.Fezzik.Entities is likely to be more fitting.
Finally, although a component may be specific to a particular tier, the project name doesn't generally include the tier name. The components in the Server tier, for example, do not necessarily have Server in the project name (although they could, as in the case of Dnp.Fezzik.Data).
Organizing the Visual Studio Projects
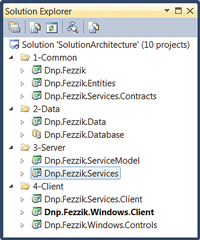
Once the components have been assigned to particular tiers, it's time to place them within the solution folders. There are two ways to approach this. The first and most obvious is to place components into the solution folder corresponding to the tier, as shown in Figure 3. This approach optimizes when finding a single project within a large solution of projects -- assuming the architecture is well understood.
[Click on image for larger view.] |
| Figure 3. Grouping projects by tier in Solution Explorer. |
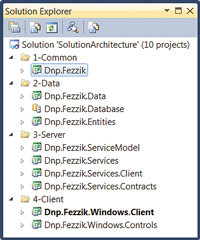
There's a second solution project layout to consider, as well. Rather than placing projects into the exact tier, consider grouping them by their dependencies (or coupling). With this approach, dependency increases as we move down the solution explorer tree:
- Common projects are not dependent on any other tiers, but it's likely that other tiers could have projects dependent on Common projects.
- Data is likely to be dependent on Common, but not the other way around.
- Services are likely to be dependent on Common- and Data-tier projects. This is especially true if the entities are likely to be used heavily from the Services tier.
- Windows is likely to be dependent on all layers, including *.Services.Client and *.Services.Contracts in the Server tier, *.Entities in the Data tier and any common code in the Common tier.
By grouping projects by dependencies, you can load and unload entire tiers from the solution, thereby improving the load and build times of large solutions. This approach also keeps tightly coupled components together so as to optimize changes across projects due to refactoring (see Figure 4).
[Click on image for larger view.] |
| Figure 4. Grouping projects based on dependencies. |
To understand this, consider the Data and Server tiers. In the case of the Data tier, there's a strong coupling between the *.Entities project and the *.Database project. This is true whether the database is generated from the entities -- as in the Entity Framework
Code First approach or vice versa. Similarly, in the case of the Server tier, both the *.Services project and the *.Services.Client projects are heavily dependent on the *.Services.Contracts project.
Note that there are a number of components in Figure 2 that are not shown in Figure 4 because they are binary references, not ones for which the source code is included in this solution. Sometimes these are third-party assemblies, like the open source NLog.dll. Other times they're framework components shared throughout the company. NuGet is a great solution for distributing such components, referencing them from a project and updating them as new versions become available.
Figure 5 graphically depicts a possible dependency graph with the arrows pointing to the components that have dependencies. In many real-world cases the dependency graph may be more or less coupled.
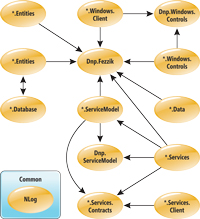
[Click on image for larger view.] |
| Figure 5. The dependency model visualizes the dependencies that exist between components. |
In addition to project naming and namespace naming, there needs to be a corresponding directory-naming convention. There are two primary possibilities to consider. First, name the directory the same as the project name. If the project is Dnp.Fezzik.ServiceModel, the directory should be named the same. The drawback to this is that, because you're in the solution folder (presumably something like Dnp.Fezzik), including the root namespace in the project folder is redundant -- ServiceModel alone should be sufficient. The alternative is to name the folder without the root namespace (ServiceModel, for example), but this requires creating the project based on the folder name and then renaming the project and editing the default project namespace.
Following the latter convention presents a problem for projects whose code is destined for the root namespace -- Dnp.Fezzik, for example. One possible convention to address this scenario is to name the folder "Core." Any folder named Core is assumed to have projects and code corresponding to the parent folder's name: Dnp.Fezzik.
There are two other points to consider in the directory structure. For large solutions (I'm on a project at the moment consisting of 250 smaller projects), it's generally helpful to create smaller solutions that only include a particular tier's set of projects or a particular category of project based on the business. A utility company with multiple service offerings might group projects into Electric, Gas, Water and Common/Core, and place projects relating to each into their own folder. Similarly, as projects get larger, consider breaking up the project by a similar category. Again, a utility company may break up a Dnp.Fezzik.Services project in to Dnp.Fezzik.Services.Gas, Dnp.Fezzik.Services.Electric and Dnp.Fezzik.Services.Water.
It's important to note that this article is presenting possible guidelines and conventions -- not rules. Conventions, by definition, provide a default with the intent that there are cases where the convention should be overruled with a custom approach. Similarly, guidelines provide default boundaries that should be followed unless explicit reasons are identified to do otherwise.
About the Author
Mark Michaelis (http://IntelliTect.com/Mark) is the founder of IntelliTect and serves as the Chief Technical Architect and Trainer. Since 1996, he has been a Microsoft MVP for C#, Visual Studio Team System, and the Windows SDK and in 2007 he was recognized as a Microsoft Regional Director. He also serves on several Microsoft software design review teams, including C#, the Connected Systems Division, and VSTS. Mark speaks at developer conferences and has written numerous articles and books - Essential C# 5.0 is his most recent. Mark holds a Bachelor of Arts in Philosophy from the University of Illinois and a Masters in Computer Science from the Illinois Institute of Technology. When not bonding with his computer, Mark is busy with his family or training for another triathlon (having completed the Ironman in 2008). Mark lives in Spokane, Washington, with his wife Elisabeth and three children, Benjamin, Hanna and Abigail.