In-Depth
Levels of TFS Build Automation
Your team won't achieve automated build nirvana overnight. Here's how to break down the process and adopt the changes in the Microsoft build system.
- By Benjamin Day
- 07/01/2011
One of the biggest areas of change in Microsoft Team Foundation Server (TFS) 2010 from its predecessor TFS 2008 is the improved build system. It was updated with a new build script format and server architecture driven by Windows Workflow (XAML). The result is that builds are now easier to set up and customize. And the new build framework helps you avoid the problem of broken builds altogether.
If you're starting from "no automated builds," it's still going to take a while. For a lot of development shops, adopting build automation can be overwhelming, and teams need a way to break it into a gradual process with varying levels of sophistication. This article will walk you through the adoption process and discuss the various levels of TFS build automation from simply compiling on a build server and running unit tests to automating continuous integration and integrating your builds with Lab Management and coded UI tests.
You might be asking yourself why teams would use a separate build server and add this additional complexity to their lives and development process. The short answer is: to try to eliminate the "works on my box" problem.
The build server is the neutral third-party that verifies that your code actually compiles. It helps automate a lot of the drudgery of your build, test and release process. The goal is to make handing off something to Quality Assurance (QA) testers or deploying to production a non-event.
Use of a build server also helps prove that you know how to deploy your application and that you and your team have dealt with all the little issues. If you can't tell the build server how to compile and package your app, you probably don't actually know how to do it.
Monthly Builds: That Was Then
Thinking back to the days before TFS Build or CruiseControl, I'd frequently see customers creating a build only about once per month.
Sure, the developers were doing "Get Latest" on the source repository at least once per day and everyone's code basically worked, but when they tried to package it up to ship it or "kick it over the wall to QA," it tended to be an ordeal: All hands on deck, don't make any plans for tonight, we're ordering pizza, we're doing a build.
Why did this always happen on the build servers when the app "basically worked" on the developers' machines? Think about what happens whenever a new developer joins the team. How long does it take to get that developer's workstation configured so that the app will compile and actually run? There are so many tweaks and other things that have to happen to the local workstation.
"Oh ... you forgot to install the third-party library for XYZ. And don't forget to set the registry keys for [fill in the blank]. That error's happening because you didn't copy the latest version of the configuration file to the foo directory. And don't forget to change the connection string to your local database. And make sure you get the right version of the database deploy script because remember we made that change to the security stored procedure two weeks ago."
Once you get all that stuff done, you're cruising again -- but it's a bit of a productivity killer. And, of course, you documented that whole process so that it's not nearly as painful next time, right?
It used to be so painful on the build server when the code basically worked on developers' workstations because, first, you were probably tearing down the build environment each time to eliminate any leftover stuff from last month's build. Second, the dev workstations were gradually patched every day with every little configuration change, but the build server didn't get used very often. This meant that a month's worth of little tweaks got lumped into a single day. Your team probably had to debug each and every one of these little changes because you basically forgot everything you did -- you had to remember what not to forget and it didn't take long before your brain "garbage collected" those details.
The automated build is going to force you to automate this whole build process so that a computer can do it. Once you do that, you can run builds all the time.
Levels of Build Awesomeness
As a consultant who works with customers to nail down and improve their software development process, I tend to want to recommend that organizations use everything in the TFS/Visual Studio application lifecycle management (ALM) stack. I can say: "You should build everything, deploy the database, populate the database with test data, spin up a virtual environment with TFS Lab Management, deploy the binaries, set all the connection strings for all possible environments, run the unit tests, run all the coded UI tests and run load tests for every check-in using TFS Build." But if you're starting from "no automated builds," it's going to take a while. It's a fair amount of work and you probably won't achieve automated build nirvana overnight.
For a lot of developers and development shops, looking at the mountain of opportunity can be overwhelming, and you may not know where to start. You need a way to break it apart into something you can adopt gradually without bringing your entire development team to a dead stop while trying to get everything perfect. That brings us to what I call the "levels of build awesomeness":
- "Get Latest" deploy on the developer desktop machine
- Compile on a build server
- Run unit tests on the build server
- Continuous Integration (CI)
- Gated Check-in
- Deploy to QA/test
- Lab Management with coded UI tests
First off, you need to solve any problems on your developer workstations. This is where all the important stuff happens, and it's the first line of defense against productivity problems. You should be able to take a brand-new developer machine, connect to TFS, right-click the solution root of your application, do a "Get Latest" and then immediately run "Build Solution" and have the application run. Granted, you might have to install some third-party components first and get the database configured, but when you pull that code down from TFS for the first time, it should just work.
If you can get this working properly, it means that you understand what it takes to build the app. It eliminates a lot of developer productivity headaches -- and makes building on a TFS Build server fairly straightforward. If you're developing an ASP.NET Web application, you should convert your Web projects to use IIS instead of the development Web server. This helps you to ensure that the developer environment is the same as the build environment, which needs to match the production environment as closely as possible. It has the added benefit of forcing you to figure out the IIS configuration as well as the IIS App Pool configuration details.
Compile on a Build Server
When you've figured out the details of how to deploy and build your solution on your developer desktop, you're ready to move on to the next level of build sophistication and compile your code on a build server. If all you want to do is compile your code, this process is surprisingly simple.
TFS build definitions are contained inside of a Team Project. You're going to start by navigating to the Team Project that will contain your build. Usually, this is the same Team Project that contains your source code. From the Team Project, navigate to the Builds node, right-click and select "New Build Definition" (see Figure 1).
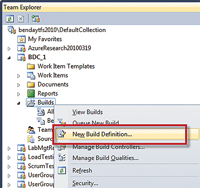
[Click on image for larger view.] |
| Figure 1. Create a new build definition. |
You should now see the build definition editor, which allows you to modify the name and description for the build. This includes information about how and when the build should be started, what the source control workspace definition is, the Build Controller that should run the build, how long the build outputs (for instance, the compiled output of the build) should be retained, and details for the build script execution.
The core configuration options are on the Process tab of the build editor dialog, as shown in Figure 2. Whereas the other tabs in the build editor dialog box control the metadata about the build, the Process tab provides the options for what happens during the actual build execution. You can choose which build script to use (by default, it uses the build script defined in DefaultTemplate.xaml), which Solutions (*.sln) to build, whether to run automated tests, the build number naming convention, build log output verbosity and static code analysis options.
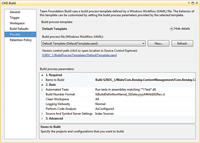
[Click on image for larger view.] |
| Figure 2. The build configuration options are found on the Process tab of the build editor. |
Advanced options allow you to disable and skip steps within the default build script template.
After you populate all the required fields on your new build definition and click Save, the build definition will appear in Team Explorer in the Builds node of your Team Project.
From here, you can right-click the build definition and choose Queue New Build to start the build. After you've started the build, the Build Explorer window will pop up and you should see your build running in the Queued tab (see Figure 3).
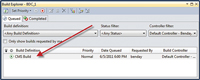
[Click on image for larger view.] |
| Figure 3. After you've started the build, the Build Explorer window will pop up and you should see your build running in the Queued tab. |
From here you can double-click on the running build and bring up the real-time details to see what the build is doing and whether it's passed, as shown in Figure 4. Ideally, your build passes -- but when it doesn't, the build details screen helps you figure out why a build has failed, whether it's compilation, unit test execution failure, something related to your build server or, if you've customized it, the build script itself.

[Click on image for larger view.] |
| Figure 4. Double-click on the running build in Build Explorer to bring up the real-time execution details to see what the build is doing and whether it passed. |
At this point you have the code compiling on someone else's box and, even if you don't do anything else, this is helpful. You can really drive quality and increase the confidence that the code is working if you run unit tests. Assuming that the code compiled successfully, the default build process settings will trigger the execution of unit tests in any DLL that contains the word "test." In a perfect world, your unit tests would always pass as part of your automated build because that helps you eliminate the "works on my box but doesn't work on anyone else's box" problem. That compilation step establishes the first level of quality. The unit tests get you to the next level of quality where you know that the unit tests work in multiple places.
Continuous Integration
Up to this point, these builds have all been started manually: someone had to actually go to Team Explorer and start the build. You've managed to clear the hurdle of scripting out the basics of the build so that it's no longer a special event but it still involves a conscious, human decision to kick it off. This is where the next levels of build awesomeness come in: builds that are triggered by a check-in.
Let's think this through a little bit. Assume for a moment that you're manually triggering your build on a fairly regular basis. You're probably spending a decent amount of time fixing little random compilation errors, and you're almost definitely running into broken unit tests. If you value your unit tests passing -- and you should -- you really want to make sure that they're passing all the time.
Continuous Integration, or CI, is one of the options on the "Trigger" tab of the build definition editor, and it causes the build to automatically run when someone checks in code related to the build. It knows that code is related to a build because of the build's Workspace settings. If the check-in is anywhere under the root of that workspace, the build will be triggered. Now, instead of the build running as a special event, the build is probably running multiple times per day; you're continuously integrating your code with everyone else on the team with every change to the codebase (see "Best Practices for Checking in Code").
Think about what this means for your code and your build: If your build passes (compiles successfully and the unit tests all pass), you know that your code is good. If someone checks in code and causes the build to fail or only partially succeed (typically the code compiles but the unit tests are failing), you know that the last check-in "broke" the build. Put another way, something that person did as part of that check-in is the cause of the problem. This is fantastic for debugging and for bringing the build back to a passing state, because you know that the problem is somewhere in that latest changeset.
For most development groups that are using CI, if the build breaks, it's a very big deal. It's "all hands on deck," working to get the build back to passing -- and it's not unusual for teams to decide that no one should check in other than the devel-oper who just broke the build. It might seem like a productivity killer to have everyone drop everything in order to fix the build, but there's real value in knowing that your application is always at a certain minimum level of quality. Plus, if you think about it, it's a productivity killer to build on top of code that doesn't compile or doesn't have passing unit tests. Some companies consider breaking the build such a major offense that it can be cause for termination.
Gated Check-In
When I'm coaching or leading a team, I seldom recommend termination upon breaking the build, but I'm definitely in the "it's a serious issue" camp. One of my pet peeves is seeing automated builds that have been breaking for more than one day -- and I start to get seriously grumpy when a build is broken for more than an hour. I want my developers to take passing the automated build very seriously. One of the worst productivity killers is coming in to work, getting the latest code out of source control, and then finding that it no longer compiles or that the unit tests no longer pass. Now the team needs to spend time figuring out what's wrong before anyone can start to do any actual new work. And there's the core of the problem for CI: When someone checks in code and the build fails, it's now everyone's problem, because that error-filled changeset has already been committed to the source control repository.
Enter gated check-in in TFS 2010. It's the best new feature. Gated check-in is a CI build that uses TFS shelvesets to make sure that the build is never actually broken. If you're checking code into a source control folder that's governed by a gated check-in build, your check-in is automatically put into a shelveset. After that, the CI build starts, does a "Get Latest" on the source repository, unshelves your code into the build server's build directory, and then builds the code and runs the test (see "What's a TFS Shelveset?").
If the build passes, the shelveset is committed to the source control repository. If the build fails, your check-in is rejected and no changes are committed to source control. When the build fails, you'll get a notification on your desktop that your check-in was rejected, and then you can go to the build details to see what actually caused the build to fail. Voila! No more broken builds!
When you've got it fixed, you can check in again and the process repeats. When the build eventually passes, you'll be notified to "reconcile your workspace" with TFS -- basically, any of those changes that you had locally that just got checked in by the build server need to be undone. For each local pending change that got committed, Reconcile will do an "undo checkout" and sync with the latest version.
Lab Management Builds and Coded UI Tests
The rock star/superhero level of TFS Builds is when you incorporate two other great new TFS 2010 and Visual Studio 2010 features: Lab Management and coded UI tests. Both of these features are aimed at eliminating the headaches and repetitive, tedious tasks that QA testers (aka "manual testers") have to do in order to test an application.
Coded UI tests are a new type of test in Visual Studio 2010 that simulate a user interacting with a running application via keyboard and mouse. As the test progresses, it can read values out of the application's UI and validate whether the test should pass or fail. QA testers frequently have to go through hundreds of test cases (especially when testing for bug regressions) in order to test an application. Coded UI tests help QA testers by doing this work automatically and often much faster than a typical human tester.
Lab Management uses Hyper-V virtualization to allow testers to easily deploy builds to complex testing environments. It helps to streamline the process of deploying applications to complex, multiserver environments, and also provides a way to "snapshot" these multiserver environments when a bug is found. Lab Management also helps developers because the bugs created by the tester can actually have links to the snapshot of the virtual test environment. It eliminates the "no repro" problem by giving the developer relatively easy access to the computers and build bits where the bug was found.
When you combine Lab Management and coded UI tests with TFS Build, you can build the code, deploy the code to the test environment and run not only the unit tests, but actually test the running application's UI. It's all about eliminating repetitive work and freeing everyone up to focus on high-value tasks. It takes a lot of effort to get to this level of build awesomeness, and definitely means that your team is going to be managing test cases and requirements using TFS and Microsoft Test Manager. All that effort isn't necessarily a bad thing, though, because if you aren't formally managing your requirements and testing plans, you might have a lot of communication overhead and miscommunication with your QA team.
Even if you're part of a smaller team and choose to skip integrating coded UI tests directly into a Lab Management build, you can still get a lot of value out of coded UI tests by bringing QA into the development process. If QA is going to run coded UI tests against your application in order to decide that it's working, your developers can save time by running the coded UI tests on their local workstations before they check in their code.
It's all about easily creating releasable code by bringing QA and quality focus into the development cycle. One of the most dangerous phrases in the software development lexicon is "kicking a build over the wall to QA." That phrase is indicative of an "us versus them" mindset and implies that quality is something that happens later -- sometime after development is done. With automated builds, you and your team can start to emphasize quality as part of every check-in. It's a change of mindset that says your application not working is the aberration rather than the other way around. Adopting automated builds is a gradual process and there are varying levels of sophistication. You need to ask yourself what's right for your team at the moment -- but remember that you can always aspire to higher levels of build awesomeness.