Practical .NET
Creating the Perfect ASP.NET UI with Web Parts and User Controls
Web Parts and User Controls let you easily build customizable UIs with the same tools you use to create inflexible user interfaces -- and implement an MVC-like pattern in ASP.NET.
In reporting dashboards and SharePoint, it's taken for granted that users should be able to customize the UI to create one that best supports their needs. In fact, only by letting your users create their own UI can you deliver the perfect UI to a diverse group of users (and you always have a diverse group of users). You can provide that same flexibility in ASP.NET by using Web Parts and User Controls. This approach to UI design really comes down to applying the same object-oriented thinking to your UI as you do to your application: Your UI as a set of simple encapsulated components that you (or your users) assemble to create a more complex whole. And it's easier than you think.
Using Web Parts and User Controls has an additional benefit: it moves you to a version of the Model-View-Controller (MVC) design pattern. You can move much of your UI logic to your Web Part so that it acts as your controller with your User Control as your view. You can then place your Web Part under Test-Driven Development (TDD) to prove that your UI logic works correctly.
Take, for instance, a page that allows users to search for sales orders by a variety of criteria (see Figure 1). Some users will have a sales order number they can enter to retrieve a sales order. Most users, however, will have to find sales orders based on other sets of criteria: the order date or the customer number, for instance. Figure 1 shows what that page might look like.
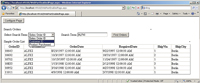
[Click on image for larger view.] |
| Figure 1. While this looks like an ordinary search page, the search criteria and the list of orders are Web Parts that the user can add, remove and modify. |
Once the sales order is displayed, its information breaks down into several components: customer, customer address, the sales order header, sales order detail, the product or service being purchased in each sales order detail line. Some users will need to see all the information for each order while other users will require only the shipping date. Rather than inflict the whole application on every user, a customizable UI lets each user assemble the components of your application they need.
Most descriptions of using Web Parts make them sound like a lot of work for tenuous benefits. But most descriptions of how to use Web Parts are overkill -- you don't need as much code as those descriptions suggest. By incorporating User Controls into your design you can, for instance, still use a visual designer (just like building a Web Form) to create your page. Where there's some "extra" code, it's often the same in every Web Part you create.
Initializing the WebPart
Customization can be divided into two categories: those customizations that require a small tweak to a UI component that all users can share, and those customizations that require a different component for different users. For instance, users that only ever search on Customer Number just need to tweak the component to have the UI default to the Customer Number search whenever they come to the page. However, users that want the search results to display just the sales orders' delivery date need to be able to swap in a different component from the one for users who want to see all the information.
A search page that supports customizing both the search criteria and the display of the search results will need two WebPartZones: one to hold a search criteria Web Part and another zone to hold the search results Web Part.
To create the WebPart that lets users tweak their search criteria, add two items to your ASP.NET project: a User Control (SearchOrderUC.ascx) that will form part of your UI, and a class file (SearchOrderWP.vb) that will be your Web Part. While you need the Web Part to take advantage of ASP.NET's personalization/customization framework, creating a UI in a Web Part is awkward because Web Parts don't come with a Visual Designer; but User Controls do come with a visual designer. By having the Web Part load and display the User Control, you get access to ASP.NET's personalization framework and a visual designer that will support creating a UI using drag and drop. You also get that MVC-like structure that supports TDD.
To convert your class file into a Web Part, have it inherit from System.Web.UI.WebControls.WebParts.WebPart, like so:
Public Class SearchOrderWP
  Inherits System.Web.UI.WebControls.WebParts.WebPart
To have your Web Part load and display my User Control, override the Web Part's CreateChildControls method. In that method, first make sure that your User Control isn't already loaded by checking the Web Part's Controls collection (ASP.NET calls the CreateChildControls method repeatedly as a Page is built; this check prevents your User Control from being added multiple times). If the Controls collection is empty, all that's necessary to have the Web Part display your User Control is to use the Page's LoadControl method to add your User Control to the Web Part's Controls collection:
Protected Overrides Sub CreateChildControls()
  Dim uc As UserControl

  If Me.Controls.Count = 0 Then
    uc = Me.Page.LoadControl("SearchOrderUC.ascx")
    Me.Controls.Add(uc)
    MyBase.CreateChildControls()
    Me.ChildControlsCreated = True
  End If

End Sub
Except for the name of the User Control, this code is identical for every Web Part/User Control combination you'll create.
Defining the Page
At this point, you might as well start creating the page that will host your Web Parts. After adding a Web Form to your project, from the Toolbox Web Parts tab, drag onto the page a WebPartManager, two WebPartZones and a CatalogZone. Then drop a DeclarativeCatalogPart into the CatalogZone -- the DeclaractiveCatalogPart part will show the user all the WebParts that the user is allowed to add to the page.
To let the user put the page into a mode where they can make add a Web Part to the page, add a button with this code in its Click event:
Me.WebPartManager1.DisplayMode = WebPartManager.DesignDisplayMode
To let the user exit edit mode and go back to using the page, add another button with this code:
Me.WebPartManager1.DisplayMode = WebPartManager.BrowseDisplayMode
To have the Web Part you just created listed in the Catalog, from the DeclarativeCatalogPart SmartTag, select Edit Templates to display the WebPartsTemplate that lists the page's Web Parts. At the top of the Visual Studio Toolbox you should find a new tab with the name of your project and, in that tab, all the Web Parts you've created in your project (if you don't find that tab or your Web Parts, rebuild the project to add them). Then drag the Web Part into your DeclarativeCataglogPart's WebPartsTemplate (this may generate an error message. Don't panic! The error will go away).
When you exit Template Editing for your DeclarateCatalogPart, you'll find that it contains an entry for your Web Part. Unfortunately, that entry has the uninformative name "Untitled." As fond as I am of Design view, you'll need to switch to Source view to fix this. In Source View, find your Web Part tag in the WebPartsTemplate and add a Title attribute to it with a more informative name, like this:
<cc1:SearchOrderWP ID="SearchOrderWP2" runat="server" Title="Search Orders" />
If you run your application now, you'll find that you can click on the Configure button to display your WebPartZone and your catalog listing your Web Part. Clicking on the catalog's Add button will add your Web Part with its User Control to your WebPartZone (see Figure 2). And, when you click on the View button to return to the page's normal display mode, you'll find that the page now displays your user control. The page will remember this setting and, furthermore, that this customization is only for you so that other users can add different controls to their versions of the page.
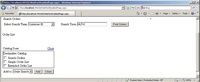
[Click on image for larger view.] |
| Figure 2. A customizable page in CatalogDisplayMode showing the search Web Part already added to the page and the catalog listing all the Web Parts that can be added. |
Tweaking the UI
The WebPart that's being displayed can now be customized by the user. However, that information needs to be communicated to the User Control that forms your WebPart's UI. The simplest way to do that is to add this code to the User Control that will allow it to access the WebPart that's displaying it:
Dim wp As SearchOrderWP

Protected Sub Page_Load(ByVal sender As Object,
ByVal e As System.EventArgs) Handles Me.Load
  wp = CType(Me.Parent, SearchOrderWP)
End Sub
The UI for the search criteria will contain two controls. The first is a drop-down list that displays three options for searching for an order: Sales Order Id, Customer Id and Ship Date. The second control is a textbox that lets the user enter a search term (such as a Customer Id). To let users tweak their UI to meet their needs, this part of the UI should remember the user's last setting in the drop-down list. That way, once the user sets their search criteria, they won't have to set it again.
That's surprisingly easy to do: You just need a property in your Web Part that's decorated with the Personalizable attribute to hold the drop down list setting. Something like this:
<Personalizable()>
Public Property SearchSetting() As String
Your next step is to store the user's choice in that property every time the user changes it. Adding this code to the drop-down list's SelectedIndexChanged event will do that:
wp.SearchSetting = Me.SelectSearchTypeDDL.SelectedValue
Finally, you need this code in the user control's Page Load event to reset the drop-down list based on the user's previous selection:
If Me.IsPostBack = False Then
  Me.SelectSearchTypeDDL.SelectedValue = wp.SearchSetting
End If
If you wanted to, you could add an editor that would allow the user to enter their chosen value for the Web Part controls on the Web Form. However, that's usually overkill -- just remembering the User's last choices is often sufficient to allow your users to tweak the UI to what they want.
Extending the UI with more functionality just consists of creating more components consisting of a WebPart to handle processing, and a User Control to handle accepting and displaying data. However, in any real UI, some of these components will need to be able to communicate with each other. With Web Parts and User Controls, creating replaceable UI components that can talk to each other also turns out to be surprisingly easy. And, again, much of the code is boilerplate.
Creating a Connectable Provider
The next step is to create a Web Part that will display the user's search results. In addition, the OrderList Web Part is probably more interesting than the SearchOrder Web Part. To support the range of needs in the user community, you'll probably need to provide a range of OrderList parts: some will list a great deal of information about each order (perhaps by using a DataList), while others will list very little (using, perhaps, just a two-column GridView).
Rather than create a complex UI that switches between many views, it's a better plan to create several simpler Web Parts, each of which handles one view very well. You can create as many search result Web Parts as you need, and add them to your Catalog for your user to add to their page.
However, you'll also need to get these two UI components (search criteria and search result) to talk to each other. In this case, the SearchOrder Web Part you've just created needs to pass to an OrderList Web Part the search type and search term to be used to find sales orders. Furthermore, after entering the search term in the SearchOrder Web Part, the user should be able to trigger the search process in the OrderList Web Part.
In order for my SearchOrder to communicate with any OrderList, you could define a common interface that all the Web Parts could share. However, again, that's overkill because you can use one of the predefined interfaces that come with ASP.NET. The IWebPartRow interface allows you to pass methods between Web Parts. Passing a method from the search list to the search criteria WebPart allows the user, by clicking a button in the search criteria Web Part, to trigger a search in the search list Web Part.
The first step is to have the search criteria WebPart implement the IWebPartRow interface:
Public Class SearchOrderWP
  Inherits System.Web.UI.WebControls.WebParts.WebPart
  Implements IWebPartRow
Implementing the interface will add two methods to your Web Part: GetRowData (which the search result Web Part will use to pass a callback method to this Web Part) and Schema (which you can ignore). In the GetRowData method, you'll accept a reference to the method in the other Web Part that displays the orders; if you have search criteria to send, it will call the method, passing those criteria:
Private SearchData As Tuple(Of String, String)
Public Sub GetRowData(callback As RowCallback)
       Implements IWebPartRow.GetRowData
  If SearchData IsNot Nothing Then
    callback(SearchData)
  End If
End Sub
You also need to add a "connection method" to pass a reference to your search criteria Web Part to the search result Web Part (this lets the search result Web Part call the GetRowData method and pass its method). You can call this method anything you want, but you must decorate it with the ConnectionProvider attribute (passing some string that documents the connection). The method must also return the IWebPartRow interface on your Web Part. A typical connection method looks like this and, except for the documentation in the ConnectionProvider attribute, is identical in every Web Part that provides information to another Web Part:
<ConnectionProvider("SearchOrder")> _
Public Function ConnectToConsumer() As IWebPartRow
   Return Me
End Function
When the user wants to see their search results, they'll click a button in the search criteria Web Part. That will cause the page to postback to the server, where ASP.NET will connect the Web Parts and pass data from the criteria Web Part to the results Web Part. As part of that button-click event, you need to prepare the data from the User Control that will be passed to the results Web Part when the two parts are connected.
The best place to prepare that data (and to do most of your processing) is in a method in your Web Part. Ideally, your view (the User Control) will just call methods on your controller (the Web Part), making your view so simple that it's easy to test. Your controller, which will have most of your logic, will require more testing but, as a standalone class, can be developed using TDD.
You're constrained by the IWebPartRow interface to sending only one parameter to the search results Web Part, so if you need to pass multiple pieces of data (as is the case in this example), you'll need to assemble the data into a single object. You could pass that data in many ways, but this example assembles the search type and search term into a tuple:
Public Sub SearchForOrders(SearchType As String, SearchTerm As String)
  SearchData = New Tuple(Of String, String)(type, searchTerm)
End Sub
In User Control, all you need is this code in the button click event to call the method, passing the necessary data:
wp.SearchForOrders(Me.SelectSearchTypeDDL.SelectedValue,
                   Me.SearchTermTextBox.Text)
Getting Web Parts to Communicate
You're now ready to set up the first of your search result Web Parts. As with the search criteria Web Part, you'll need to add a User Control (OrderListUCSimple.ascx) and a Web Part (OrderListWPSimple.vb). Again, the Web Part will load the User Control in the Web Part CreateChildControls method and add it to the Controls collection.
The search result Web Part needs a method that accepts the reference to my search criteria Web Part. Again, you can call that method anything you want, but you have to decorate it with the ConnectionConsumer attribute, and it must accept a parameter of type IWebPartRow. As soon as ASP.NET passes a reference to another part, use the UI's GetRowData method to return a reference to another method in your search result Web Part:
<ConnectionConsumer("SearchOrder")> _
Public Sub ReturnCallback(ByVal provider As IWebPartRow)
  provider.GetRowData(AddressOf ListOrders)
End Sub
The method you pass will accept the search criteria from the other Web Part and do as much of the work of retrieving the sales orders as possible -- leaving just the display of the results to the Web Part. Except for the string you pass to the ConnectionConsumer attribute and the name of the ListOrders method, this code is also going to be identical in every Web Part you build.
In the method that retrieves the sales orders, you'll need to accept the search criteria, retrieve the sales orders, and pass the results to the User Control to be displayed. You have several ways of passing data to the User Control, but I'd recommend raising an event that the User Control can catch. Using an event reduces the coupling between the Web Part and the UserControl, making it easier to test your Web Part.
First, you need to define the event that will return the collection of matching orders:
Public Event SearchOrders(ords As List(Of Order))
Next, in the method and after retrieving the sales orders, ensure that the user control is loaded by calling your Web Parts Create¬ChildControls method. There's no point in raising the event unless the User Control is present to catch it. Finally, raise the event that passes the data to the User Control for display:
Public Sub ListOrders(SearchData As Tuple(Of String, String))
  'retrieve sales orders
  CreateChildControls()
  Dim ords As New List(Of Order)
  RaiseEvent SearchOrders(ords)
End Sub
The code in the User Control to wire up to the event and catch it looks like this:
Private WithEvents wp As OrderListWP

Protected Sub Page_Load(ByVal sender As Object, ByVal e As System.EventArgs) Handles Me.Load
  wp = CType(Me.Parent, OrderListWP)
  AddHandler wp.SearchOrders, AddressOf DisplayOrders
End Sub

Public Sub DisplayOrders(SearchTerm As String, SearchType As String)
  'display orders
End Sub
Putting all of this together, there are six steps to creating a UI where the user can combine components that communicate with each other:
- In the User Control that accepts user input, call methods on the underlying Web Part to pass data from the User Control to the Web Part
- Do most of the processing in the Web Part, including preparing data to be passed to other Web Parts
- In the Web Part connection method, call the callback method passed to the connection method, passing the prepared data (boilerplate)
- In the connection method of the Web Part that processes data, return the method that will handle incoming data (boilerplate)
- In that data processing method, accept the data, process it and raise an event to pass the result to the related User Control
- In the User Control, catch the event, accept the data and display it
Finishing the Page
Now that you've got your first OrderList built, return to the Web Form and select Edit Templates on your DeclarativeCatalogPart. Then drag your new OrderList from the Toolbox and drop it on the Catalog WebPartsTemplate. Finally, in Source view, add a title attribute to the part. Your users are now ready to assemble a complete page from your parts.
While you could allow users to connect the Web Parts on the page themselves, it's unnecessary (and open to error). Instead, you should connect the Web Parts that the user has added in your page's Load event. In a "componentized" UI, this kind of code is often the only code that goes into the page itself -- all of the application's UI logic goes into the Web Parts and User Controls that make up the page.
You only have to connect the Web Parts once for the page for any user -- the ASP.NET personalization framework will remember that these parts are connected and join them together the next time that the page is displayed. Your first step, therefore, is a series of tests that check both WebPartZones have controls in them and that a connection hasn't already been made (the only code that changes here is the name of the WebPartZones and the Web Part involved in the connection):
If Me.SearchPartZone.WebParts.Count > 0 AndAlso
  Me.ListPartZone.WebParts.Count > 0 AndAlso
  WebPartManager1.Connections.Count > 0 AndAlso
  Me.WebPartManager1.Connections(0).
    ConsumerConnectionPoint.ControlType.Name <> "OrderListWP" Then
The next step is to retrieve the Web Part in each zone. If you only have one Web Part in each zone, you can just grab the Web Part in the first position of each zone's Web Parts collection:
Dim prov As WebPart
Dim cons As WebPart

prov = Me.SearchPartZone.WebParts(0)
cons = Me.ListPartZone.WebParts(0)
Now that you have each Web Part, you need to retrieve their connection points using the GetProviderConnectionPoints and GetConsumerConnectionPoints methods on the WebPartManager you added to the page. If each Web Part has only one connection, you can just ask for the first connection in each part (if you do have multiple connection points, you can assign them names and use the names in this code):
Dim provConn As ProviderConnectionPoint =
  Me.WebPartManager1.GetProviderConnectionPoints(prov)(0)
Dim consConn As ConsumerConnectionPoint =
  Me.WebPartManager1.GetConsumerConnectionPoints(cons)(0)
The final step is to use the WebPartManager ConnectWebParts method to join the two Web Parts, passing both Web Parts and their connection points, like this:
Me.WebPartManager1.ConnectWebParts(prov, provConn, cons, consConn)
When the user clicks on the Find Results button in the search criteria Web Part, the sales orders display in the search results Web Part.
There's some additional work you could do here. As you create additional search result parts, for instance, you might find that there's code they all share. It might be worthwhile to put that code in a base Web Part that all your search result Web Parts could inherit from. In addition to joining the Web Parts in the Page's Load event, you could also "pre-load" the WebPartZones to provide a default configuration for the page. But by letting users create the page that they actually need to do their job, you're now only waiting on them to create their perfect UI from the components you provide.