C# Corner
The Command Pattern in .NET
In Part 1 of this series, Eric Vogel walks you through a software design pattern that is commonly used to handle UI interactions.
The command pattern is a common software design pattern that allows you to easily encapsulate the logic needed to defer execution of a method. It's commonly used to handle control actions in a unified manner.
The pattern involves three actors: a client, an invoker and a receiver. The client is responsible for creating a concrete command, and provides its input for later execution. The invoker determines when to execute the command. The receiver is the class that carries out the needed action within the command. Typically, the receiver class is passed either to the execute method on the command, or to the constructor of the common object.
The command pattern is well suited for handling GUI interactions. It works so well that Microsoft has integrated it tightly into the Windows Presentation Foundation (WPF) stack. The most important piece is the ICommand interface from the System.Windows.Input namespace. Any class that implements the ICommand interface can be used to handle a keyboard or mouse event through the common WPF controls. This linking can be done either in XAML or in a code-behind.
The ICommand interface requires CanExecute and Execute methods, as well as a CanExecuteChanged event handler that signals when the can execute status has changed:
public interface ICommand
{
    bool CanExecute(object parameter);
    event EventHandler CanExecuteChanged;
    void Execute(object parameter)
}
Message Box Command
Next, you create a concrete command and link it to a control action. The custom command will display a message box with the passed greeting to the user. In the constructor, you accept the receiver class. Check to see if it implements the INotifyPropertyChanged interface and subscribe to its PropertChanged event, if it does implement it. In the PropertyChanged event handler, the CanExecuteChanged event handler is called to force the CanExecute method to be re-evaluated. In the CanExecute method, you only allow the command to be executed if there is a non null parameter given. Finally, in the execute method, the message box is displayed with the given parameter value as its content. See
Listing 1 for the full source code.
Next, you link the command to a real application. Create a C# WPF application named VSMCommandPatternDemo. Then, create a new folder named Commands, and add the MessageBoxCommand class to it. Now, you add the view model class, which will contain ICommand and MyMessage properties that will be bound to the UI. Add a new class named MessageViewModel to the project. The class also implements the INotifyPropertyChanged interface for the MyMessage property. See Listing 2 for the full source code.
User Interface Markup
Next, you add the UI markup. The application contains a textbox for entering the message and a Say button to display the message box. Open up MainWindow.xaml, and insert the following markup into the root <Grid> element:
<StackPanel x:Name="MessageStack">
            <Label>Message</Label>
            <TextBox x:Name="Message" Text="{Binding Path=MyMessage, Mode=TwoWay,
UpdateSourceTrigger=PropertyChanged}"></TextBox>
            <Button x:Name="Say" CommandParameter="{Binding Path=MyMessage}"
Command="{Binding Path=MessageBoxCommand}">Say</Button>
         </StackPanel>
The Message textbox binding uses a two-way binding, with an UpdatedSourceTrigger set to PropertyChanged, which updates the binding whenever the text changes. The default textbox binding behavior will only perform the bind on the LostFocus event. The CommandParameter and Command properties are used to bind the custom command to the Say button. The CommandParameter binding is set to the MyMessage property of the view model, and the Command property is assigned to the MessageBoxCommand property. See Listing 3 for the full markup of the MainWindow form.
Now, all that is left to do is to bind the MessageViewModel to the MainWindow form. Open up the MainWindow.xaml.cs class definition, and set the DataContext of the form to a new MessageViewModel instance as follows:
this.DataContext = new MessageViewModel();
The full MainWindow class code is shown below:
using System;
using System.Windows;

namespace VSMCommandPatternDemo
{
    public partial class MainWindow : Window
    {
        public MainWindow()
        {
            InitializeComponent();
            this.DataContext = new MessageViewModel();
        }
    }
}
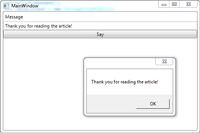
You should now be able to run the application, enter a message and output it to a message box upon clicking the Say button as shown in Figure 1.

[Click on image for larger view.] |
| Figure 1. Completed App with Message Box Command |
What's Next?
The command pattern is a good way to encapsulate user interaction code. Its main strength is that it allows you to keep your view--code-behind clean-- and flexible. You can swap out commands as needed, and set up the same command to multiple control events. The command pattern is also great for handling an undo system as I'll demonstrate in part 2 of this series.
About the Author
Eric Vogel is a Senior Software Developer for Red Cedar Solutions Group in Okemos, Michigan. He is the president of the Greater Lansing User Group for .NET. Eric enjoys learning about software architecture and craftsmanship, and is always looking for ways to create more robust and testable applications. Contact him at [email protected].