Practical .NET
Creating Modularity with WPF, Prism and Unity
If you're building Windows Presentation Foundation applications that will change over time or have some combination of complex workflows, rich user interaction, and significant presentation or business logic, Microsoft recommends that you add Prism and Unity to your toolkit. That's good advice.
There's a better set of tools than using Windows Presentation Foundation (WPF) straight out of the box: WPF plus Prism (formerly "Composite Application Guidance for WPF and Silverlight") and Unity. Prism focuses on letting you turn your XAML file into a true view, supported by a completely separate ViewModel class.
Because your XAML view is built declaratively, you might have blunders in it (incorrect property settings, for instance), but you can't have logic errors. Instead, your bugs are limited to your procedural code (the validation code, the integration with your business objects, workflow management and so on), which is segregated into your ViewModel class. That ViewModel class can be developed in parallel to your view and, more importantly, built using test-driven development (TDD) to ensure it works correctly. Once your view model is built, it just needs to be wired up to your XAML to create your application.
Unity focuses on giving you runtime flexibility in that "wiring up" phase by providing the ability to create composable applications -- applications that choose their parts at runtime. Instead of hardcoding class names into your code, you specify the criteria for the classes you want to use. At runtime, your application looks for the class it needs and loads it. This gives you an easier way to swap in and out your views and view models from one site to another, from one scenario to another (premium customers versus ordinary customers) or from one state to another (test versus production; supporting a customer in default versus supporting a customer in good standing). Applications determine the criteria for the components they need by reading a configuration file or by making decisions based on information in the environment.
It's a different way of thinking: Using Prism and Unity with WPF is as much about adopting a way of creating your applications as it is about adopting new technology. And while I'm focusing on WPF in this article, Prism and Unity work equally well with Silverlight, throwing in the ability to dynamically search for the classes to download to the client as a bonus.
The easiest way to get the Prism/Unity combo is to use the Extensions Manager on the Visual Studio Tools menu to search for and install the NuGet Package Manager. Once you have NuGet installed, you can right-click on your project and select Manage NuGet Packages. A search in the online forums on Prism will bring you to the Prism.UnityExtensions package, which you can download and install into your project.
While Prism is the constant in this toolset, you can replace Unity with other packages that support finding components at runtime (referred to as dependency injection managers or Inversion of Controller -- IoC -- containers). Microsoft provides support for the Managed Extensibility Framework, or MEF (for more on MEF, see my September 2011 column on dynamic applications, "Dynamically Loading Classes at Runtime"), and NuGet includes packages for Castle Windsor and Ninject, among others.
Prism Speak
What a developer would normally think of as an application is called the Shell in "Prism speak," and loads one or more Modules as needed from the Modules listed in a Module catalog. A Module holds all the views, view models or classes required for a piece of business functionality.
The XAML file in a Shell consists of one or more regions that hold views (regions are implemented through WPF components such as ContentControls, ItemsControl, TabControl, ListBox and so on). A region might have one or more views associated with it. A component in one region can coordinate activities with views in other regions either by accessing the other component or by firing and responding to events. In Prism speak, UI navigation is any change to the UI, made either by updating the UI or switching to a new view.
Application functionality is a set of commands subdivided into Services (non-UI functionality) and Controllers (presentation logic, including adding and removing components, and navigation logic).
For my case study, I'm going to build a WPF application that allows a user to select a customer from a list, then displays the sales orders for that customer (I've used the Northwind database, and because my focus isn't on the business rules, I generated my business objects using the Entity Framework). My Shell is shown in Figure 1. At the top of the form, the user can select a customer or click a button to refresh the list of customers. The bottom of the form lists all of the sales orders for that customer.
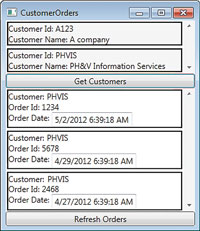
[Click on image for larger view.] |
| Figure 1. The Shell for this application loads two views (with their view model) dynamically at runtime: the top view displays a list of customers, and the bottom view displays the orders for the currently selected customer. |
In this article, I'll describe how to create a view, how to have it loaded into a region in the Shell, and how to wire up a button in the view to a command. If you're creating a single view application, this article has everything you need. But in this month's online columns and next month's Language Lab article, I'll be connecting the two views, handling more interesting events than a button click, and displaying multiple views in a region.
Initializing the Application
Every Prism application starts with a Bootstrapper object that's responsible for initializing the application. To get your application to use the Bootstrapper to start your application, delete the StartupUri attribute in your App.xaml file, add code to the file's OnStartup method to instantiate a Bootstrapper class, and call its Run method.
This example, added to the App.xaml OnStartup method, assumes that my Bootstrapper class is named CustomerOrderBootstrapper:
base.OnStartup(e);
CustomerOrderBootstrapper btsr = new CustomerOrderBootstrapper();
btsr.Run();
If you're using Unity, your Bootstrapper is a class that inherits from the UnityBootstrapper class (other IoC tools will use a different base class). You must override the base class's CreateShell method, create an instance of the window that forms your Shell using the ServiceLocator's Current properties GetInstance method, and return it. You must also set the application's MainWindow property to that window and display your window using its Show method. You can either override the InitializeShell method and put those last two steps there, or add that code to your Bootstrapper CreateShell method.
The code in Listing 1 instantiates the CustomerOrders XAML file in CreateShell and finishes the initialization process in IntializeShell.
The Bootstrapper also includes methods for initializing all other components a Prism application might use (for instance, the CreateLogger method returns the container for the logging tool you'll use). You'll need to override the Bootstrapper CreateModuleCatalog method to return a ModuleCatalog that your application will use to find your application's Modules.
There are several choices for creating a ModuleCatalog -- your catalog can be a XAML file listing the application Modules or a folder holding the DLLs, for instance. Using a folder lets you add, remove or change components just by changing the DLLs in the folder; that's what I use in this case study.
This example creates a DirectoryModuleCatalog and sets its ModulePath to a folder called CustomerList in the same folder as the application's executable:
protected override
  Microsoft.Practices.Prism.Modularity.IModuleCatalog CreateModuleCatalog()
{
  Microsoft.Practices.Prism.Modularity.DirectoryModuleCatalog dmc =
    new Microsoft.Practices.Prism.Modularity.DirectoryModuleCatalog();
  dmc.ModulePath = "CustomerList";
  return dmc;
}
Configuring Modules
With the initialization code written, you can start defining the Modules that hold your application's functionality. It isn't absolutely essential to define all your application's components through Modules. Prism uses reflection to discover the components in a Module; as a result, the process of loading Modules is inherently less efficient than just hardcoding class names at design time.
For small numbers of objects that loss of efficiency is negligible. If you're going to create thousands of instances of a particular class, however, you should consider just hardcoding that class in your application. Of course, if you do that and then later decide to replace that class, you'll have to rewrite your code instead of just dropping a new DLL in a folder.
In adding a class using a Module, you must define the class in two places:
- In an interface file that lists all the class members.
- In the class itself where you'll provide the code (the implementation) of all of those members.
In the Shell, you'll refer to your classes using the interface and let Unity find the class you need.
A Module can be a separate class library project from the Shell project. However, if the number of Modules in your application is going to result in an overwhelming number of projects, you can define multiple Modules in a single project (including in the Shell project). For this example, however, I've used a separate project for each of my Modules.
A Module consists of an initializer class, and, if the Module forms part of the UI, at least one view and view model (Modules can also be used to implement business functionality -- "Services" in Prism speak). The CustomerList portion of the case study's UI is defined in the class library project called CustomerListModule.
After creating the class library project, there are two configuration tasks. First is to add the NuGet packages for Prism and Unity to the project. Second, in your project's properties, you'll need to add a post-build event activity to copy the DLL generated by the project to the directory you specified as your ModuleCatalog. I used this code for the case study (all on one line):
xcopy "$(TargetDir)CustomerListModule.dll"
  "$(SolutionDir)CustomerOrdersManagement\bin\Debug\CustomerList" /Y
Initializing Modules
The next step is to add the initializer class that registers the components of the Module with Unity. The initializer class is a class that implements the IModule interface and is decorated with the Module attribute which specifies the Module's name. In the Module attribute, if you don't specify any options other than your Module name, your Module will be loaded when the application starts up.
The CustomerListModule's initializer is called Initializer (I'm not very original) and its declaration looks like this:
[Microsoft.Practices.Prism.Modularity.Module(
  ModuleName = "CustomerList")]
public class Initializer:
  Microsoft.Practices.Prism.Modularity.IModule
{
If a Module isn't always used by the application, you specify that the Module shouldn't be loaded until it's needed. You do that in the Module attribute by setting its OnDemand attribute to true. If the Module is to be loaded only to support some other Module, you can decorate the class with the ModuleDependency attribute, passing the name of the Module that depends on this Module.
In your initializer you must add code to two members: the constructor and the interface's single method, Initialize. In the constructor, you just need to save the two references that will be passed to it by Prism: the IoC container your Module will be placed in and a Prism region manager. That's what this code does:
private Microsoft.Practices.Unity.IUnityContainer cont;
private Microsoft.Practices.Prism.Regions.IRegionManager rm;

public Initializer(Microsoft.Practices.Unity.IUnityContainer container,
  Microsoft.Practices.Prism.Regions.IRegionManager regionManager)
{
  cont = container;
  rm = regionManager;
}
In the Initialize method, register any classes your Module provides using the container's RegisterType method. The RegisterType method must be passed the class's interface, the class itself, and a name for this combination of interface and class implementation. You also need to pass the RegisterType a LifetimeManager object that controls how many instances of the class will be created.
Using the ContainerControlledLifetimeManager as the manager effectively makes the object a singleton (only one instance of the object is created for the whole application), but more complex management choices are available.
Finally, you can pass any initialization parameters that the class requires as InjectionConstructor objects (values to be passed to the class's constructor) or as InjectionProperty objects (to set properties on the newly created object), among other choices.
For the CustomerListModule, the only class I need to register is the ViewModel for the view that displays the list of customers. My view model's interface is named ICustListVM, my class that implements that interface is named CustListViewModel and the name I've chosen for this combination is DefaultCustListVM.
I'm using the ContainerControlledLifetimeManager to ensure that only one instance of the view model is created. Because my view model requires a reference to the UnityContainer to be passed to it, this code uses an InjectionConstructor to pass the UnityContainer passed to the initializer's constructor to my view model (if no parameters are required, you can just pass null/Nothing for the last parameter):
public void Initialize()
{
 Microsoft.Practices.Unity.ContainerControlledLifetimeManager cclm =
   new Microsoft.Practices.Unity.ContainerControlledLifetimeManager();
 cont.RegisterType(typeof(ICustListVM),
   typeof(CustListVM), "DefaultCustListVM", cclm,
   new Microsoft.Practices.Unity.InjectionConstructor(cont));
By the way, my view model's constructor accepts an instance of the UnityContainer for two reasons. First, it lets me demonstrate how to register a class that has a constructor. More important, I'll need the container in next month's article to coordinate my Customer and Orders list.
To retrieve a registered object, use the container's Resolve method, passing the interface of the class that you want and the name of the relationship. Because my CustomerListModule is responsible for providing the CustomerList, I need to create that view and attach its view model to its DataContext. I might as well take advantage of the registration I've just created to retrieve the view model from the container. That's what the following code does -- it requests the ViewModel class that implements the ICustListVM interface with the name DefaultCustListVM:
CustListView cl = new CustListView();
cl.DataContext = cont.Resolve(typeof(ICustListVM),"DefaultCustListVM");
Finally, your Module can tell the application in which region in the Shell the view is to be displayed. You do this by adding your view to the collection of regions in the RegionManager passed to your initializer, specifying the name of the region. This example specifies that the view should be used in the region called CustomerListRegion:
rm.Regions["CustListRegion"].Add(cl);
}
Adding Functionality
With the view and view model loaded, it makes sense to provide some code for them. I begin with the view, which is just a WPF user control. For my user control, I have a ScrollView containing an ItemsControl, and beneath the ScrollView, a button to refresh the list of customers. The ItemsControl is bound to a property on my view model called Customers that holds an Observable collection of Customer objects:
<StackPanel>
  <ScrollViewer>
    <ItemsControl ItemsSource="{Binding Customers}" >
The button is bound to a property (called cmdGetCustomers) that will, eventually, call a method on my view model that populates the collection in the Customers property:
<Button Command="{Binding cmdGetCustomers}">Get Customers</Button>
Defining the view has, effectively, defined the members of my view model interface (which I called ICustListVM when I registered it):
public interface ICustListVM
{
  System.Collections.ObjectModel.ObservableCollection<Customer>
    Customers { get; set; }

  void GetCustomers();
}
This raises the question of where you should put the interface definition. You don't want your Shell project to have a reference to the project holding your Module: you want your Shell to be able to swap Modules in and out at will, so the Shell project can't have a reference to any particular Module project. You could put the interface in a separate project and add a reference to that project to both the application project and the Module project (Microsoft's recommendation). For this example, I put the ICustListVM interface (and all other shared resources) in the Shell project. I'll then add to my Module project a reference to my Shell application.
The ViewModel class (which I called CustListVM when I registered it) implements my interface (ICustListVM) along with the Microsoft .NET Framework INotifyPropertyChanged and IDataErrorInfo interfaces. I've discussed, in earlier columns, the INotifyPropertyChanged interface ("Integrating with the .NET Framework UI Controls"), which ensures that updates to your view model's properties are reflected in your UI; and the IDataErrorInfo interface ("Exploiting the .NET Validation Frameworks"), which supports passing error messages to your UI.
My ViewModel class includes the Customers property that holds a list of Customer objects in an ObservableCollection and raises the PropertyChanged event (required by the INotifyPropertyChanged interface) whenever it's updated (see Listing 2).
I also need to create my GetCustomers method that builds that list of customers (I've omitted the code that retrieves those objects). If I have an error in building my list of Customers, I use the members of the IDataErrorInfo interface to report it (see Listing 3).
To make a method available for binding to a button in your view, you must bind your button to a property of type ICommand in your view model that holds a class that implements the ICommand interface. Your first step is to create the ICommand class (I've discussed Command objects before in "Extending XAML Applications with Custom Commands").
Your ICommand class must accept a reference to your view model in its constructor and call your method in its Execute method. Listing 4 shows the ICommand class (GetCustomersCommand) for my GetCustomers method.
Finally, in your view model constructor, you need to instantiate your ICommand class and put it into an ICommand property, passing a reference to the view model:
public System.Windows.Input.ICommand cmdGetCustomers { get; set; }
public CustListVM(Microsoft.Practices.Unity.IUnityContainer cont)
{
  cmdGetCustomers = new GetCustomersCommand(this);
}
This view, view model and ICommand class are now complete. The view model and the ICommand class could be tested independently of the view (or any other UI) to ensure that they meet requirements. This Module could be developed independently and in parallel with the rest of the application.
Once you've determined the Module is working, the next step is to integrate it into your Shell application. You've already done part of that by ensuring that the Module DLL is copied to the Shell application ModuleCatalog folder.
Integrating with the Shell
It's now time to add the region in your Shell into which the view in the Module is to be loaded. First, you need to add a namespace prefix for the new attributes that Prism integrates into the WPF elements to name regions. I've used prism as my prefix to specify the required namespace:
xmlns:prism="http://www.codeplex.com/prism"
You can now use any one of several controls to define a region in the window -- you just need to add the RegionManager attribute to the control using the prism prefix. After adding the RegionManager attribute, you use its RegionName property to set the region's name. In this example, I'm using a ContentControl and setting the RegionName to the name (CustListRegion) that I tied to my view when I added it to the RegionManager in its Module intializer:
<ContentControl prism:RegionManager.RegionName="CustListRegion">

</ContentControl>
At this point, you can press <F5>, and WPF, Prism and Unity will assemble your application and display your UI.
For the case study, there's still more work to be done. I need to create another module to handle the display of Orders, for example, but it's enough like my Customers list that I won't inflict it on you. What I do need to do is to allow users to select a Customer and have the related Orders displayed in the Orders list. I'll tackle that (among other interesting problems) in next month's column. In between now and then, I'll be using the online Practical .NET columns to look at integrating non-UI functionality as a Prism Service and changing views within a region.
The Benefits of Bite-Sized Chunks
Now's a good time to step back and take a look at what, if any, benefits you'll gain from all of this work. There are certainly a lot of moving parts in this solution: the Shell, the Modules, the views, the view models, the Command classes. Given that, why not just put all your code in the view's code file?
First, Prism and Unity provide an application made up of replaceable Modules -- you can update any part of this application just by dropping a new DLL into your ModuleCatalog folder. In addition, any of these Modules -- and the Shell itself -- can be developed independently and in parallel with each of the other Modules (though the various developers do have to settle on interfaces to be used). Finally, each of the Modules can be built in a TDD kind of way with fully automated testing. Only the Shells and the views -- which have no procedural logic -- require a human being for testing. The result is a more flexible, more reliable application. And that, as Martha would say, is a good thing.