In-Depth
Metro Apps with HTML5
If you're an experienced Web developer, you'll love the HTML5/JavaScript/CSS3 options provided by Visual Studio 2012. Here's a step-by-step guide to getting started.
- By Michael Crump
- 09/02/2012
We now know that Windows 8 is coming on Oct. 26. That presents developers with a decision to make for building new Metro-style applications: HTML5 with JavaScript and CSS3, or XAML with C#, or Visual Basic with C++?
Many Web developers will choose HTML5/JavaScript/CSS3 because they already have experience with it. Once that decision's made, the next step is to understand Windows Runtime (WinRT) and how its new APIs interact with Windows 8. [As this issue went to press, Microsoft was considering changing the name "Metro" to something else, but hadn't yet decided on the new name. We're leaving it as "Metro" until a new name is officially chosen. -- Ed.]
This article takes you through the process of building your first HTML5/JavaScript/CSS3 Metro application. Let's get started.
Setting up the Environment
Before getting started, you'll need to download the following items:
- The Windows 8 release preview, which can be downloaded from the Windows 8 Download Center. You can run Windows 8 on actual hardware or install it onto a VM or virtual hard disk. The optimal experience is gained with a touch-supported monitor.
- The Visual Studio 2012 release candidate (RC), which is required to build Metro apps. It comes with several templates to jump-start your dev efforts. In this article, we'll specifically be reviewing the HTML5/JavaScript/CSS3 templates.
- I'd also recommend downloading the Metro app samples. Samples include new controls featured in WinRT; how to work with tap gestures; device orientation and much more. The samples pack is licensed for public use, so feel free to use it in your own applications. It's available in a number of languages: C++, C#, JavaScript and Visual Basic .NET.
Begin by launching the Visual Studio 2012 RC from the Metro Start screen and selecting Templates/Other Languages/JavaScript/Windows Metro style.
Here are the templates that ship out of the box:
- Blank App: A single-page project for a Metro app that has no predefined controls or layout.
- Grid App: A multipage Metro project that navigates among groups of items. Dedicated pages display group and item details.
- Split App: A two-page Metro project that navigates among grouped items. The first page allows group selection, while the second displays an item list alongside details for the selected item.
- Fixed-Layout App: A Metro project that scales a fixed-aspect ratio layout.
- Navigation App: A Metro project with predefined navigation controls.
Components
You'll start with a blank template and add in the required functionality as you go, rather than selecting a template with a lot of the plumbing already in place. This will better help you understand the makeup of an HTML5/JavaScript/CSS3 Metro application.
Once you become accustomed to building Metro applications, feel free to try another template to speed up development. For now, select the "Blank Application" template and give it a name such as VSMagJS, then press OK.
Once the Visual Studio 2012 RC loads, take a look at the Solution Explorer on the right. First, I'll give some details on the various files:
- References: Contains the dependent WinRT API references needed for this application to function. Notice that only one is added by default: the Microsoft Windows Library for JavaScript 1.0 RC. This includes both the dark and light CSS files, as well as the base API files needed for WinRT. It also includes global string files for the English language in this case
- CSS: The default.css file is simple; it only contains CSS3 media queries to determine device orientation.
- Images: This folder contains four images used for the logos to represent your application. It also contains the splashscreen, which is displayed upon your application's startup.
- JS: Includes one file -- default.js -- that runs when your application starts. It contains boilerplate code to get you started quickly.
- Default.html: The standard HTML page where you'll add your code for a UI.
- Package.appxmanifest: Describes the deployment package for your application and allows you to make changes to capabilities, declarations and so forth. You'll dive into each tab later.
- VSMagJS_TemporaryKey.pfx: A Personal Information Exchange File -- in other words, a digital certificate for this application.
Modifying the Start Page
Let's begin by taking a look at the default.html page that comes with the template. It's shown in Listing 1.
Starting from the top, you can see the application uses the HTML5 doctype and other standard HTML tags such as meta and title. Moving down the page, you'll see the WinJS references to the WinRT API. The next set of references is specific to your application. Again, the default.css is just handling orientation, and the default.js will be covered shortly. Everything else is standard HTML you're used to seeing, from a body paragraph to a closing HTML tag.
It's time to modify the default.html page by replacing the body with the following code:
 <body >
   <h1 >Hello, VSM Reader </h1 >
   <p >What's your favorite magazine? </p >
   <input id="magazineInput" type="text" / >
   <button id="questionButton" >OK </button >
   <div id="questionOutput" > </div >
 </body >
If you run the application by pressing the "Local Machine" button from the debug toolbar, you should see Figure 1.

[Click on image for larger view.] |
| Figure 1. The first Metro application using HTML5/JavaScript/CSS3. |
There's one small problem -- nothing happens when entering data or clicking the button. This is where you need to dive into the default.js file and add logic to UI.
Adding Logic to the Start Page
You've defined a UI, but it doesn't respond to a user's actions just yet. For that, you'll need to take a look at the default.js file provided by the blank template (see Listing 2) and add some custom code.
To begin, you can see that default.js is wrapping itself in a self-executing anonymous function. This helps avoid naming conflicts or a situation where you didn't intend to modify a value. Next up, note the strict keyword provides additional error checking for your code. Scrolling down, you'll see the application becomes activated and several TODOs, which include what code to run from a fresh start or suspended state. There's also a placeholder for adding code when the application's about to be suspended.
Now you'll wire in some code to make the default.html page functional. Locate the following line:
args.setPromise(WinJS.UI.processAll());
Underneath it, add the following three lines of code:
// Get the Element ID of our OK Button and attach an event handler to it.
var OKButton = document.getElementById("questionButton");
OKButton.addEventListener("click", OKbuttonClickHandler, false);
Start by getting the Element ID of your OK button defined in default.html and adding a simple event handler to it. Even though you're building an HTML5 Metro application, you're free to use popular JavaScript libraries such as jQuery to simplify code. In this instance, you're simply waiting on a click event of the OK button.
Next, you need to add a function called OKbuttonClickHandler to run code once the OK button has been clicked. Add this function underneath app.oncheckpoint. (Refer to the complete default.js shown in Listing 3, opposite page.) Here's the function:
function OKbuttonClickHandler(eventInfo) {
  var answer = document.getElementById("magazineInput").value;
  if (answer == 'Visual Studio Magazine') {
    var finalanswer = "Good Answer!";
  }
  else {
    var finalanswer = "Try Again! - Hint type Visual Studio Magazine";
  }
  document.getElementById("questionOutput").innerText = finalanswer;
}
With the addition of this function, you've defined a local variable -- answer -- that gets the value set in our magazineInput input tag. Once you have the value, check to see if the user typed "Visual Studio Magazine." Then either "Good Answer!" or "Try Again! - Hint type Visual Studio Magazine" is displayed in the questionOutput div tag. The completed default.js is shown in Listing 3.
Go ahead and run the application, entering the value "Visual Studio Magazine." Figure 2 should be the result.

[Click on image for larger view.] |
| Figure 2. The updated application with the click event. |
As you can tell from Figure 2, the application displayed the output in your div defined in default.html. Entering anything else will get you the message "Try Again! - Hint type Visual Studio Magazine."
Styling Your Application Quickly and Easily
One of the most important concepts you can learn when working with Metro is the difference between styles supplied out of the box by Microsoft. By default, the dark style is applied in the default.html file by this line:
<link href="//Microsoft.WinJS.1.0.RC/css/ui-dark.css" rel="stylesheet" / >
The Metro UI supplies a light theme as well. By simply changing one line of code in the default.html, your UI reacts accordingly:
<link href="//Microsoft.WinJS.1.0.RC/css/ui-light.css" rel="stylesheet" / >
Go ahead and switch back over to default.html and change that line from ui-dark.css to ui-light.css and run the application again. The application should look like Figure 3.

[Click on image for larger view.] |
| Figure 3. The application using the light theme. |
Notice how the background changed to white and the text to black, the input tag now has a nice gray border around it, and the button is clearly visible. This was accomplished with only one slight change to an HTML file.
Explore More
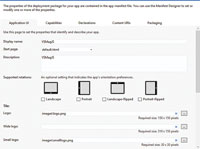
Now it's time to explore the package.a- ppxmanifest further. As discussed earlier, the package.appxmanifest describes the deployment package for your application. You can access it by double-clicking the file, but under the covers it's simply an XML file. Open it to see the screenshot in Figure 4.
[Click on image for larger view.] |
| Figure 4. The package.appxmanifest describes the application's deployment package. |
Each page provides access to specific functionality that your application may or may not need. Each tab is explained in Table 1, (and more information is available in the MSDN help documentation).
| Tab Name |
Description |
| Application UI |
Use this page to set the properties that identify and describe your app. |
| Capabilities |
Use this page to specify system features or devices your application can use. |
| Declarations |
Use this page to add declarations and specify their properties. |
| Content URIs |
Use this page to confi gure URIs that have access to Web standards for geolocation and clipboard access. |
| Packaging |
Use this page to set the properties that identify and describe your package once deployed. |
Table 1. Package.appxmanifest category descriptions.
|
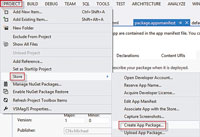
Packaging Your App
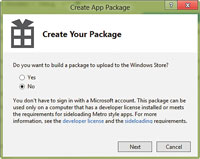
Now that you've built your app, you can distribute it by navigating through Project/Store/Create App Package..., as shown in Figure 5. The distribution options are the Windows Store or local (known as sideloading), as shown in Figure 6 . For this, you'll create a local package, as the Windows Store is not publicly open yet. In most circumstances, you'll distribute through the Windows Store.
[Click on image for larger view.] |
| Figure 5. Creating the app package to deploy to the Windows Store or a local machine. |
[Click on image for larger view.] |
| Figure 6. Creating the app package for local distribution, as opposed to the Windows Store. |
After hitting the Next button, you have the option to save the files as well as set the version number and what platform you wish to target (if your target application is set to Release mode prior to running the wizard; by default it's set to debug).
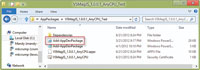
Clicking Create presents a package you can sideload onto another machine by simply selecting the Add-AppDevPackage file and using the context menu to Run with PowerShell. This installs the application on the end-user machine, as shown in Figure 7.
[Click on image for larger view.] |
| Figure 7. Installing the application with the local deployment option in Visual Studio 2012. |
Only the Beginning
What you've done in building this application is just the beginning of the possibilities of Metro. Microsoft has provided a rich API that most developers will embrace, while continuing to use their existing skillset. So keep exploring Windows 8 Metro, because the future of computing has changed, and your abilities need to keep pace.