C# Corner
Building Web Apps with SignalR, Part 1
In the first installment of app-building with SignalR, learn how to build a real-time chat application.
More on this topic:
Are you sick of that dreaded page refresh? Want to turn your Web application up to 11? If you've answered yes to either question, SignalR is for you. With SignalR, you can provide content to your users in real-time, all from ASP.NET. Most importantly, it's compatible with browsers ranging all the way back to IE6! SignalR uses WebSockets on supported browsers and will fall back to server-side events, Forever Frame, or AJAX long polling if needed. This means you can use a single library and not have to worry about that minutia.
There are two approaches you can use with SignalR to achieve real-time communications: a persistent connection or a hub. The persistent connection API allows you to keep open a persistent connection between the client and server to send and receive data. The hub API is an abstraction above the persistent connection API, and is suitable for remote procedure calls (RPC).
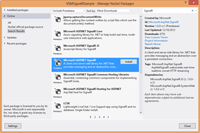
This article will focus on the persistent connection API. I believe the best way to learn a new technology is to build something useful with it, so we'll create a chat client using SignalR. To get started, create a new C# ASP.NET MVC 4 project from Visual Studio 2012, then select the Web API option for your project type. Next, install the Microsft SignalR pre-release NuGet package through the NuGet Package Manager (Figure 1).

[Click on image for larger view.] |
| Figure 1. Installing the SignalR pre-release NuGet package. |
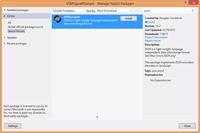
In order to support IE 6 and 7, install the JSON-js-json2 NuGet Package as well, as shown in Figure 2.

[Click on image for larger view.] |
| Figure 2. JSON2 NuGet package installation. |
Without further ado, let's get started on this app. First create a new folder in the project named Chat. Then create a new class named ChatConnection within the Chat directory that inherits from PersistentConnection. You'll need to add a using statement for the Microsoft.AspNet.SignalR namespace.
Now open up the RouteConfig class under the App_Start folder in the project. Add a using statement for the Microsoft.Asp.Net.Signal namespace to the RouteConfig class:
using Microsoft.AspNet.SignalR;
Next, register the ChatConnection class to the "chat" route in the RegisterRoutes method in the RouteConfig class:
RouteTable.Routes.MapConnection<ChatConnection>("chat","chat/{*operation}");
Your completed RouteConfig class should resemble Listing 1.
Now to create the ChatData data structure that will be used to interchange data between the client and the server. Create a new class named ChatData with Message and Name string data type properties:
namespace VSMSignalRSample.Chat
{
    public class ChatData
    {
        public string Name { get; set; }
        public string Message { get; set; }

        public ChatData()
        {
        }

        public ChatData(string name, string message)
        {
            Name = name;
            Message = message;
        }
    }
}
Now it's time to finish implementing the ChatConnection class, which will receive and broadcast chat messages. Add using statements for the System.Threading.Tasks and Newtonsoft.Json namespaces. Next, add a private Dictionary<string, string> to store the clients that connect to the chat room:
private Dictionary<string, string> _clients = new Dictionary<string, string>();
The PersistentConnection base class includes functionality for dealing asynchronously with a few critical server-side events such as a new connection, disconnection, reconnection and data retrieval. Let's implement the OnConnectedAsync event handler first. When a new user first joins the room, they're added to the _clients Dictionary object, which will be used to map the user's chosen chat name with their connectionId. Then a broadcast message is sent to all users, letting them know a new user has joined the chat room:
protected override Task OnConnectedAsync(IRequest request, string connectionId)
{
    _clients.Add(connectionId, string.Empty);
    ChatData chatData = new ChatData("Server", "A new user has joined the room.");
    return Connection.Broadcast(chatData);
}
Now it's time to tackle data retrieval from a connected client through the OnReceivedAsync event handler. First, the JSON data object from the client is desterilized into a ChatData object through JSON.NET. Then the user's name is stored in the _clients dictionary. Finally, the user's ChatData is broadcast to all users:
protected override Task OnReceivedAsync(IRequest request, string connectionId, string data)
{
    ChatData chatData = JsonConvert.DeserializeObject<ChatData>(data);
    _clients[connectionId] = chatData.Name;
    return Connection.Broadcast(chatData);
}
The last event to handle is client disconnection, via the OnDisconnectedAsync method. When a user disconnects, he or she is removed from the _clients dictionary. Then a message is broadcast to all users, letting them know a user has left the room:
protected override Task OnDisconnectAsync(IRequest request, string connectionId)
{
    string name = _clients[connectionId];
    ChatData chatData = new ChatData("Server", string.Format("{0} has left the room.", name));
    _clients.Remove(connectionId);
    return Connection.Broadcast(chatData);
}
Now it's time to create the client-side JavaScript that will communicate with the persistent chat connection to display incoming chat messages and chat room events to the user. Create a new JavaScript file named ChatR.js within the Scripts folder. The first step is to retrieve the server chat connection object through the SignalR JavaScript plug-in:
var myConnection = $.connection("/chat");
Next, the received event is set up to display a received chat message as a new list item element in the messages unordered list DOM element:
myConnection.received(function (data) {
        $("#messages").append("<li>" + data.Name + ': ' + data.Message + "</li>");
    });
After that, the error handler for the connection is set up to display a console warning. This is mainly to ease debugging of the chat connection:
myConnection.error(function (error) {
        console.warn(error);
    });
Lastly, a connection is initiated to the chat server and a continuation is set up to handle the message send button-click event. Within the button-click event handler, the user's name and message are retrieved from the name and message text boxes, respectively. Then the user's name and message are sent to the chat server as a JSON object, as shown in Listing 2.
Now it's time to set up the UI for the Web application. Add a new MVC View class to the Home directory, named ChatR, that binds to the Chat.ChatData model. In the bottom of the view add a script reference to the ~/Sciprts/ChatR.js script created earlier:
@{
    ViewBag.Title = "Chat";
}

<h2>Chat</h2>

@using (Html.BeginForm()) {
    @Html.EditorForModel();

<input id="send" value="send" type="button" />
<ul id="messages" style="list-style:none;"></ul>
}

@section Scripts { <script src="~/Scripts/ChatR.js"></script> }
Now, add a controller action method named ChatR to the HomeController that returns a new view bound to an empty Chat.ChatData object:
public ActionResult ChatR()
 {
     var vm = new Chat.ChatData();
     return View(vm);
 }
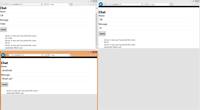
That's it: sit back, relax and invite a few friends to try out your new chat app, shown in Figure 3.

[Click on image for larger view.] |
| Figure 3. The completed real-time chat application. |
As you can, see SignalR is quite easy to work with and the PersistentConnection API is very flexible. With SignalR, you can tackle a plethora of real-time Web app use cases from business to gaming. Stay tuned for the next installment, which covers how to use the SignalR Hub API to create a dynamic form.
More on this topic:
About the Author
Eric Vogel is a Senior Software Developer for Red Cedar Solutions Group in Okemos, Michigan. He is the president of the Greater Lansing User Group for .NET. Eric enjoys learning about software architecture and craftsmanship, and is always looking for ways to create more robust and testable applications. Contact him at [email protected].