C# Corner
Recording Media in a Windows Store App Part 2: Photo Capture
Eric Vogel covers how to capture a photo in a Windows Store App by using the MediaCapture API.
More On Windows Store App Media from Visual Studio Magazine:
Welcome to Part 2 of the MediaCapture API series. In Part 1 I covered how to record audio with a selected encoding and sound quality. In this article, I'll cover how to capture a photo from a webcam with the MediaCapture API in a new Windows Store App in a selected image format.
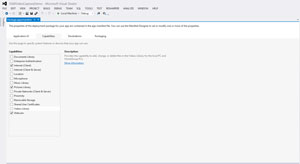
The first step is to create a new blank C# Windows Store app. Next, open up the Package.appxmanifest file and click on the Capabilities tab, and check the Internet (Client), Pictures Library and Webcam options, as seen in Figure 1.
 [Click on image for larger view.]
Figure 1. Setting app capabilities for photo capture and storage.
[Click on image for larger view.]
Figure 1. Setting app capabilities for photo capture and storage.
The MediaCapture API allows for photo capture in three encoding formats: JPEG, JPEG XR and PNG. To handle each format, create a new enum named ImageEncodingFormat with Jpeg, JpegXr and Png formats in a new C# class file:
public enum ImageEncodingFormat
  {
    Jpeg,
    JpegXr,
    Png
  }
In the application, the user will be presented with a ComboBox with selections for each option. The user will also be able to save a picture, and the file extension will be set appropriately for his selected image encoding. To handle both of these requirements, add a static extension method class named ImageEncodingFormatExtensions. The ImageEncodingFormatExtensions class will contain two methods: ToFileExtension and ToDisplayName. The ToFileExtension method translates an ImageEncodingFormat to its appropriate file extension. The ToDisplayName method translates an ImageEncodingFormat enum value to its UI displayed value. See Listing 1 for the completed ImageEncodingFormat class file containing the enum declaration and extension method definitions.
Listing 1. The ImageEncodingFormat.cs class file.
using System;

namespace VSMVideoCaptureDemo
{
  public enum ImageEncodingFormat
  {
    Jpeg,
    JpegXr,
    Png
  }

  public static class ImageEncodingFormatExtensions
  {
    public static string ToFileExtension(this ImageEncodingFormat imageEncodingFormat)
    {
      switch (imageEncodingFormat)
      {
        case ImageEncodingFormat.Jpeg:
        case ImageEncodingFormat.JpegXr:
          return ".jpeg";
        case ImageEncodingFormat.Png:
          return ".png";
        default:
          throw new ArgumentOutOfRangeException("imageEncodingFormat");
      }
    }

    public static string ToDisplayName(this ImageEncodingFormat imageEncodingFormat)
    {
      switch (imageEncodingFormat)
      {
        case ImageEncodingFormat.Jpeg:
          return "JPEG";
        case ImageEncodingFormat.JpegXr:
          return "JPEG XR";
        case ImageEncodingFormat.Png:
          return "PNG";
        default:
          throw new ArgumentOutOfRangeException("imageEncodingFormat");
      }
    }
  }
}
To further encapsulate the UI display logic for the image format encodings, I've decided to create an ImageEncodingDisplay view model class. Create a new folder named ViewModels within the main project. Next, create a new C# class file named ImageEncodingDisplay. Then add a Format ImageEncodingFormat Type property to the ImageEncodingDisplay. Next, add FileExtension and Name read-only properties to the class that use the ToFileExtension and ToDisplayName ImageEncodingFormat extension methods, respectively. Last, add an ImageEncodingDisplay constructor that accepts an ImageEncodingFormat argument that sets the Format property. See Listing 2 for the full ImageEncodingDisplay class implementation.
Listing 2. The full ImageEncodingDisplay.cs class definition.
namespace VSMVideoCaptureDemo.ViewModels
{
  public class ImageEncodingDisplay
  {
    public string Name { get { return Format.ToDisplayName(); }}
    public string FileExtension { get { return Format.ToFileExtension(); } }
    public ImageEncodingFormat Format { get; set; }

    public ImageEncodingDisplay(ImageEncodingFormat format)
    {
      Format = format;
    }
  }
}
Now it's time to implement the UI for the application. Open up the MainPage.xaml file and copy the root Grid element from Listing 3 into your MainPage.xaml XAML markup file.
Listing 3. The MainPage.xaml UI XAML.
<Page
  x:Class="VSMVideoCaptureDemo.MainPage"
  xmlns="http://schemas.microsoft.com/winfx/2006/xaml/presentation"
  xmlns:x="http://schemas.microsoft.com/winfx/2006/xaml"
  xmlns:local="using:VSMVideoCaptureDemo"
  xmlns:d="http://schemas.microsoft.com/expression/blend/2008"
  xmlns:mc="http://schemas.openxmlformats.org/markup-compatibility/2006"
  mc:Ignorable="d">

  <Grid Background="{StaticResource ApplicationPageBackgroundThemeBrush}">
    <StackPanel HorizontalAlignment="Center">
      <StackPanel HorizontalAlignment="Center" Margin="0,10,0,0" Orientation="Horizontal">
        <TextBlock Margin="0,0,10,0">Image Encoding</TextBlock>
        <ComboBox Name="ImageEncodings" ItemsSource="{Binding}"
          DisplayMemberPath="Name" SelectedValuePath="Format"
          SelectionChanged="ImageEncodings_SelectionChanged"></ComboBox>
      </StackPanel>
      <CaptureElement Name="CaptureElem" Width="400" Height="600"></CaptureElement>
      <StackPanel Name="VideoPanel" HorizontalAlignment="Center" Orientation="Horizontal">
        <Button Name="PreviewButton" Click="PreviewButton_Click">Preview</Button>
        <Button Name="TakePhotoButton" Click="TakePhotoButton_Click">Take Photo</Button>
      </StackPanel>
    </StackPanel>
  </Grid>
</Page>
The application's UI is very minimalist. The user has the ability to select an image-encoding format, and then they can preview their webcam via the CaptureElement and, finally, snap a photo via the TakePhotoButton.
Now it's time to tie everything together in the MainPage class. Open up the MainPage.xaml.cs class file and add the following using statements to the MainPage class:
using System.Threading.Tasks;
using VSMVideoCaptureDemo.ViewModels;
using Windows.Media.Capture;
using Windows.Media.MediaProperties;
using Windows.Storage;
using Windows.Storage.Pickers;
using Windows.Storage.Streams;
using Windows.UI.Popups;
Next, add a MediaCapture Type private member variable to the MainPage class:
private MediaCapture _mediaCapture;
Then add an ImageEncodingFormat Type private member variable:
private ImageEncodingFormat _imageEncodingFormat;
Next, in the OnNavigatedTo event, the ImageEncodings ComboBox is populated and the media capture is initialized:
protected async override void OnNavigatedTo(NavigationEventArgs e)
{
  LoadImageEncodings();
  await InitializeMediaCapture();
}
The LoadImageEncodings method populates the ImageEncodings ComboBox by enumerating over the ImageEncodingFormat enum values and translating them to ImageEncodingDisplay objects. In addition, it sets the default image encoding to JPEG and stores the selected ImageEncodingFormat into the _imageEncodingFormat member variable:
private void LoadImageEncodings()
  {
    var imageEncodings = Enum.GetValues(typeof(ImageEncodingFormat));
    List<ImageEncodingDisplay> encodings = new List<ImageEncodingDisplay>();
    foreach (ImageEncodingFormat imageEncoding in imageEncodings)
    {
      encodings.Add(new ImageEncodingDisplay(imageEncoding));
    }
    ImageEncodings.ItemsSource = encodings;
    ImageEncodings.SelectedIndex = 0;
    _imageEncodingFormat = (ImageEncodingFormat)ImageEncodings.SelectedValue;
  }
The InitializeMediaCapture method initializes the _mediaCapture object to capture video only and subscribes the application to the Failed event:
private async Task InitializeMediaCapture()
  {
    _mediaCapture = new MediaCapture();
    var mediaCaptureInitSettings = new MediaCaptureInitializationSettings()
      {
        StreamingCaptureMode = StreamingCaptureMode.Video
      };
    await _mediaCapture.InitializeAsync(mediaCaptureInitSettings);
    _mediaCapture.Failed += MediaCaptureOnFailed;
  }
The MediaCaptureOnFailed method handles the _mediaCapture object's Failed event by displaying a message dialog to the user to notify him that the photo capture failed:
private async void MediaCaptureOnFailed(MediaCapture sender,
  MediaCaptureFailedEventArgs errorEventArgs)
{
  await Dispatcher.RunAsync(Windows.UI.Core.CoreDispatcherPriority.Normal, async () =>
  {
    var warningMessage = new MessageDialog(String.Format("The photo capture failed: {0}",
      errorEventArgs.Message), "Capture Failed");
    await warningMessage.ShowAsync();
  });
}
The PreviewButton_Click method is invoked when the PreviewButton is clicked. In the method, the CaptureElem XAML element is bound to the _mediaCapture object and the capture preview is started:
private async void PreviewButton_Click(object sender, RoutedEventArgs e)
{
  CaptureElem.Source = _mediaCapture;
  await _mediaCapture.StartPreviewAsync();
}
The ImageEncodings_SelectionChanged method handles the SelectionChanged event from the ImageEncodings ComboBox. In the method the _imageEncodingFormat member variable is set to the newly selected image encoding user selection:
private void ImageEncodings_SelectionChanged(object sender, SelectionChangedEventArgs e)
{
  _imageEncodingFormat = (ImageEncodingFormat)ImageEncodings.SelectedValue;
}
Next, the TakePhotoButton_Click method handles the Click event of the TakePhotoButton element. In the method, image-encoding properties are set for the selected ImageEncodingFormat:
var imageEncodingProperties = GetImageEncodingProperties();
Then a memory stream is created and the image-encoding properties and memory stream are used to take a photo from the user's webcam:
IRandomAccessStream mediaStream = new InMemoryRandomAccessStream();
await _mediaCapture.CapturePhotoToStreamAsync(imageEncodingProperties, mediaStream);
Next, the captured media stream is persisted to a file selected by the user:
await SavePhoto(mediaStream);
Here's the completed TakePhotoButton_Click method implementation:
private async void TakePhotoButton_Click(object sender, RoutedEventArgs e)
{
  var imageEncodingProperties = GetImageEncodingProperties();
  IRandomAccessStream mediaStream = new InMemoryRandomAccessStream();
  await _mediaCapture.CapturePhotoToStreamAsync(imageEncodingProperties, mediaStream);
  await SavePhoto(mediaStream);
}
The GetImageEncodingProperties method creates a new ImageEncodingProperties object based on the user's selected image-encoding format stored in the _imageEncodingFormat member variable, as seen in Listing 4.
Listing 4. The GetImageEncodingProperties method implementation.
private ImageEncodingProperties GetImageEncodingProperties()
{
  ImageEncodingProperties imageEncodingProperties = null;

  switch (_imageEncodingFormat)
  {
    case ImageEncodingFormat.Jpeg:
      imageEncodingProperties = ImageEncodingProperties.CreateJpeg();
      break;
    case ImageEncodingFormat.JpegXr:
      imageEncodingProperties = ImageEncodingProperties.CreateJpegXR();
      break;
    case ImageEncodingFormat.Png:
      imageEncodingProperties = ImageEncodingProperties.CreatePng();
      break;
    default:
      throw new ArgumentOutOfRangeException();
  }

  return imageEncodingProperties;
}
The SavePhoto method creates a FileSavePicker that allows the user to select the file path for his snapped photo:
FileSavePicker photoSavePicker = new FileSavePicker();
The default location is set to the user's pictures library:
photoSavePicker.SuggestedStartLocation = PickerLocationId.PicturesLibrary;
The file extension is set to the matching file extension for the user's selected image encoding:
photoSavePicker.FileTypeChoices.Add(new KeyValuePair<string, IList<string>>(
  "Photo", new List<string>() { _imageEncodingFormat.ToFileExtension() }));
Then the FileSavePicker is presented to the user:
var mediaFile = await photoSavePicker.PickSaveFileAsync();
Finally, the file is saved to disk through the SaveStreamToFileAsync method:
await SaveStreamToFileAsync(mediaStream, mediaFile);
Here's the completed SavePhoto implementation:
private async Task SavePhoto(IRandomAccessStream mediaStream)
 {
   FileSavePicker photoSavePicker = new FileSavePicker();
   photoSavePicker.SuggestedStartLocation = PickerLocationId.PicturesLibrary;
   photoSavePicker.FileTypeChoices.Add(new KeyValuePair<string, IList<string>>(
     "Photo", new List<string>() { _imageEncodingFormat.ToFileExtension() }));
   var mediaFile = await photoSavePicker.PickSaveFileAsync();
   await SaveStreamToFileAsync(mediaStream, mediaFile);
 }
The SaveStreamToFileAsync method saves the given media stream to the given StorageFile asynchronously, as shown in Listing 5.
Listing 5. Asynchronously saving the media stream to the StorageFile.
private static async Task SaveStreamToFileAsync(
  IRandomAccessStream stream, StorageFile mediaFile)
  {
    if (mediaFile != null)
    {
      using (var dataReader = new DataReader(stream.GetInputStreamAt(0)))
      {
        await dataReader.LoadAsync((uint)stream.Size);
        byte[] buffer = new byte[(int)stream.Size];
        dataReader.ReadBytes(buffer);
        await FileIO.WriteBytesAsync(mediaFile, buffer);
      }
    }
  }
Congratulations! The application is now completed, and you can take a photo from your webcam, as seen in Figure 2, then save the file to disk, as seen in Figure 3.
 [Click on image for larger view.]
Figure 2. The completed app video preview.
[Click on image for larger view.]
Figure 2. The completed app video preview.
 [Click on image for larger view.]
Figure 3. Saving the photo.
[Click on image for larger view.]
Figure 3. Saving the photo.
In this article, I've shown you how simple it is to take a photo with a webcam in a Windows Store app. Stay tuned for the final installment in this series, in which I'll cover how to record video with audio from a webcam in a Windows Store app.