In-Depth
How to Set Up In-App Purchasing for Your Windows Phone App
In-App purchasing helps you make money after the initial sale. Learn how to use the new API to set it up.
- By Michael Crump
- 07/15/2013
Microsoft recently added in-app purchasing to the Windows Phone SDK 8.0. With in-app purchasing, you can continue to generate revenue after the initial app sale by offering other features or functionality the user can purchase while inside your application. This functionality further enhances your ability to monetize your apps with Windows Phone 8.
Windows Phone 8 in-app purchasing allows you to sell digital content inside your app with the same payment method used to purchase the original app. With this new functionality comes a new API with which you'll need to become familiar. In this article, I'll walk you through setting up your app to take advantage of this feature.
Setting Up Download the following items in order to enhance your productivity while working with in-app purchasing in Windows Phone 8: - The Windows Phone SDK 8.0 is the starting point and provides you with everything you need to build and develop apps or games for Windows Phone 7.5 and later.
- A valid Windows Phone Developer account is optional, but highly recommended -- it will allow you to submit beta apps and beta in-app products. With a Developer account, you can submit your app to the marketplace and add beta users to test your app before going live. This is extremely important, as some items can be purchased more than once, and this can result in a negative rating if your features aren't tested and implemented properly (a problem I'll discuss later in this article).
- The mock in-app purchase library is designed to simulate in-app purchase capabilities for your app without submitting the app to the store. I won't cover this library here because I believe submitting your app as a beta provides better testing. Note that you may also set up an in-app purchase mock service by using IIS.
Creating a Windows Phone 8 App
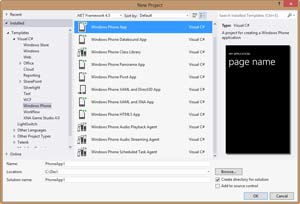
With the necessary tools in hand to begin building a Windows Phone 8 app, start by launching Visual Studio 2012 from the Windows 8 Start screen, and select Templates | Visual C# | Windows Phone, as shown in Figure 1.
 [Click on image for larger view.]
Figure 1. The default Windows Phone templates.
[Click on image for larger view.]
Figure 1. The default Windows Phone templates.
Select the Windows Phone App Template and give it the name InAppPurchasing. After selecting the template, you'll be asked which version of the OS you want to use. Make sure you select Windows Phone 8.0. Once your project finishes loading, make a few changes to the MainPage.xaml: Simply replace the contents of the Grid with the code shown in Listing 1.
Listing 1. Adding three buttons and two TextBlocks to demonstrate various functionality of in-app purchasing.
<Grid x:Name="LayoutRoot" Background="Transparent">
  <Grid.RowDefinitions>
    <RowDefinition Height="Auto"/>
    <RowDefinition Height="*"/>
  </Grid.RowDefinitions>

  <!--TitlePanel contains the name of the application and page title-->
  <StackPanel x:Name="TitlePanel" Grid.Row="0" Margin="12,17,0,28">
    <TextBlock Text="INAPP PURCHASING" Style="{StaticResource PhoneTextNormalStyle}"
      Margin="12,0"/>
    <TextBlock Text="demos" Margin="9,-7,0,0" Style="{StaticResource PhoneTextTitle1Style}"/>
  </StackPanel>

  <!--ContentPanel - place additional content here-->
  <StackPanel Margin="12,0,12,0" Grid.Row="1">     <Button x:Name="btnListAllProducts" Content="List All Products"
      Click="btnListAllProducts_Click_1" />
    <Button x:Name="btnBuy50Points" Content="Buy 50 points!" Click="btnBuy50Points_Click_1" />
    <Button x:Name="btnBuySuperWeapon" Content="Buy Super Weapon!"
      Click="btnBuySuperWeapon_Click_1" />
    <TextBlock x:Name="txtBought50Pts" Text="Bought 50 Points!" Visibility="Collapsed" />
    <TextBlock x:Name="txtBoughtSW" Text="Bought SuperWeapon!" Visibility="Collapsed" />
  </StackPanel>
</Grid>
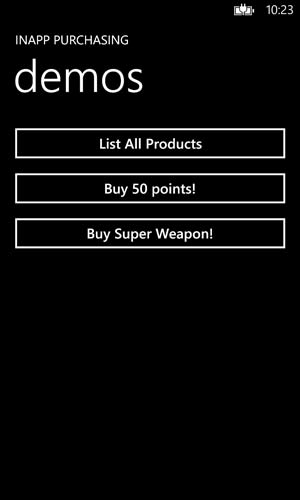
The changes in Listing 1 will create a UI that will show you the various features used with in-app purchasing in Windows Phone 8. Here are the functions of each button:
- ListAllProducts will list all of the in-app products associated with an application.
- Buy50Points will demonstrate an example of a consumable (an item that can be purchased more than once). In a typical game scenario, you might want the user to be able to purchase additional points to gain access to special prizes without having to complete all of the levels.
- BuySuperWeapon will demonstrate an example of a durable (an item that can be purchased only once). Again, in a typical game scenario, this may be some sort of super-weapon that costs $5; once a user has purchased it, he can use it as long as he plays the game.
- The last two TextBlocks will simply display text confirming the user purchased those items. By default, they won't be visible to the user until he's purchased the consumable or durable.
Make sure you resolve all the event handlers. Then you should see the app shown in Figure 2.
 [Click on image for larger view.]
Figure 2. The in-app purchasing demo application.
[Click on image for larger view.]
Figure 2. The in-app purchasing demo application.
With your stubbed-out demo application prepared, "Build the Solution" by pressing F6 and navigating over to the Release folder created inside your solution. For example, mine is found inside: C:\Dev\InAppPurchasing\InAppPurchasing\Bin\Release. If you used the same name, you'll see a file named InAppPurchasing_Release_AnyCPU.xap. This is your compiled application, which you'll submit to the marketplace as a beta application and to which you'll add two in-app purchase items (buy 50 points and the super-weapon).
Submitting an App to the Marketplace As a Beta
After arriving at the Windows Phone Developer Center, click on Dashboard, then Submit App. The next step is to click on App Info and fill in the required information. At the bottom of the page are "More options" that shows Distribution Channels. In More options, select Beta, enter e-mail addresses for the beta participants, and hit the Save button.
This will return you to the Submit App screen, and you may now upload the XAP file you created earlier. After uploading your XAP file, the marketplace will automatically pull in details about the submitted app such as the file name, file size and much more. The only thing you're required to add is the language details, description for the store and the required images. Once those are in place, you're ready to submit your beta application to the marketplace by clicking the Submit button.
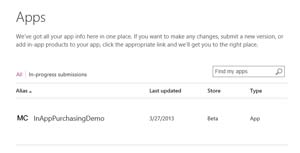
Next, click on Dashboard, then Apps, and you'll see your newly created Beta App, as shown in Figure 3.
 [Click on image for larger view.]
Figure 3. The Windows Phone 8 app in the store as a beta.
[Click on image for larger view.]
Figure 3. The Windows Phone 8 app in the store as a beta.
Adding In-App Products
If you click on InAppPurchasingDemo and select Products, you're given the opportunity to "Add in-app product." Go ahead and select that, and you'll see two required fields: In-App product properties and a description.
The In-App product properties allows you to specify how much you want to charge for this in-app item, if it's a consumable or durable, and other information. Select the In-App product properties option and fill in the following fields:
- In-App product alias (alias for the product): 50Points
- Product Identifier (used in code to identify what product is being sold): 11111
- Type: Consumable
- Default Language: English (International)
No other changes are required. Press the Save button.
Now you need to fill in the description section to the in-app product. This is where you'll provide a description of the product that your users will see, including a title, an image and a description. Select this option and fill in the following fields:
- Language: English (International)
- Product Title: Gives You 50 Points
- Description: By purchasing this item, you will get an additional 50 points added to your score.
- Product Image: (here you can use any 300x300 PNG image file)
You're now ready to submit your in-app product to your InAppPurchasingDemo beta by clicking Submit. You'll see a message that says, "In-app product submission successful."
Next, you'll submit another in-app product just as you did before -- except this time it will be a durable (can only be purchased once). Follow the same directions as before, except use the following data:
Under in-app product properties:
- In-App product alias: SuperWeapon
- Product Identifier: 22222
- Type: Durable
- Default Language: English (International)
Under description:
- Language: English (International)
- Product Title: Gives you the Super Weapon.
- Description: By purchasing this item, you will receive the Super Weapon. This weapon fires at a faster rate than the standard weapon.
- Product Image: (as before, use any 300x300 PNG image file)
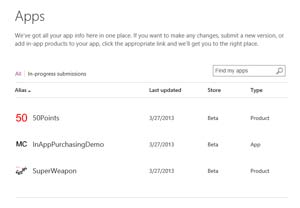
Finish up by selecting save, then submit. If you select Dashboard and then Apps, you'll now see the Beta Application as well as the two In-App products, as shown in Figure 4.
 [Click on image for larger view.]
Figure 4. The Windows Phone 8 app and the in-app products listed in the store as a beta.
[Click on image for larger view.]
Figure 4. The Windows Phone 8 app and the in-app products listed in the store as a beta.
Before leaving this screen, select InAppPurchasingDemo and click Details, then copy the App ID to your clipboard. Now navigate over to your Visual Studio 2012 solution and paste the App ID into the ProductID found in the WMAppManifest.xml. This registers your app as the one that has two in-app products available.
Testing Your In-App Purchases
Switch over to MainPage.xaml.cs and add in the following properties just above the MainPage constructor:
int m_pointCount=0;
int i=1;
bool ownsSuperWeapon=false;
public string receipt;
These properties are going to handle things such as how many points the user has purchased, and how many times he has purchased the consumable. You should also ensure the app starts with the super-weapon disabled until verification that the user has purchased it. Finally, declare a receipt string that will provide detailed information about the transaction.
Listing Available Products for Purchasing
Now you'll add in the code to list all the products available for purchasing. See Listing 2 for an example.
Listing 2. Displaying all the in-app products available for purchase.
private async void btnListAllProducts_Click_1(object sender, RoutedEventArgs e)
  {
    StringBuilder sb = new StringBuilder();

    var listing = await CurrentApp.LoadListingInformationAsync();
    foreach (var product in listing.ProductListings)
    {
      sb.AppendLine(string.Format("{0}, {1}, {2},{3}, {4}",
        product.Key,
        product.Value.Name,
        product.Value.FormattedPrice,
        product.Value.ProductType,
        product.Value.Description));
    }

    MessageBox.Show(sb.ToString(), "List all products", MessageBoxButton.OK);
  }
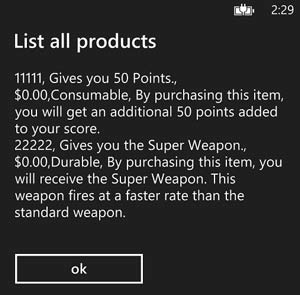
As you can see, it's easy to get a listing of all the in-app products available for purchase by calling the CurrentApp.LoadListingInformationAsync method. You can then loop through each product and pull out vital information such as the name, price and description. A sample of this is shown in Figure 5.
 [Click on image for larger view.]
Figure 5. A MessageBox showing the available in-app products for this application.
[Click on image for larger view.]
Figure 5. A MessageBox showing the available in-app products for this application.
Buying 50 Points Now that you have a list of products available, add the code shown in Listing 3 to purchase 50 points.
Listing 3. Code to purchase the 50 Points in-app product.
async private void btnBuy50Points_Click_1(object sender, RoutedEventArgs e)
{
  // 50 Points - Consumable
  var listing=await CurrentApp.LoadListingInformationAsync();
  var fiftypoints=
    listing.ProductListings.FirstOrDefault(
    p => p.Value.ProductId == "11111" && p.Value.ProductType == ProductType.Consumable);

  try
  {
    receipt=await CurrentApp.RequestProductPurchaseAsync(fiftypoints.Value.ProductId, true);

  if (CurrentApp.LicenseInformation.ProductLicenses[fiftypoints.Value.ProductId].IsActive)
  {
    CurrentApp.ReportProductFulfillment(fiftypoints.Value.ProductId);
    m_pointCount+=50;
    txtBought50Pts.Visibility=System.Windows.Visibility.Visible;
    txtBought50Pts.Text=
      "Bought 50 Points " + i++ + " times for a total of " + m_pointCount + "!";
  }
}
  catch (Exception ex)
  {
    MessageBox.Show(ex.ToString());
  }
}
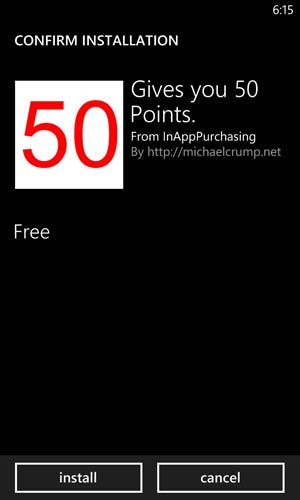
You begin by loading the product listings available for this app, then presenting the user with an interface to purchase the item. If the item was purchased, you report to Microsoft's servers that the product has been fulfilled. Then you add 50 points to your counter variable, as well as toggle the visibility and add some text to your TextBlock alerting the user that he's bought the 50 Points product, and the number of times it has been purchased. The app will look like Figure 6 once the user clicks on the Add 50 Points button.
 [Click on image for larger view.]
Figure 6. Confirm Installation screen for 50 Points.
[Click on image for larger view.]
Figure 6. Confirm Installation screen for 50 Points.
Buying the Super Weapon Product
Adding the code snippet shown in Listing 4 will allow the user to purchase the Super Weapon product.
Listing 4. Code to purchase the Super Weapon in-app product.
async private void btnBuySuperWeapon_Click_1(object sender, RoutedEventArgs e)
{
  // Super Weapon - Durable
  var listing=await CurrentApp.LoadListingInformationAsync();
  var superweapon=
  listing.ProductListings.FirstOrDefault(
    p => p.Value.ProductId == "22222" && p.Value.ProductType == ProductType.Durable);
  try
    {
      if (CurrentApp.LicenseInformation.ProductLicenses[superweapon.Value.ProductId].IsActive)
    {
      MessageBox.Show("You already own this weapon!");
    }
    else
    {
    receipt = await CurrentApp.RequestProductPurchaseAsync(superweapon.Value.ProductId, true);
    txtBoughtSW.Visibility=System.Windows.Visibility.Visible;
    txtBoughtSW.Text="You own the Super Weapon Now!";
    }
    }
    catch (Exception ex)
    {
      MessageBox.Show(ex.ToString());
    }
  }
As noted previously, a durable can only be purchased one time, whereas a consumable (such as 50 points) can be purchased an unlimited number of times. You'll find the durable code snippet is almost identical to the consumable one, with the only difference being that the product fulfillment code isn't listed.
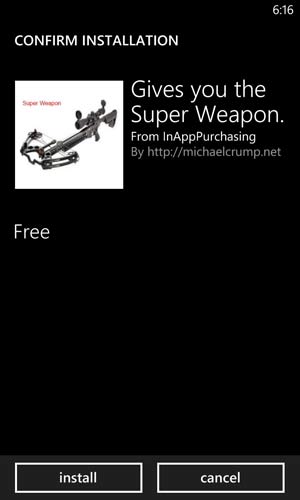
After a user purchases a durable, it isn't necessary to report product fulfillment. In this example, if you determine that the license is active, you simply tell the user he already owns the weapon; otherwise, display the UI shown in Figure 7 to allow the user to purchase it. Once the item is purchased, simply toggle the visibility and text of a TextBlock.
 [Click on image for larger view.]
Figure 7. Confirm Installation screen for Super Weapon.
[Click on image for larger view.]
Figure 7. Confirm Installation screen for Super Weapon.
(Note that because this is a beta application, all the in-app products are free.)
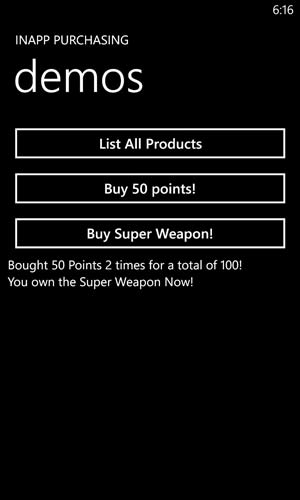
Figure 8 shows both of the items purchased successfully by the user.
 [Click on image for larger view.]
Figure 8. Both in-app products purchased successfully.
[Click on image for larger view.]
Figure 8. Both in-app products purchased successfully.
Test, Verify and Publish
As you can see, in-app purchasing involves many moving parts. In order for your app to benefit properly, you must ensure it's fully tested before going into the marketplace. Keeping that in mind, in-app purchasing opens up a brand-new way to continue making money after the initial sell. I'm excited that Microsoft decided to add in-app purchasing in Windows Phone 8, and you should be, too!