Cross Platform C#
Mapping and Location with Mono for Android
Google has replaced MapView with MapFragment for adding mapping and location in Android. Learn what the new API can do, and how to use it.
Real Estate is all about location, location, location. Mobile is about maps, location and maps. Maps are an excellent mechanism to communicate information about locations. Maps are graphical, and you know that a picture is worth a thousand words. When users are mobile, presenting a user with a map provides him with easy-to-understand location information in a graphical format. Android provides full mapping support to present maps to users along with a programmable API. In this article, I'll introduce the mapping and location APIs in Mono for Android.
Where Am I?
There are several ways to determine location:
- Wi-Fi location: With Wi-Fi location, latitude and longitude are associated with a Wi-Fi network. Getting latitude and longitude via Wi-Fi location is fairly accurate, but not very useful if no Wi-Fi network is available.
- Cell tower triangulation: Cell tower triangulation gives a rough estimate of a location's latitude and longitude. This is a relatively low-power technology, but is also typically low in accuracy.
- Global Positioning System (GPS): GPS technology is extremely accurate in obtaining latitude and longitude, but is also incredibly power-hungry.
Android provides a mechanism to determine the location of a device. Unfortunately, location is also a potential security risk. The first thing an application must do is ask a user for his current location. In Android, this is done by an application asking for permission to determine location. The permissions that can be requested are:
- ACCESS_COARSE_LOCATION: This permission allows an application to access location via Wi-Fi or cell tower triangulation.
- ACCESS_FINE_LOCATION: This permission allows an application to access the GPS on a system. The ACCESS_FINE_LOCATION permission implies that an application has the ACCESS_COARSE_LOCATION permission.
Now that the application has the proper permissions, I'll look at the code necessary to get the current location. In the code shown in Listing 1, note several things:
1. Your class needs to implement the ILocationListener interface. This interface is marked on your class, which also happens to inherit from an Activity; however, the Activity class is not a requirement. The only requirement is that your code must implement the ILocationListener interface.
2. Because your code will use the ILocationListener interface, several methods must be implemented:
- OnLocationChanged provides the program with information regarding location changes. These location changes are occurring on a background thread, so the code will need to call RunOnUIThread to make changes to the application's UI.
- OnProviderDisabled is called when a provider is disabled. The name of the provider is passed in.
- OnProviderEnabled is called when a provider is enabled. The name of the provider is passed in.
- OnStatusChanged is called when a provider's status changes. This may be when a location update hasn't been provided in a while, or if a provider becomes available after an extended period.
3. The application will need to determine how accurate its needs are. In addition, you must know if the application should be directly coded against a specific GPS provider. (Usually, the answer to that is, unless there's a good reason why, absolutely not!) Thankfully, with the Criteria object, the Android OS has solved this problem of multiple devices and multiple hardware for you. By handing in some basic criteria about the application's needs, the application lets the OS determine the appropriate provider to get location information.
Listing 1. Code to get the user's current location.
[Activity (Label = "LocationActivity")]
public class LocationActivity : Activity, ILocationListener
{
  LocationManager _locMgr;
  protected override void OnCreate (Bundle bundle)
  {
    base.OnCreate (bundle);
    SetContentView (Resource.Layout.LocationView);
    // Use location service directly
    _locMgr = GetSystemService (Context.LocationService) as LocationManager;
  }

  protected override void OnResume ()
  {
    base.OnResume ();
    var locationCriteria = new Criteria ();
    locationCriteria.Accuracy = Accuracy.NoRequirement;
    locationCriteria.PowerRequirement = Power.NoRequirement;
    string locationProvider = _locMgr.GetBestProvider (locationCriteria, true);
    _locMgr.RequestLocationUpdates (locationProvider, 2000, 1, this);
  }

  protected override void OnPause ()
  {
    base.OnPause ();
    _locMgr.RemoveUpdates (this);
  }

  #region ILocationListener implementation
  public void OnLocationChanged (Location location)
  {
    var locationText = FindViewById<TextView> (Resource.Id.locationTextView);
    locationText.Text = String.Format ("Latitude = {0}, Longitude = {1}",
      location.Latitude, location.Longitude);
    new Thread (new ThreadStart (() => {
      var geocdr = new Geocoder (this);
      var addresses = geocdr.GetFromLocation (location.Latitude, location.Longitude, 5);

      RunOnUiThread (() => {
        var addrText = FindViewById<TextView> (Resource.Id.addressTextView);

        addresses.ToList ().ForEach ((addr) => {
          addrText.Append (addr.ToString () + "\r\n\r\n");
        });
      });

    })).Start ();
  }

  public void OnProviderDisabled (string provider)
  {
  }

  public void OnProviderEnabled (string provider)
  {
  }

  public void OnStatusChanged (string provider, Availability status, Bundle extras)
  {
  }
  #endregion
}
Mapping
Now that you know how to get location, turn your attention to presenting that data to users via a map. Initially, Android used the MapView as the view or control that allowed developers to provide mapping support for applications. Figure 1 shows a MapView running in Android. Unfortunately, the MapView didn't run within a fragment, along with other issues.
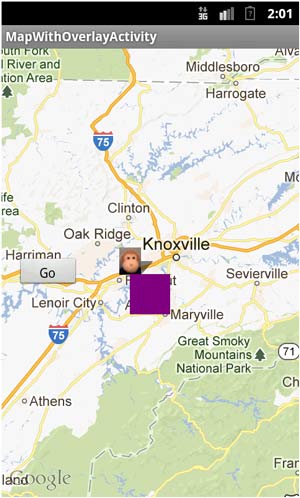 [Click on image for larger view.]
Figure 1. A MapView running in Android.
[Click on image for larger view.]
Figure 1. A MapView running in Android.
MapFragment In December 2012, Google Inc. introduced the MapFragment for mapping support in Android going forward. With the release of the MapFragment, the MapView was put on the back burner. Don't worry -- if you're currently working with the MapView, you can continue to work with it. The keys you're using will continue to work, but Google will no longer be distributing new keys for the MapView. Going forward, when you work on new applications and add new mapping support into applications, you'll be required to use the MapFragment. The rest of this article will discuss how to use it.
Setup The first challenge with the MapFragment is to set up an application to use it. The setup isn't difficult, but there are multiple steps, and they're not entirely obvious. (Note that Google licensing doesn't allow for distribution of the Google Play services library by third parties. As a result, you'll need to walk through these steps to set up this project.)
The basics of setting up:
1. Verify that the Android SDK Manager is installed and set up in the path. You must have the directory $ANDROID_HOME/tools added to your path.
2. Verify that version 4.4.x or higher of Xamarin.Android is being used. At the time of this writing, the 4.6.x versions are the most recent. It's highly likely that 4.8.x will ship as a stable release by the time you read this article.
3. Use the Android SDK Manager to install the Google Play services if they haven't already been installed locally on the development system. Because of the requirements for Google Play services, the MapFragment can only be tested and debugged on a device. The Google Play services weren't available on the emulator at the time this article was written.
4. Copy the directory at extras/google/google_play_services/libproject/google-play-services_lib into the same directory level as the application. This is a library project for using Google Play services.
5. Download and install Apache Ant. This involves downloading, unzipping and setting the appropriate path statements.
6. Compile and build google-play-services_lib. This is done by having a command window open in the directory of the google-play-services_lib. Once in that window, there are two commands that will be run: android update project –p and ant debug.
7. Create the Xamarin.Android application project and a solution.
8. Add the GooglePlayServices project to the solution. Note that there are two versions of this project included in the Xamarin download samples at GitHub. The version used in this sample is the Froyo version. Froyo is Android 2.2. The other version is for Android 4.0 and later. Check the references for information on updating this project as necessary.
9. Within the GooglePlayServices project, add a linked file that points to the google-play-services_lib/project.properties. It's important that this be included as a linked file, and not copied into the project.
10. Get a new API Key for Google Maps version 2.
11. In the AndroidManifest.xml file, many of the entries shown in Listing 2 will need to be made. Remember, the AndroidManifest.xml file is created in the project properties in Visual Studio and is stored in the Properties directory of a project. The AndroidManifest.xml file is very common in Android applications. If you have any questions regarding the AndroidManifest.xml file, you can learn more about it at the Android developer site.
Listing 2. Entries for the AndroidManifest.xml file.
 <?xml version="1.0" encoding="utf-8"?>
<manifest xmlns:android="http://schemas.android.com/apk/res/android">
  <uses-sdk />
<uses-sdk android:targetSdkVersion="10" android:minSdkVersion="8"/>
<!-- Google Maps for Android v2 requires OpenGL ES v2 -->
<uses-feature android:required="true" android:glEsVersion="0x00020000"/>
<!-- Need to be able to download map tiles and access Google Play Services-->
<uses-permission android:name="android.permission.INTERNET"/>
<!-- Allow the application to access Google Web-based services. -->
<uses-permission android:name="com.google.android.providers.gsf.permission.READ_GSERVICES"/>
<!-- Google Maps for Android v2 will cache map tiles on external storage -->
<uses-permission android:name="android.permission.WRITE_EXTERNAL_STORAGE"/>
<!-- Google Maps for Android v2 needs this permission so that it may check the connection state as it must download data -->
<uses-permission android:name="android.permission.ACCESS_NETWORK_STATE"/>
<!-- These are optional, but recommended. They will allow Maps to use the Location provider. -->
<uses-permission android:name="android.permission.ACCESS_COARSE_LOCATION"/>
<uses-permission android:name="android.permission.ACCESS_FINE_LOCATION"/>
<!-- Notice that the package name of the application is a prefix on the permissions. -->
<uses-permission android:name="com.wallym.com.permission.MAPS_RECEIVE"/>
  <permission android:name="com.wallym.maps.permission.MAPS_RECEIVE" android:protectionLevel="signature"/>
<application android:label="@string/app_name">
<!-- Put your Google Maps V2 API Key here. This key will not work for you.-->
<!-- See https://developers.google.com/maps/documentation/android/start#obtaining_an_api_key -->
<!--  This map key is for my Windows 7 running VS 2012 running on my Mac
<meta-data android:name="com.google.android.maps.v2.API_KEY" android:value="xxxxxxxyyyyyyyzzzzzzz"/>
-->
<!-- This map key is for my Mac running OS X 10.8 and Xamarin Studio. You will need to place your value in its place. -->
<meta-data android:name="com.google.android.maps.v2.API_KEY" android:value="aaaaaaabbbbbbbcccccc " />
</application>
</manifest>
12. Finally, set up the Google Play services project to support the Android version 4 Support Library. This setup includes adding the version 4 Android Support Library to the project, adding the project to the solution, and referencing the project from the necessary Android application.
Don't be intimidated by these steps; they're not too time-consuming. It took me about 30 minutes the first time, starting from scratch. If I can figure it out, it can't be that difficult. The bad news is it's not quite "point, click and program."
Programming The first step in programming the map is to set it up, by creating a layout. In this example, a FrameLayout is used:
<?xml version="1.0" encoding="utf-8"?>
<LinearLayout xmlns:android="http://schemas.android.com/apk/res/android"
  android:orientation="vertical"
  android:layout_width="fill_parent"
  android:layout_height="fill_parent">
  <FrameLayout
    android:id="@+id/mapWithOverlay"
    android:layout_width="fill_parent"
    android:layout_height="fill_parent" />
</LinearLayout>
Now you'll configure the map. This is done via the GoogleMapOptions class. Note that Visual Studio seems to have some problems with the IntelliSense support in mapping. Xamarin Studio (the Xamarin IDE) doesn't have this problem.
Next, create the MapFragment and add it:
var mapOptions = new GoogleMapOptions()
  .InvokeMapType(GoogleMap.MapTypeSatellite)
  .InvokeZoomControlsEnabled(false)
  .InvokeCompassEnabled(true);

var fragTx = SupportFragmentManager.BeginTransaction();
var mapFragment = SupportMapFragment.NewInstance(mapOptions);
fragTx.Add(Resource.Id.mapWithOverlay, mapFragment, "map");
fragTx.Commit();
Now that the application has a map, it has to be configured. This is done in the OnResume method and in the following code:
protected override void OnResume()
{
  base.OnResume();
  if (MapIsSetup())
  {
    // Enable the my-location layer.
    _map.MyLocationEnabled = true;
    _map.AnimateCamera(CameraUpdateFactory.NewLatLngZoom(new LatLng(lat, lon), 12));
    // Setup a handler for when the user clicks on a marker.
    _map.MarkerClick += MapOnMarkerClick;
  }
}
In this code, the map has a camera, which is the user's vantage point. It's set up with the user's latitude and longitude as determined in code shown in Listing 1. The latitude and longitude is shared by using the Android Application class. The map is set up so that when a user touches or clicks a map point, the MarkerClick event is fired. When this happens, the method MapOnMarkerClick method is called.
Now you need to get some data to put on the map. Where does it come from? That's a great question. In the example shown in Listing 3, the data is provided via a call to the Yahoo! API to return data. (I've used the Yahoo! API for location data for years, but any data source can be used.)
The Web service at Yahoo! is called with the Begin/End async pattern, which should be familiar. The code is shown in Listing 3. In this code, a search request is made for the term "golf" in the general area. This is done asynchronously to keep the UI response and the request from locking the UI and possibly being closed by Android. When the request is returned, a loop is performed to place the points on the map. This is done with a simple foreach operation. A custom image is used for the markers for the points. In this case, a golf driver shows points associated with golf. The points are added to the map with a call to RunOnUIThread, because the application is loading data asynchronously, and the UI elements can only be manipulated from the main UI thread.
Listing 3. Calling the Yahoo! Web service with the Begin/End async pattern.
protected override void OnCreate(Bundle bundle)
{
  base.OnCreate(bundle);
  SetContentView(Resource.Layout.MapWithOverlayLayout);
  InitMap();
    var app = (MyApp)this.Application;
    lat = app.Lat;
    lon = app.Lon;
    ys = new YahooSearch.YahooSearch(lat, lon, 100000f, "golf");
    ys.StartSearch(new AsyncCallback(YahooSearchProcessResult));
}
void YahooSearchProcessResult(IAsyncResult iar)
{
    srl = ys.ProcessRestXmlLINQHttpResponse(iar);
    AddGolfMarkersToMap();
}
private void AddGolfMarkersToMap()
{
    foreach(SearchResult sr in srl)
    {
      RunOnUiThread(delegate{
        var icon = BitmapDescriptorFactory.FromResource(Resource.Drawable.Driver);
        var mapOption = new MarkerOptions()
          .SetPosition(new LatLng(sr.Latitude, sr.Longitude))
            .InvokeIcon(icon)
            .SetSnippet(String.Format(sr.Description))
            .SetTitle(String.Format(sr.Name));
          _map.AddMarker(mapOption);
      });
    }
}
Note: By the time you read this, the Xamarin stack that supports the Microsoft .NET Framework 4.5 async APIs with async and await should be released, or at least nearly released.
Don't Be Power Hungry
These are the basics of location and mapping in Android. With location, remember to be a good citizen on the device and stop tracking location if your application doesn't need to. In the mobile world, power is important; don't use too much of it. With mapping, after some involved setup, programming with the API isn't too laborious.
Notes: Many times during the course of building this sample project, I ran into problems with a "value-el (1)" or "value-cs (1)" resource directory. Xamarin's Tom Opgenorth helped me track down this issue. For some reason, this directory was being generated within the google-play-services_lib project when it was being generated. Deleting the "(1)" version of this file resolved the issues. Be aware of this problem if it happens to you.
You may also notice that Xamarin.Android doesn't always produce IntelliSense support when running in Visual Studio. Xamarin Studio doesn't have this problem. Xamarin is aware of this issue and working on it.
Finally, you'll want to verify you're using the most up-to-date version of the Google Play services library. It's been my experience that not keeping up-to-date with this library may cause problems in the compilation or build sequence. Microsoft documentation on linking existing files to a project can be found here.
I'd like to thank Mike Bluestein for his help understanding mapping in Android and the sample code he provided me back in 2011. I'd also like to thank Tom Opgenorth for his help in getting the new MapFragment set up, and Kevin Darty and Stephen Long for reading my articles for accuracy and feedback.